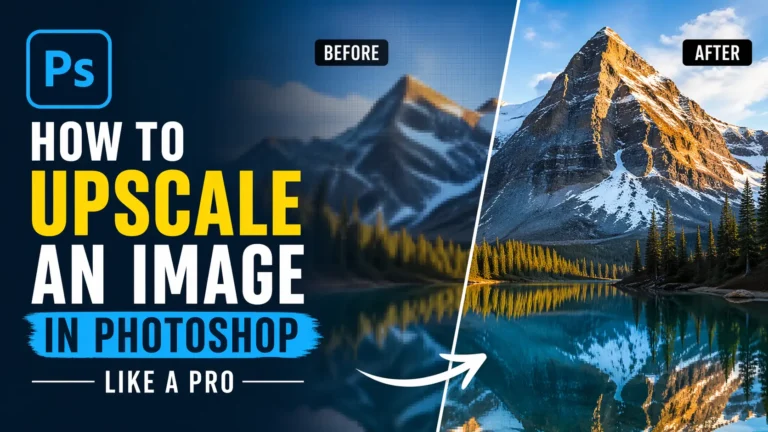
Have you ever tried to enlarge an image and ended up with a blurry or pixelated result? That’s a common issue when working with low-resolution images. How to upscale an image in Photoshop is a question many designers, marketers, and content creators ask when they need high-quality visuals for print, websites, or social media.
Image upscaling helps you increase the size of an image while keeping it sharp and clear. Photoshop uses advanced tools and AI image upscaler technology to add new details and improve overall quality.
In this guide, you’ll learn how to upscale an image in Photoshop using both basic and advanced methods, so you can get professional-quality results every time.
Things to Know Before Upscaling
AI product photography is becoming more popular for eCommerce and marketing. High-resolution images created through upscaling help products look sharper, cleaner, and more professional. Before you upscale any image, it’s important to understand a few key factors that can affect your final result.
Image quality limitations
Upscaling cannot fully fix a very low-quality or blurry image. If the original image lacks detail, increasing its size may still result in softness or artifacts, even with AI tools.
Best file formats (JPEG, PNG, RAW)
Different file formats give different results. RAW files offer the best quality and flexibility, while PNG works well for graphics and sharp edges. JPEG is more common but may lose quality due to compression.
Importance of starting resolution
The higher your starting resolution, the better your upscaled image will look. Images with more pixels and detail will produce sharper and cleaner results after enlargement.
Best Professional Methods to Upscale Images in Photoshop
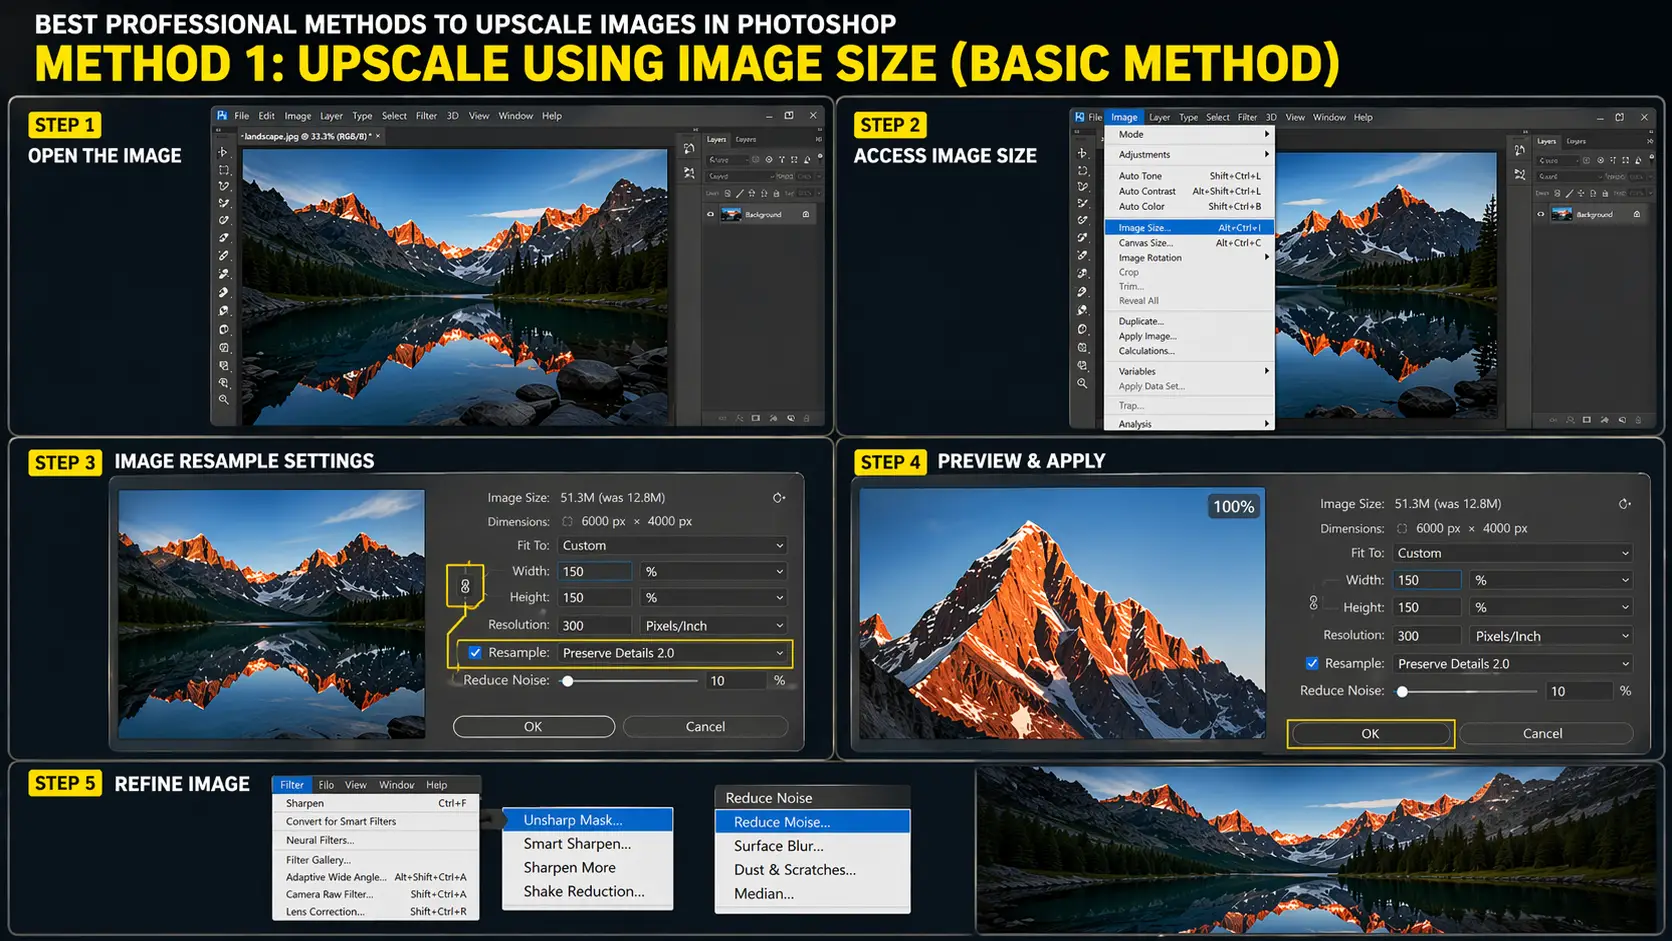
Method 1: Upscale Using Image Size (Basic Method)
This method gives you full control over your image size, resolution, and how Photoshop creates new pixels. It is one of the easiest and most effective ways to upscale an image without making it look blurry or pixelated. By using the right resampling option, you can increase the image size while keeping the details sharp and clear.
Step 1: Open the image:
To start, open Adobe Photoshop and load your image. You can do this by clicking on “File” from the top menu and selecting “Open,” or you can simply press Ctrl + O on your keyboard to quickly access your file.
Step 2: Access image size:
Once your image is open, go to the top menu and click on Image, then select Image Size. This will open a settings panel where you can control the dimensions and resolution of your image.
Step 3: Image resample settings:
Now it’s time to adjust the resampling settings. Make sure the chain link icon between width and height is turned on so your image does not get stretched or distorted. Then check the Resample option and choose Preserve Details 2.0 from the dropdown menu for better quality. You can increase the image size gradually, such as 1.5x or 2x, to maintain the best results.
Step 4: Preview the settings & apply:
Before applying the changes, zoom in to 100% in the preview window to check how the image looks. This helps you avoid quality loss. Once you are satisfied, click OK to apply the changes.
Step 5: Refine image:
After upscaling, you can further improve the image by going to the Filter menu. Use sharpening tools to enhance clarity or apply noise reduction if needed. These final adjustments will help your image look more professional and polished.
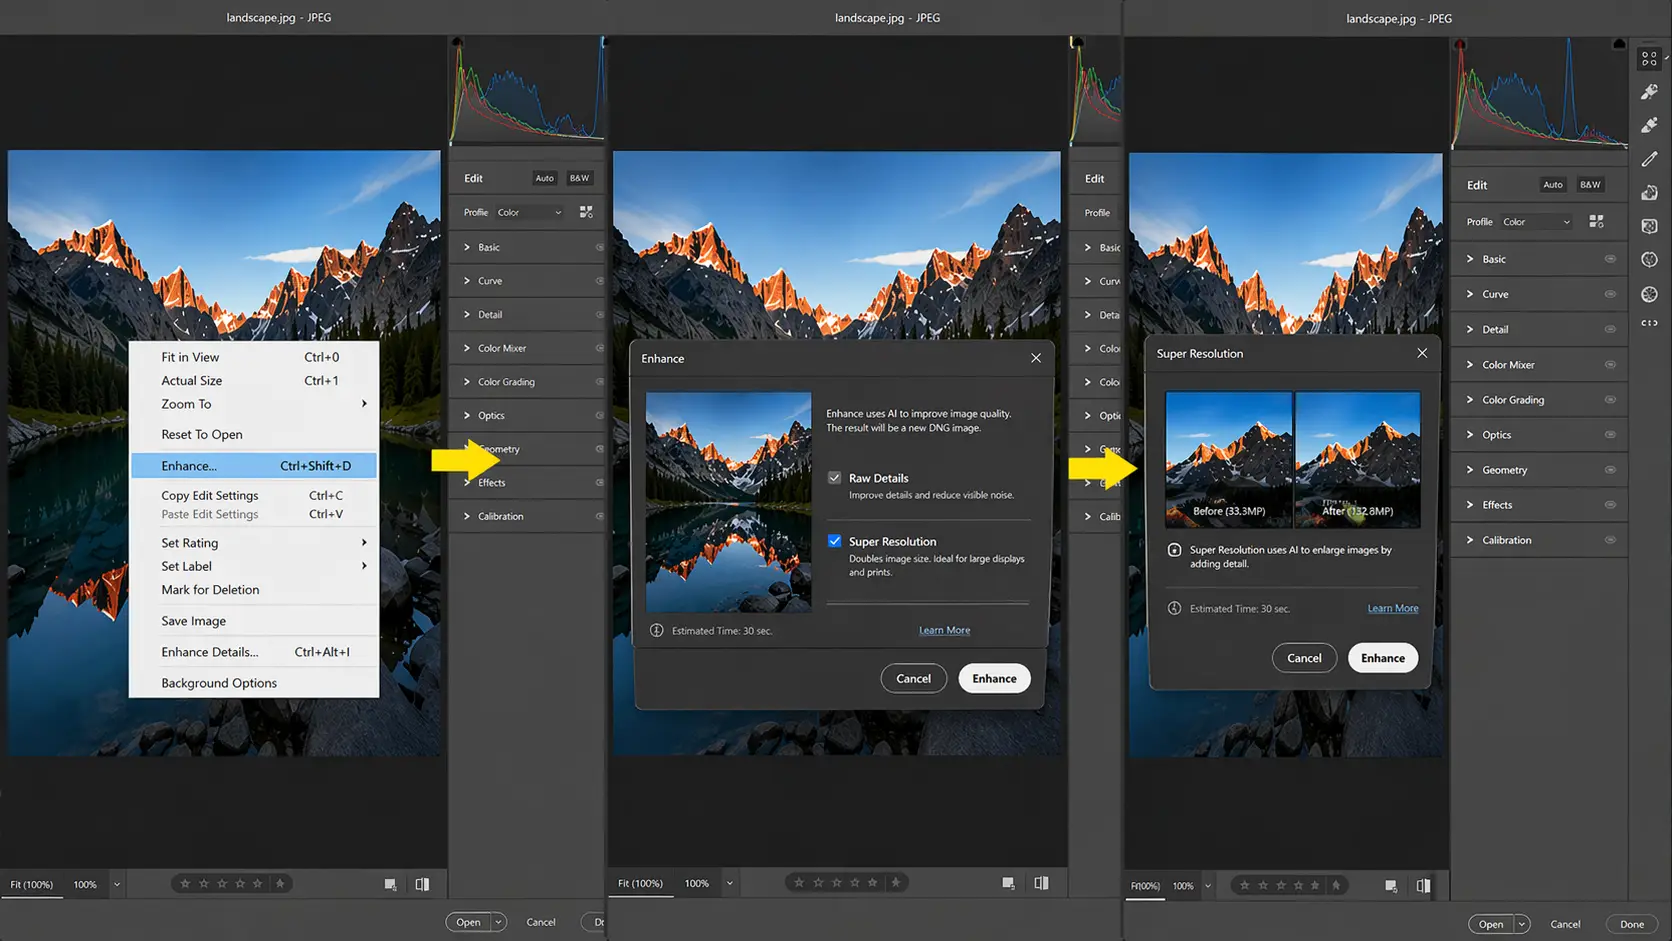
Method 2: Upscale Using Super Resolution (Advanced AI Method)
Open your image in Adobe Camera Raw. This tool gives you access to advanced AI features designed for high-quality image enhancement.
Right-click on the image and choose Enhance. This opens a special panel where Photoshop prepares to improve resolution using AI.
Select Super Resolution from the options. This feature doubles the width and height of your image, giving you four times more pixels.
AI improves quality by analyzing textures, edges, and patterns. It adds new pixels in a smart way, so the image looks sharper, cleaner, and more detailed instead of blurry.
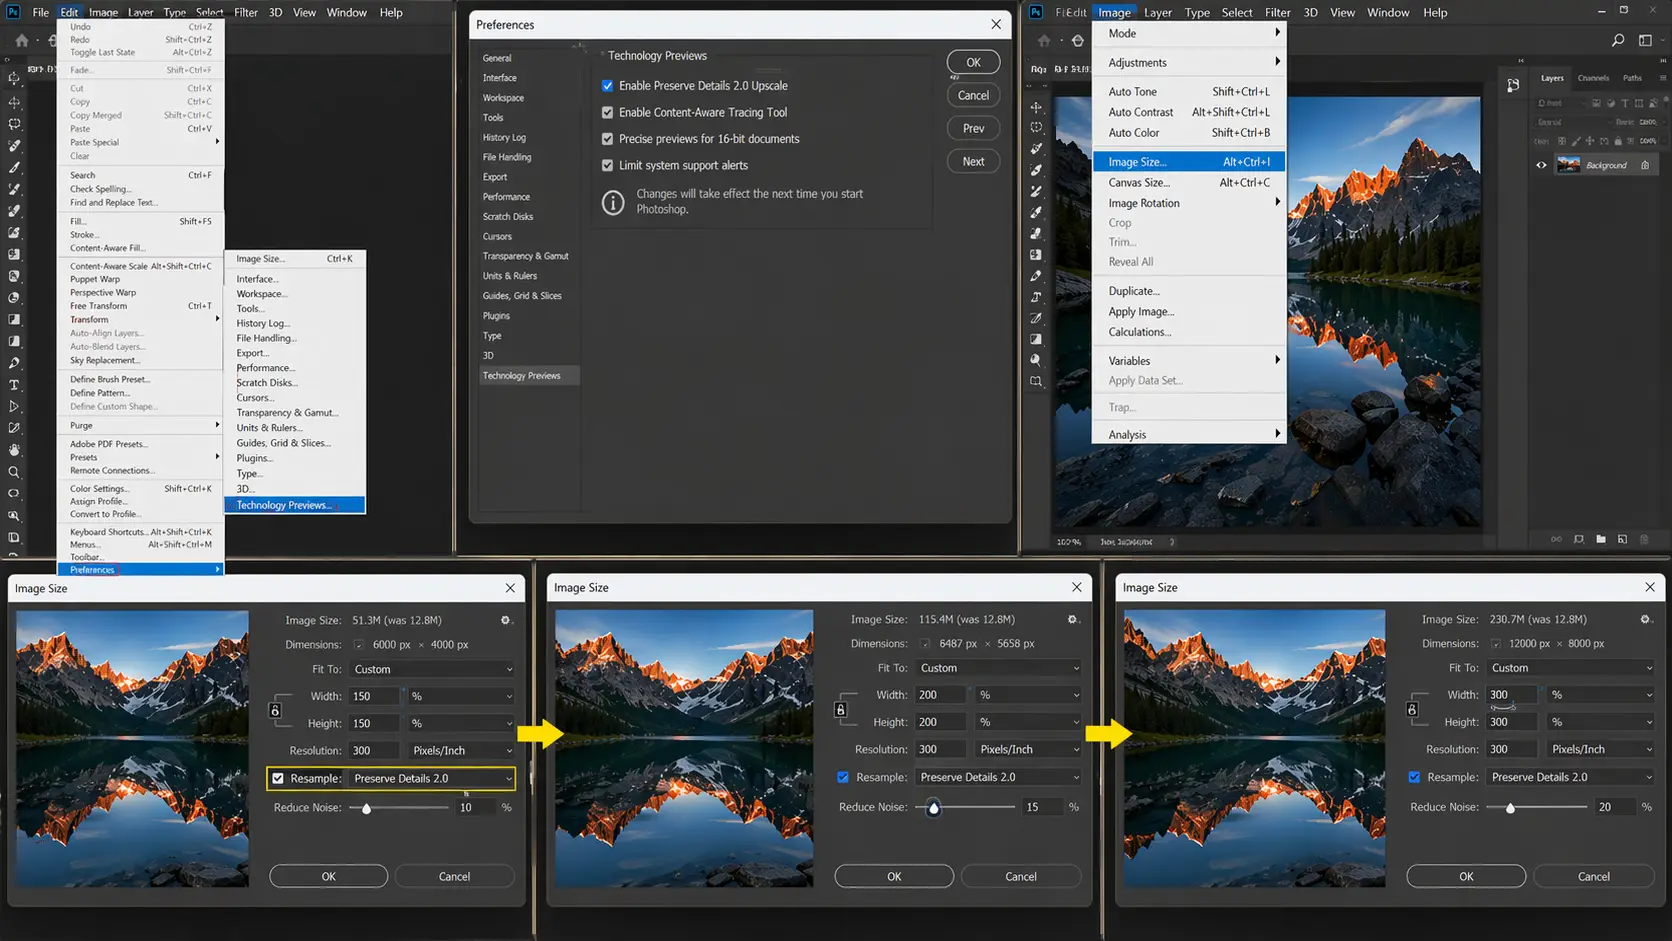
Method 3: Preserve Details 2.0 (AI Method)
Go to Edit > Preferences > Technology Previews and enable Preserve Details 2.0. This turns on Photoshop’s AI-based upscaling feature for better results.
Open your image and navigate to Image > Image Size. This is where you control how much you want to upscale the image.
Check the Resample option and select Preserve Details 2.0 from the dropdown. This setting helps maintain sharp edges while reducing blur.
Adjust the image size gradually, such as 1.5x or 2x. Increasing too much at once can reduce quality.
Use the Reduce Noise slider to clean up grain. Keep it balanced so the image stays sharp but not overly smooth.
This method works best because AI analyzes the image and adds pixels in a smarter way, keeping details clear and natural.
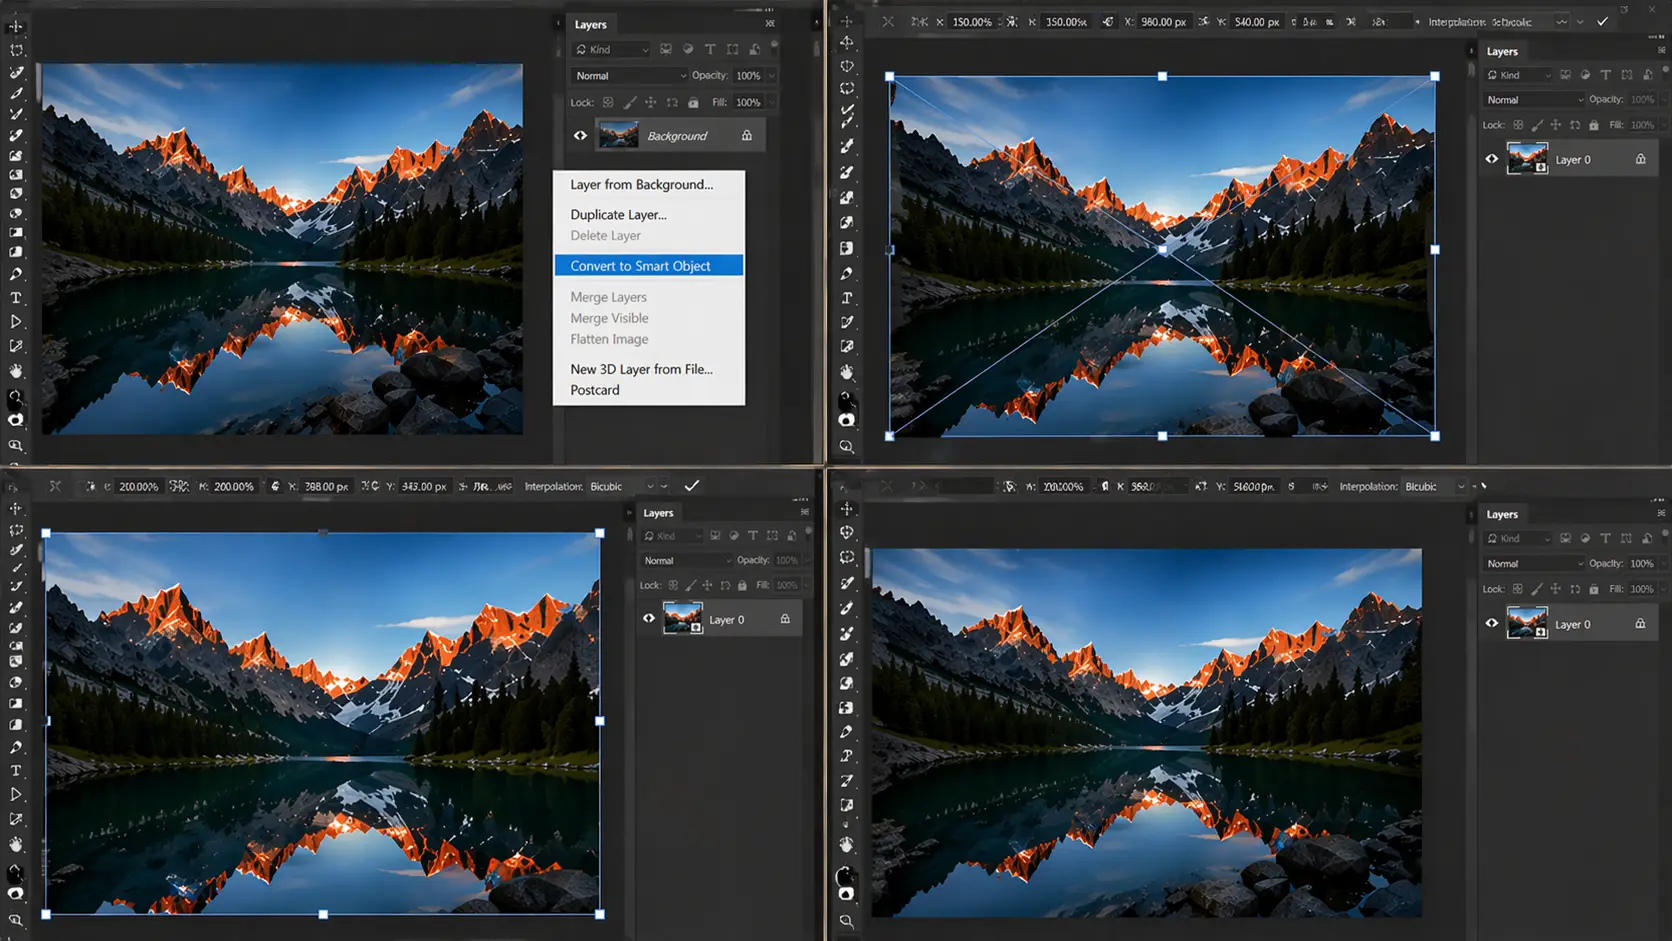
Method 4: Upscale with Smart Objects
Convert your image layer into a Smart Object by right-clicking on the layer and selecting Convert to Smart Object. This allows you to make changes without damaging the original image.
Resize the image using Edit > Free Transform (Ctrl + T). You can scale the image up, and Photoshop will preserve the original data in the background.
This method works non-destructively, so you can resize the image multiple times without losing quality. It’s perfect when you need to experiment with different sizes.
Smart Objects also give you flexibility, as you can go back and adjust the size anytime without starting over.
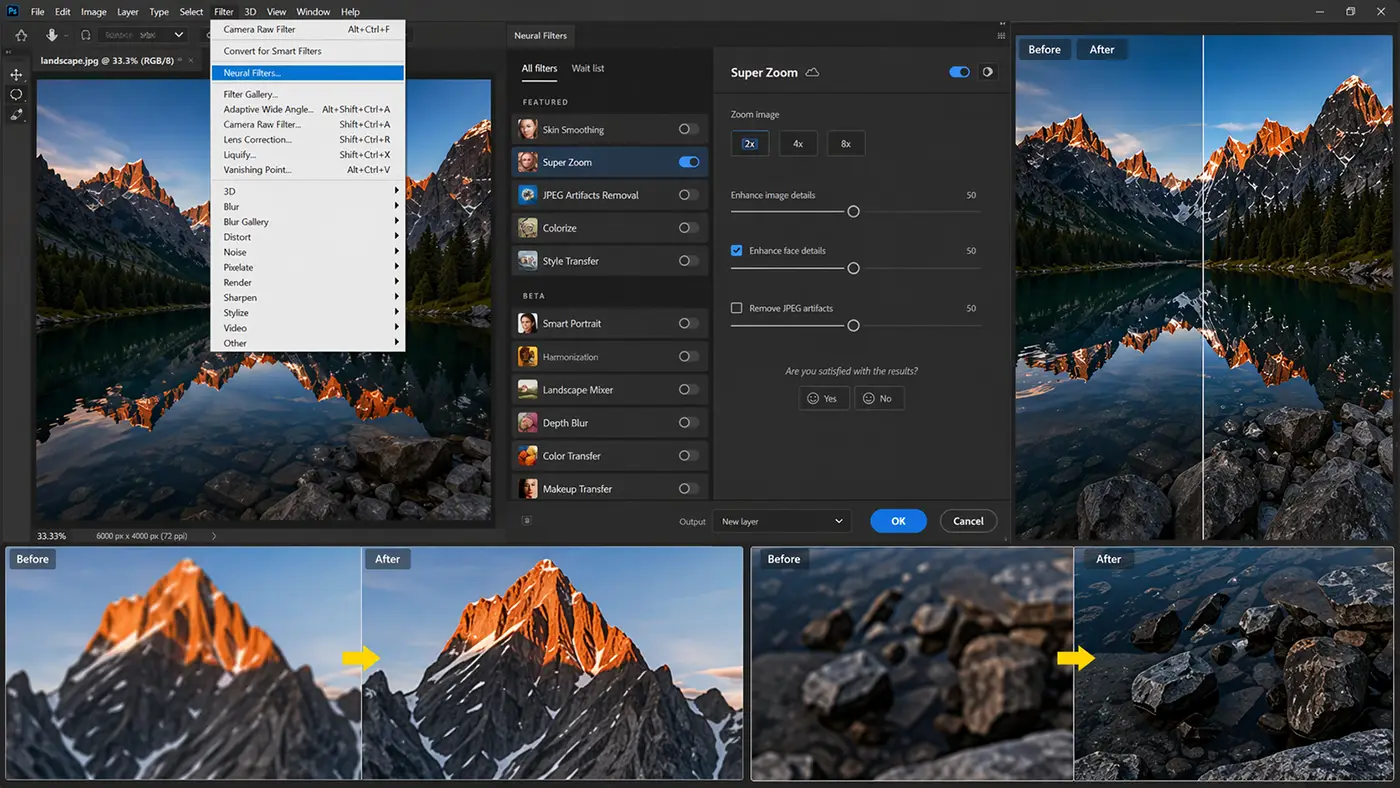
Method 5: Neural Filters (Super Zoom)
You can find this feature by going to Filter > Neural Filters in Photoshop. Inside the panel, scroll down and turn on Super Zoom.
To use it, select your desired zoom level and adjust settings like Enhance Face Details and Remove JPEG Artifacts. Photoshop will process the image and upscale it automatically.
This method is useful because it uses AI to recover lost details and improve image clarity. It works especially well for old, blurry, or low-resolution images.
Method 6: Camera Raw Enhance
This method works best for RAW and high-quality images, especially for photographers who want maximum detail and clarity. It keeps textures sharp and avoids quality loss during upscaling.
Open your image in Adobe Camera Raw, then right-click on the image and choose Enhance. From there, enable Super Resolution to start the process.
Super Resolution uses AI to double the width and height of your image, which means it creates four times more pixels. It analyzes edges, changes image hue, and textures to add realistic details, making the image look sharper and more refined instead of blurry.
How to Improve Quality After Upscaling
After you upscale images in Photoshop, your image may look slightly soft or noisy. You can fix this by applying a few simple adjustments in Photoshop.
Start with sharpening to bring back details. You can go to Filter > Sharpen > Unsharp Mask and adjust the amount and radius to make edges clearer. Another option is the High Pass filter, which enhances fine details and gives a crisp, professional look.
Next, apply noise reduction to remove grain or unwanted texture. Go to Filter > Noise > Reduce Noise and adjust the sliders carefully. Image upscaler-ai helps smooth out the image without losing too much detail.
Finally, improve the overall look by adjusting contrast and clarity. Use Image > Adjustments > Brightness/Contrast or Camera Raw Filter to boost contrast and add depth. Increasing clarity slightly can make the image look sharper and more defined.
These small adjustments can make a big difference and give your upscaled image a clean, high-quality finish.
Common Mistakes to Avoid
One common mistake is over-upscaling low-quality images. If the original image is very small or blurry, increasing it too much (like 4x or 8x) will not magically fix it and can make it look worse.
Another mistake is ignoring sharpening after upscaling. When you enlarge an image, it often loses sharpness, so you need to apply sharpening to bring back clear edges and details.
Using the wrong resampling method is also a big issue. If you don’t choose options like Preserve Details 2.0 or AI-based tools, the image can become soft, pixelated, or lose important details.
Best Practices for Image Upscaler-AI
Always start with a high-quality source image. The better your original image, the better your final upscaled result will look.
Combine AI tools with manual adjustments for the best outcome. Use features like Super Resolution or Neural Filters first, then fine-tune with sharpening, contrast, and noise reduction.
Save your image in the correct resolution based on use. For printing, set it to 300 DPI to ensure sharp and clear output, while lower resolutions work fine for web and social media.
Conclusion
Upscaling an image in Photoshop is no longer difficult when you use the right tools and techniques. From the basic Image Size method to advanced options like Preserve Details 2.0, Smart Objects, and Neural Filters, each method offers a different level of control and quality.
For the best overall results, Super Resolution in Camera Raw stands out as the most powerful option. It uses AI to add realistic details and keeps your image sharp even after increasing its size.
The key to success is practice. Try different methods, test settings, and see what works best for your images. With time, you’ll be able to upscale images like a pro and achieve clean, high-quality results every time.