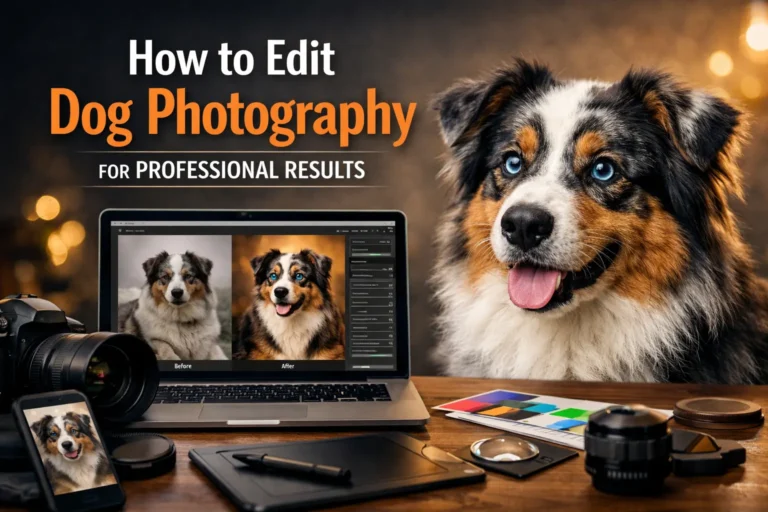
Dog photography looks better when the editing is clean and natural. In this guide, you will learn how to edit dog photos step by step for professional results. We will cover lighting fixes, fur enhancement, and eye adjustments. You will also learn background cleanup and simple color correction.
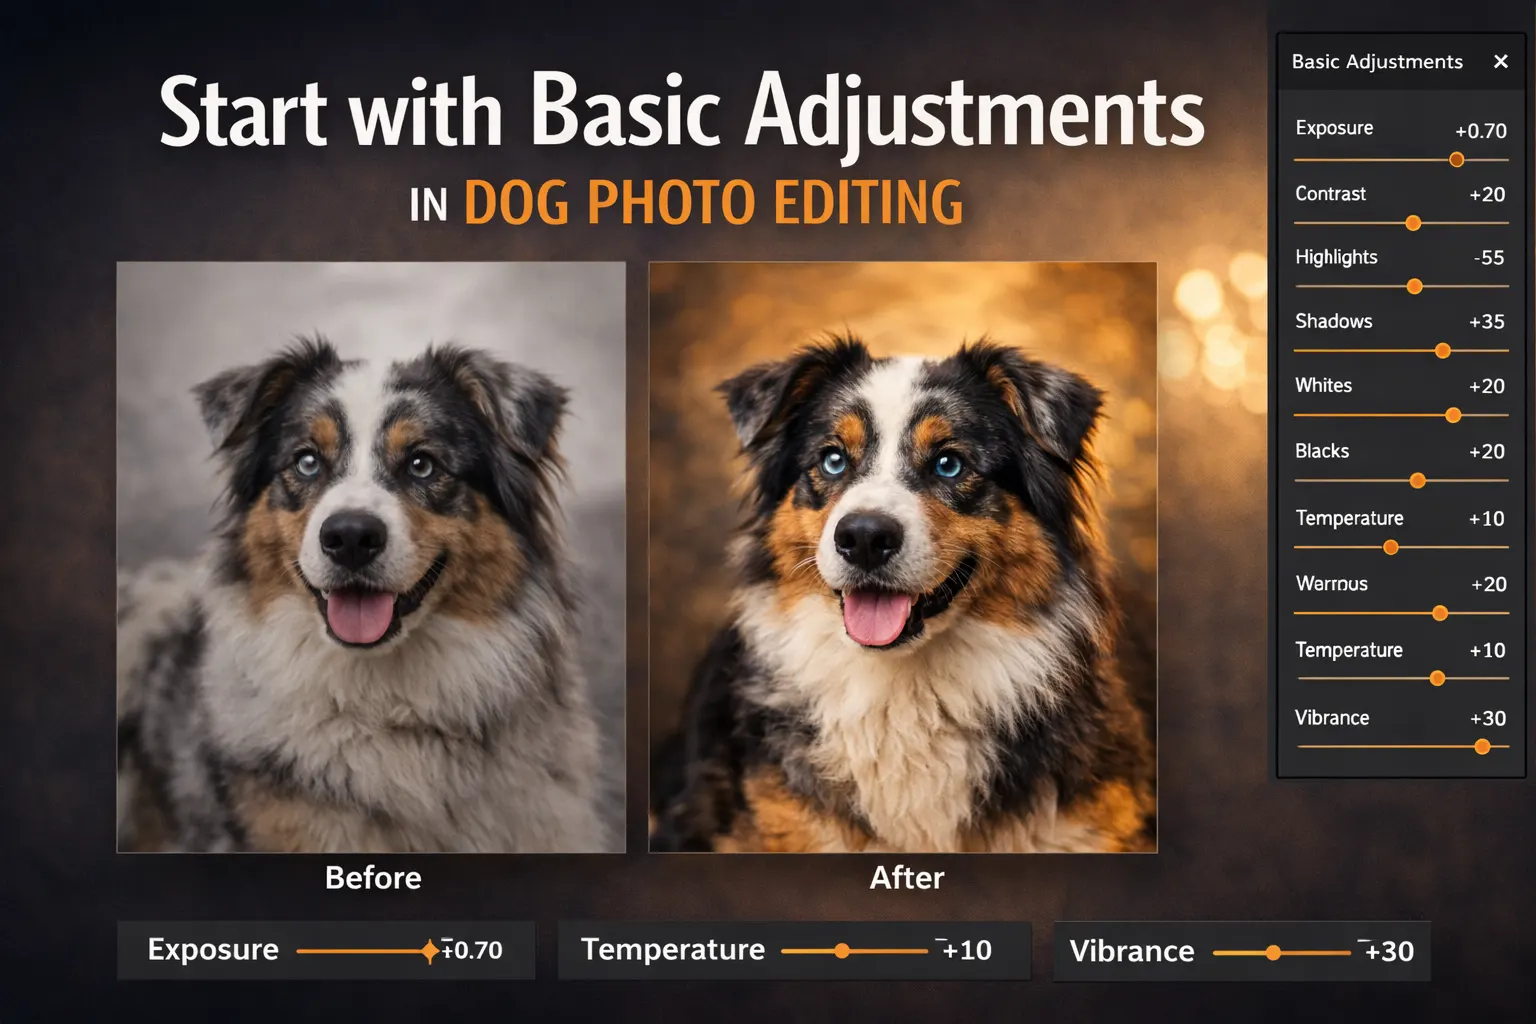
Start with Basic Adjustments in Dog Photo Editing
Before applying advanced effects, start with simple corrections. Basic steps build a strong foundation in dog photo editing. These small changes improve clarity and balance. When you edit dog photos carefully at the start, the final result looks more natural and professional.
Fixing White Balance and Exposure
White balance controls the overall color tone of the image. If it is off, the dog’s fur may look too yellow or too blue. Adjusting white balance helps restore natural color. This step is important in dog photography because fur often reflects light from the surroundings.
Exposure controls how bright or dark the image appears. If the photo is underexposed, details in the fur may disappear. If it is too bright, highlights can lose texture. Small exposure adjustments help bring back detail without making the image look artificial.
Adjusting Contrast and Sharpness
Contrast adds depth to the image. A slight increase can make the dog stand out from the background. However, too much contrast can make shadows too dark and highlights too strong. Keep the adjustment soft and balanced.
Sharpness improves detail, especially around the face and eyes. Apply sharpening gently to avoid noise. Clean and controlled sharpening improves dog portrait photography without making the fur look rough.
Cropping and Straightening the Image
Cropping helps improve composition. Remove extra space that does not add value to the photo. This keeps the focus on the dog and strengthens the frame.
Straightening the image is also important. A tilted horizon or uneven background can distract viewers. Simple alignment makes the photo look clean and professional. These basic steps make dog photography editing more effective from the start.
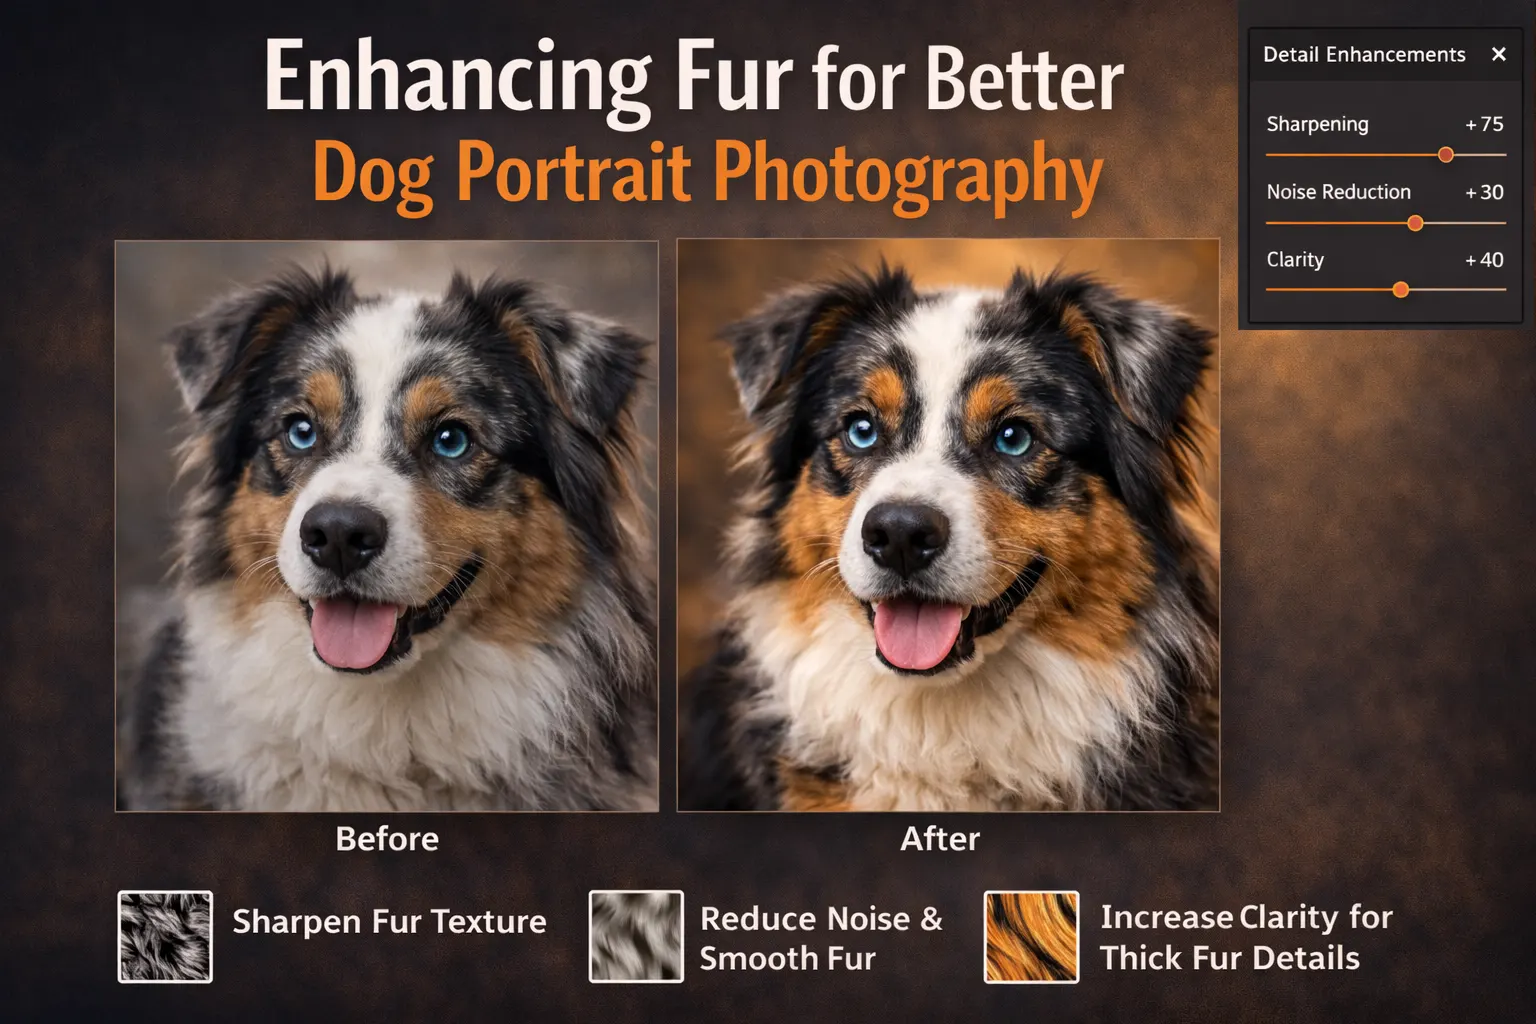
Enhancing Fur for Better Dog Portrait Photography
Fur detail plays a big role in dog portrait photography. If the fur looks flat or dull, the image loses depth. Careful editing helps bring out texture without changing the natural look. Good dog photo retouching should improve clarity while keeping the fur soft and realistic. Many of these methods are also explained in our detailed pet photo editing guide.
Improving Fur Texture Naturally
Start by adjusting clarity and sharpness in a controlled way. Light sharpening helps define small hair details, especially around the face and ears. Always zoom in while editing so you can see how the fur looks at full size.
Use contrast carefully to add depth between light and dark areas of the coat. This makes the fur appear fuller and more detailed. In dog photography, natural texture is more important than strong effects. Small and steady adjustments give better results.
Avoiding Over-Smoothing
Over-smoothing is a common mistake in dog photo retouching. When too much blur or noise reduction is applied, the fur loses its natural pattern. The image may start to look artificial or painted.
Avoid heavy skin-smoothing tools on fur. Instead, fix only small problem areas and keep the original texture visible. Clean and subtle editing helps maintain realism. This approach makes dog portrait photography look professional without appearing over-edited.
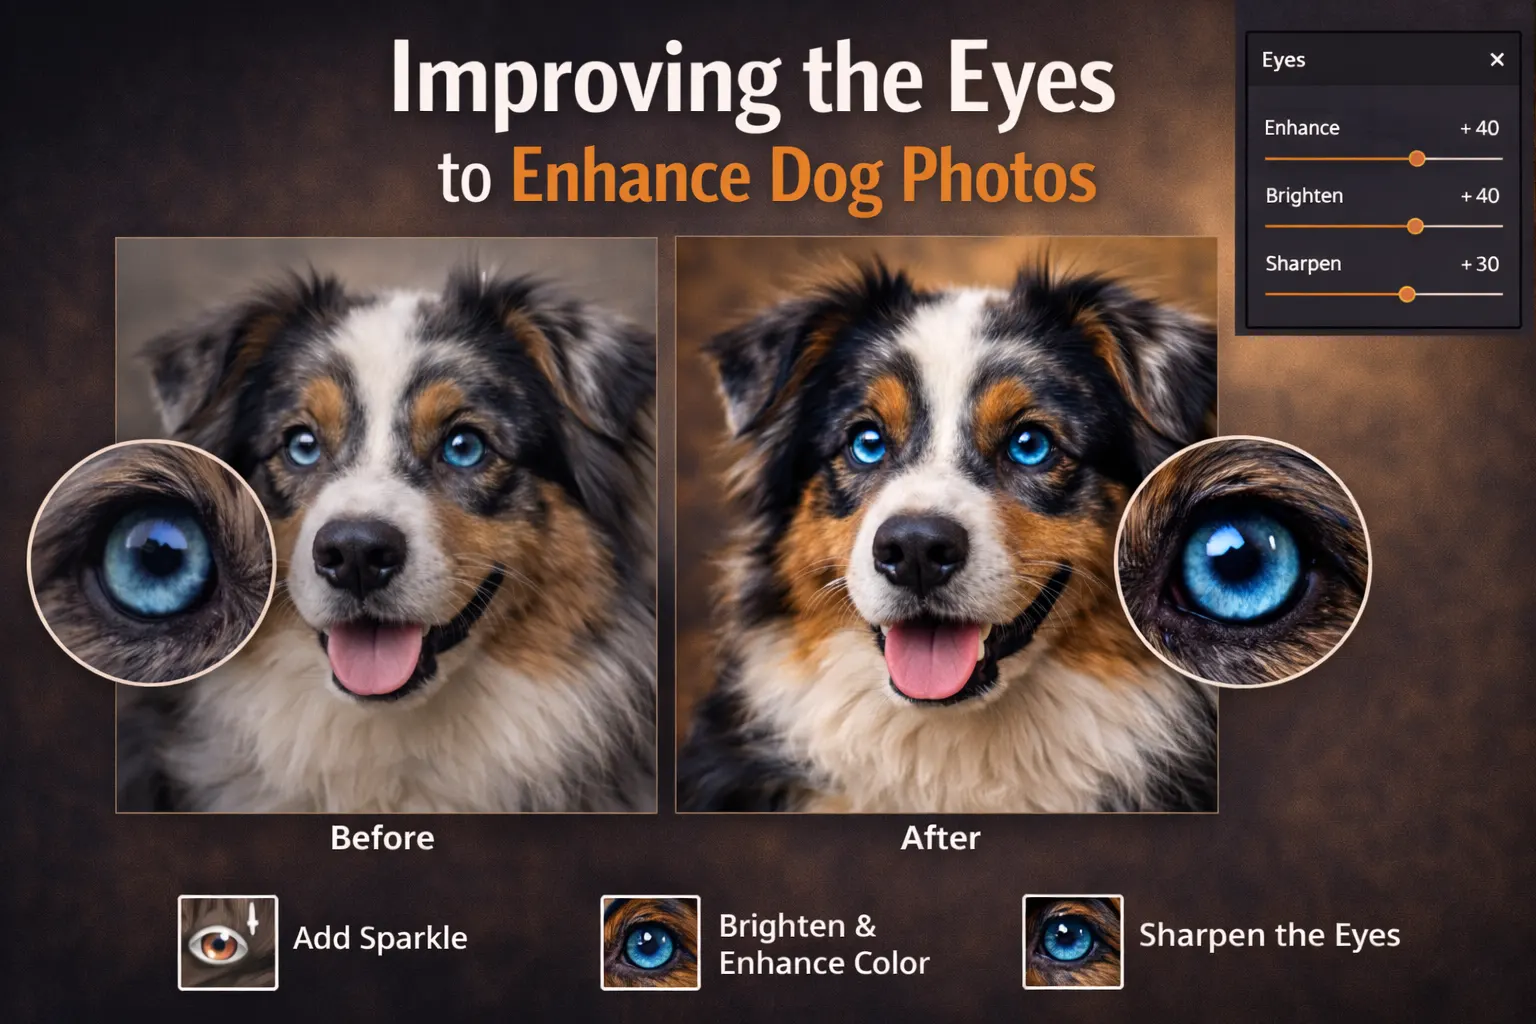
Improving the Eyes to Enhance Dog Photos
The eyes are the most expressive part of dog photography. Clear and bright eyes help create emotion and connection. If the eyes look dull, the whole image can feel flat. Simple adjustments can enhance dog photos without changing the natural look. The goal is to improve clarity while keeping the eyes realistic.
Brightening the Eyes
Start by increasing brightness slightly in the eye area. Small exposure and contrast changes can make the eyes look clearer. Avoid strong adjustments that remove natural detail.
You can also improve sharpness around the iris and pupil. This adds focus and makes the face stand out. Subtle changes often work best when you edit dog photos for professional results.
Adding Catchlight for Depth
Catchlight is the small reflection of light inside the eye. It adds depth and makes the dog look more alert. If the reflection is weak, you can enhance it gently.
Keep the effect soft and natural. A strong or fake highlight can look unrealistic. Balanced editing helps enhance dog photos while keeping the portrait believable and professional.
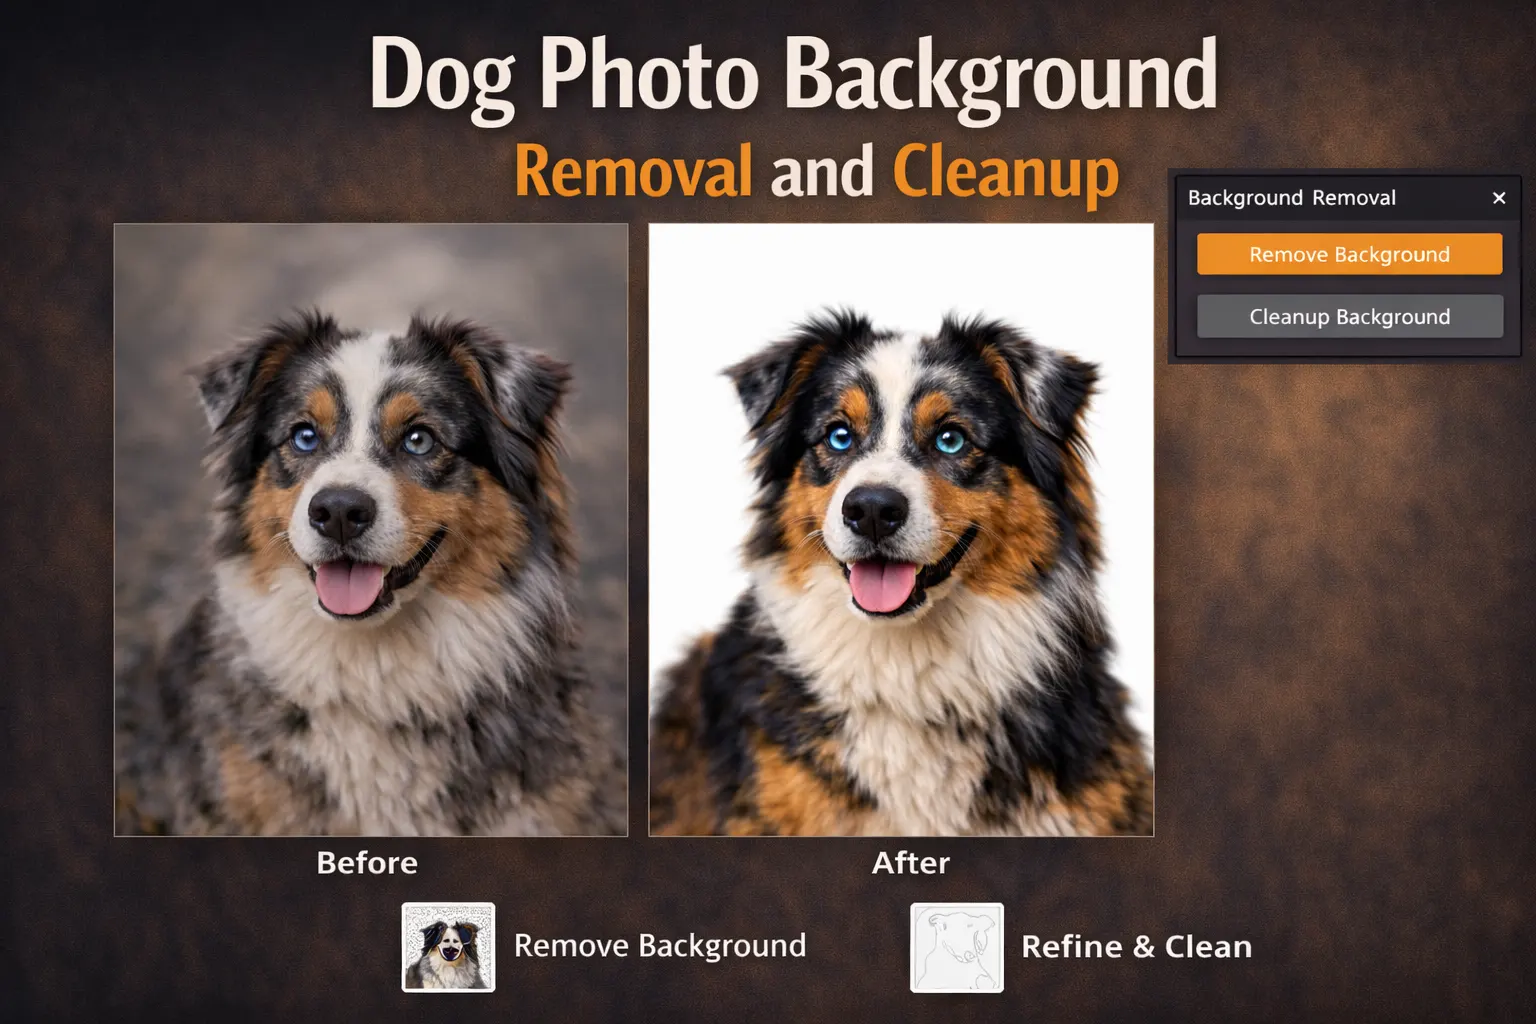
Dog Photo Background Removal and Cleanup
A clean background helps the dog stand out in the frame. In dog photography, busy or messy backgrounds can distract the viewer. Dog photo background removal improves focus and gives the image a professional look. Careful cleanup also makes colors and lighting appear more balanced.
Removing Distractions
Small objects like leashes, toys, or random items can reduce visual impact. These distractions pull attention away from the dog. Use simple retouching tools to remove unwanted elements.
Work slowly and blend the edited areas with the surrounding background. The goal is to make the changes invisible. Clean and careful edits improve the overall quality of dog photo editing.
Blurring or Replacing the Background
Sometimes the background cannot be fully cleaned. In that case, soft blurring can help reduce distractions. A gentle blur keeps attention on the dog while maintaining a natural look.
If needed, you can replace the background completely. Make sure the new background matches the lighting and color of the dog. Proper dog photo background removal and replacement create a polished and realistic final image.
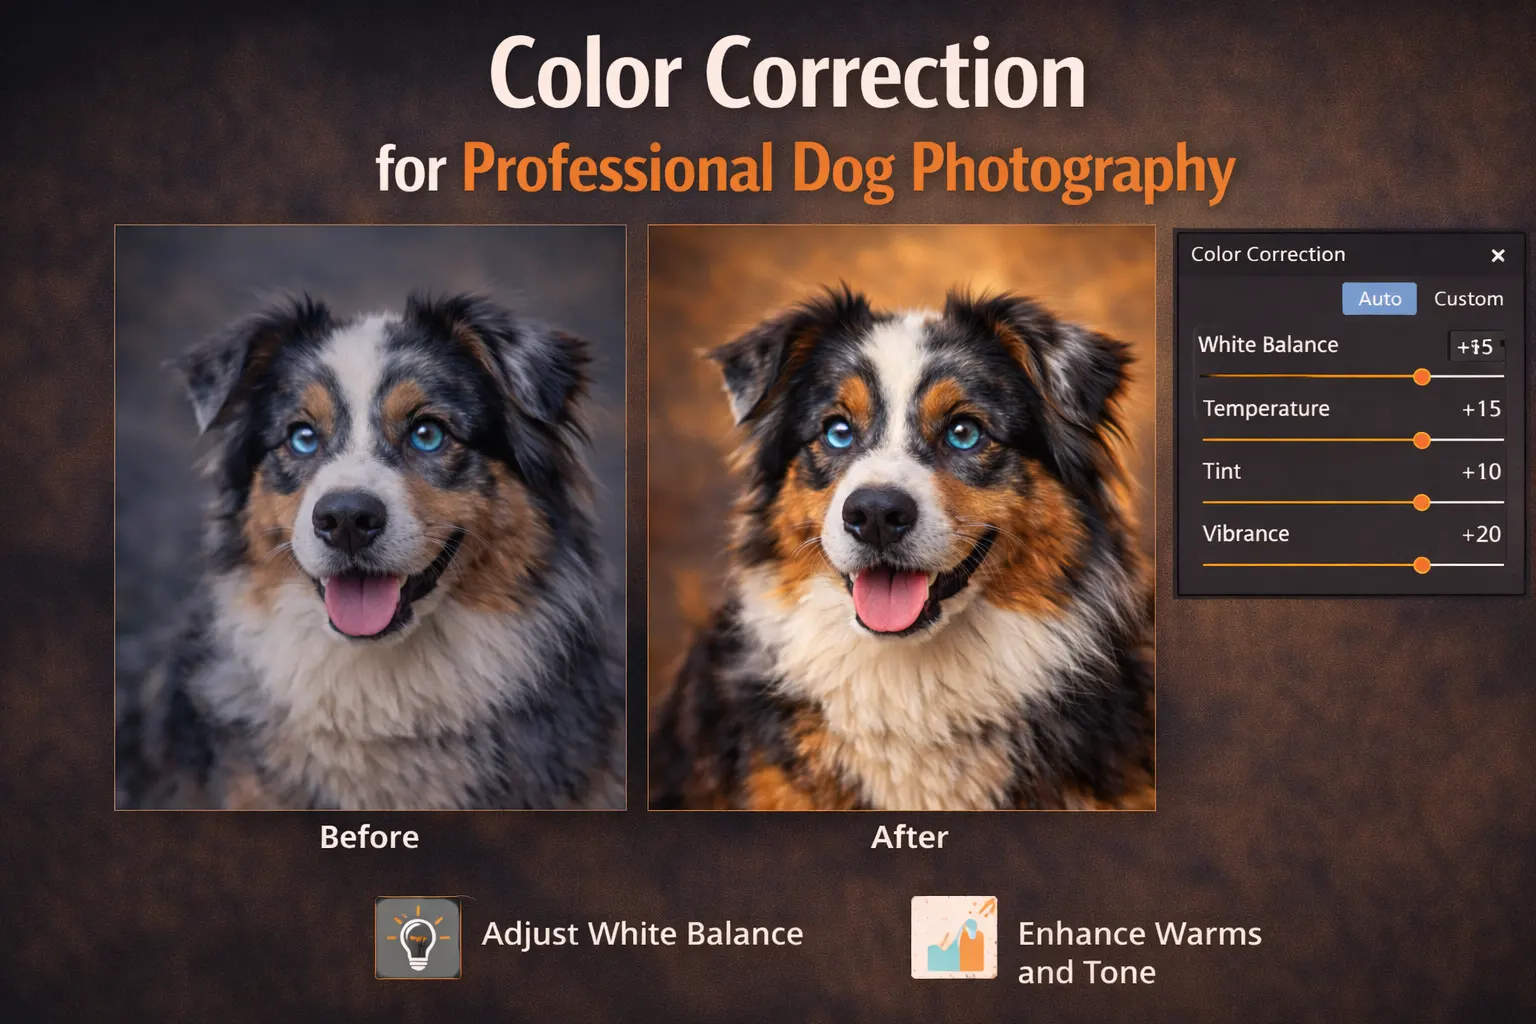
Color Correction for Professional Dog Photography
Color correction is an important step in professional dog photography. Even a well-shot image can look dull if the colors are not balanced. Proper color adjustment improves mood and makes the dog stand out. When tones look natural, the image feels clean and realistic.
Balancing Warm and Cool Tones
Warm tones add a soft and friendly feel to the photo. Cool tones create a calm and sharp look. In dog photography, the right balance depends on the setting and lighting.
If the image looks too yellow or too blue, adjust the temperature slowly. Small changes help restore natural fur color. Balanced tones improve depth without making the photo look edited.
Keeping Colors Natural
Strong saturation can make fur look unnatural. Bright colors may look attractive at first, but they can reduce realism. Professional dog photography focuses on natural and soft tones.
Instead of pushing colors too far, make gentle adjustments. Check the image on different screens if possible. Natural color correction keeps the portrait believable and visually pleasing.
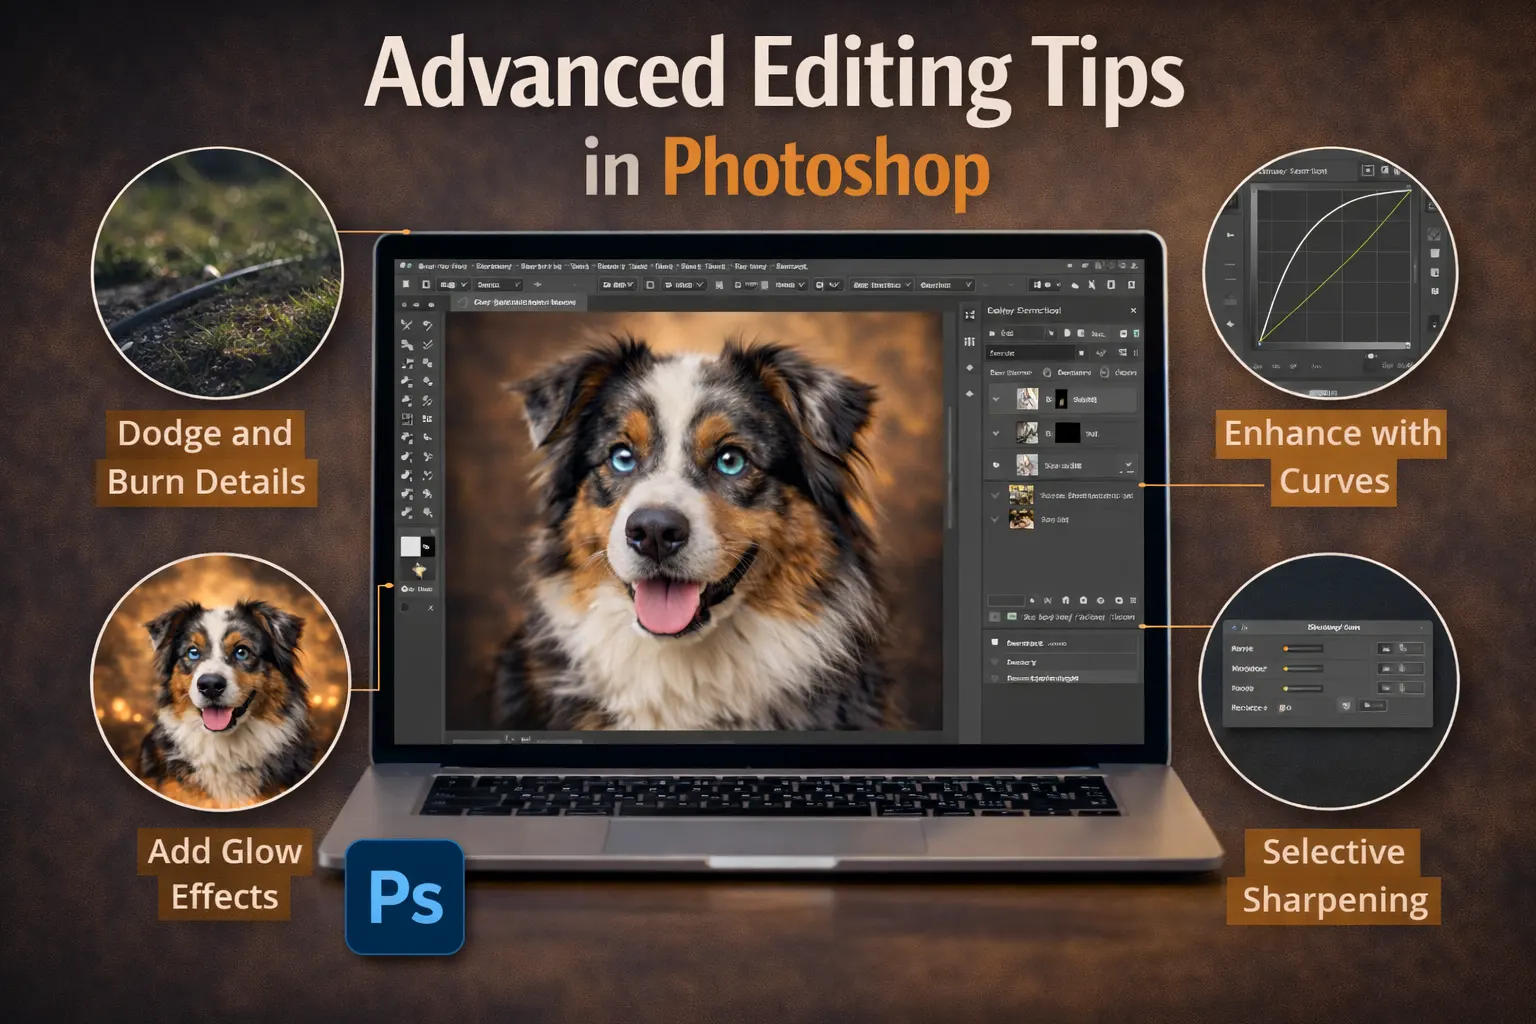
Advanced Editing Tips in Photoshop
Basic corrections improve most images, but advanced tools give you more control. In dog photography, small details can change the final look. Photoshop offers powerful features that help refine light, color, and edges. When used carefully, these tools improve quality without making the image look over-edited.
Using Layer Masks for Precision
Layer masks allow you to edit specific parts of the image. Instead of changing the whole photo, you can adjust only the areas that need improvement. This is helpful when working on fur, eyes, or background edges.
With layer masks, you can hide or reveal adjustments smoothly. This keeps the editing flexible and safe. If something looks wrong, you can fix it without damaging the original image. Precise masking makes dog photo editing cleaner and more professional.
Dodge and Burn for Depth
Dodge and burn is a simple but powerful technique. Dodging makes areas slightly brighter, while burning makes them darker. This helps shape the face and body of the dog. It adds depth without changing the natural color.
Apply the effect gently and build it slowly. Strong adjustments can create uneven patches. Soft dodge and burn improves dimension and makes professional dog photography look more realistic.
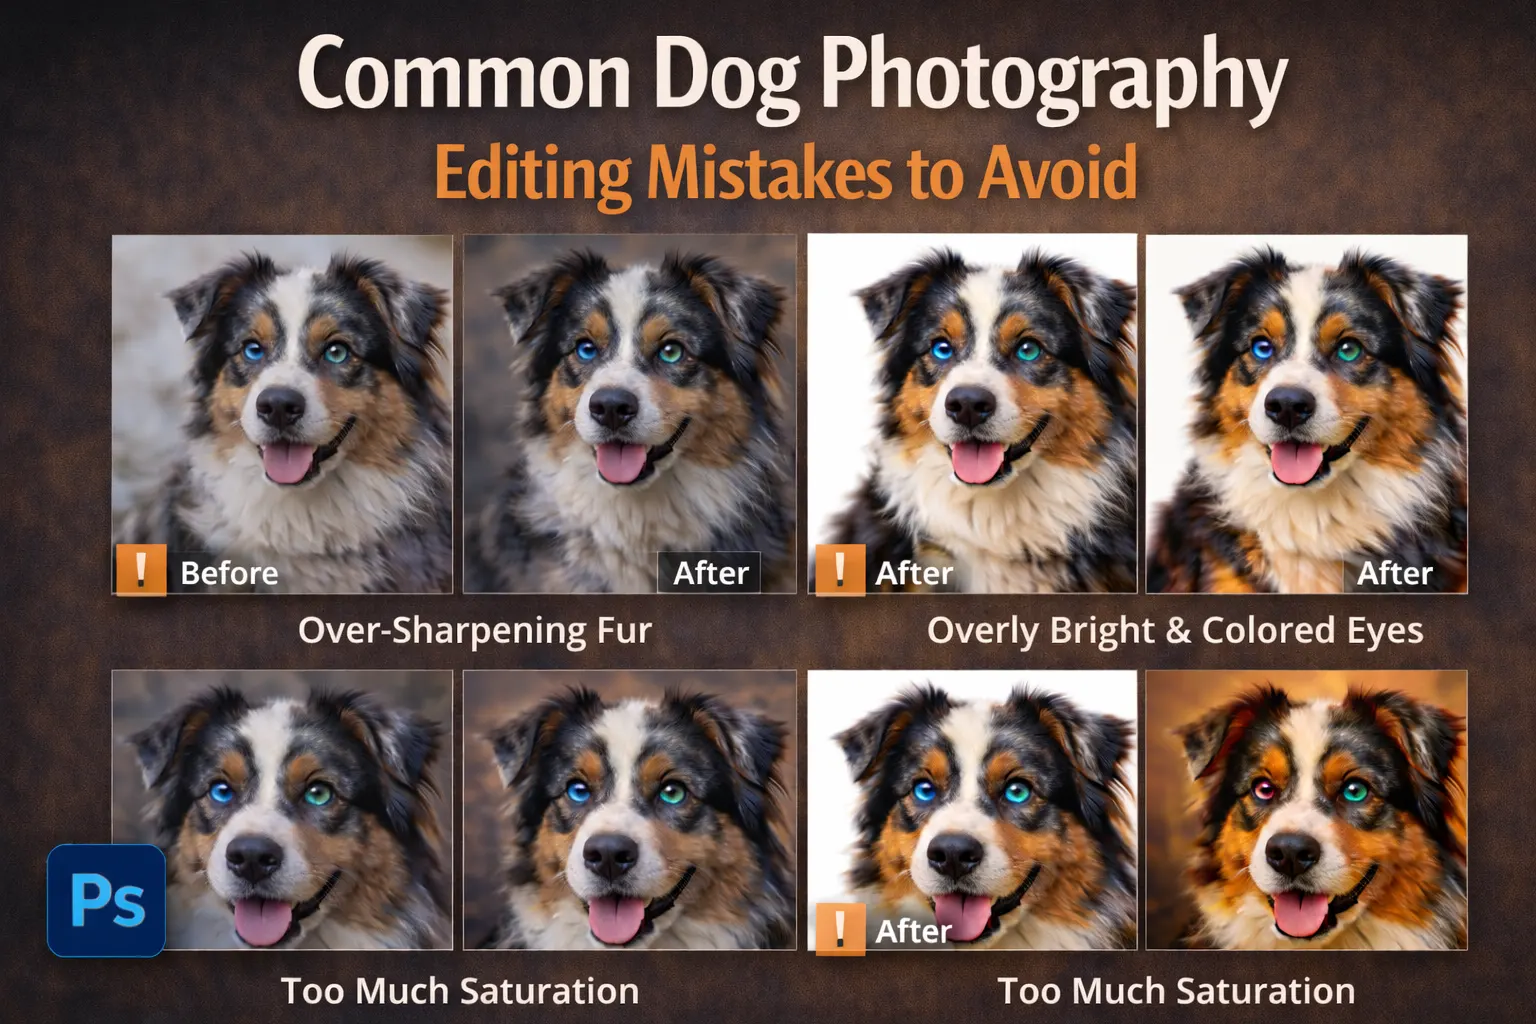
Common Dog Photography Editing Mistakes to Avoid
Even experienced editors can make small mistakes when working on dog photography. These errors can reduce image quality and make the photo look unnatural. Clean and simple edits often give better results than heavy adjustments. Knowing what to avoid helps you create more professional images.
One common mistake is over-sharpening. Too much sharpness creates noise and makes fur look rough. Always apply sharpening gently, especially around the face. Soft and controlled detail works better in dog photo editing.
Another mistake is using too much saturation. Bright colors may look attractive at first, but they can quickly appear unrealistic. Natural tones are important in professional dog photography. Balanced color correction keeps the image believable.
Poor background cleanup is also a problem. Hard edges or visible editing marks reduce quality. Take time to refine selections and blend areas smoothly. Careful editing helps dog photography look polished and consistent.
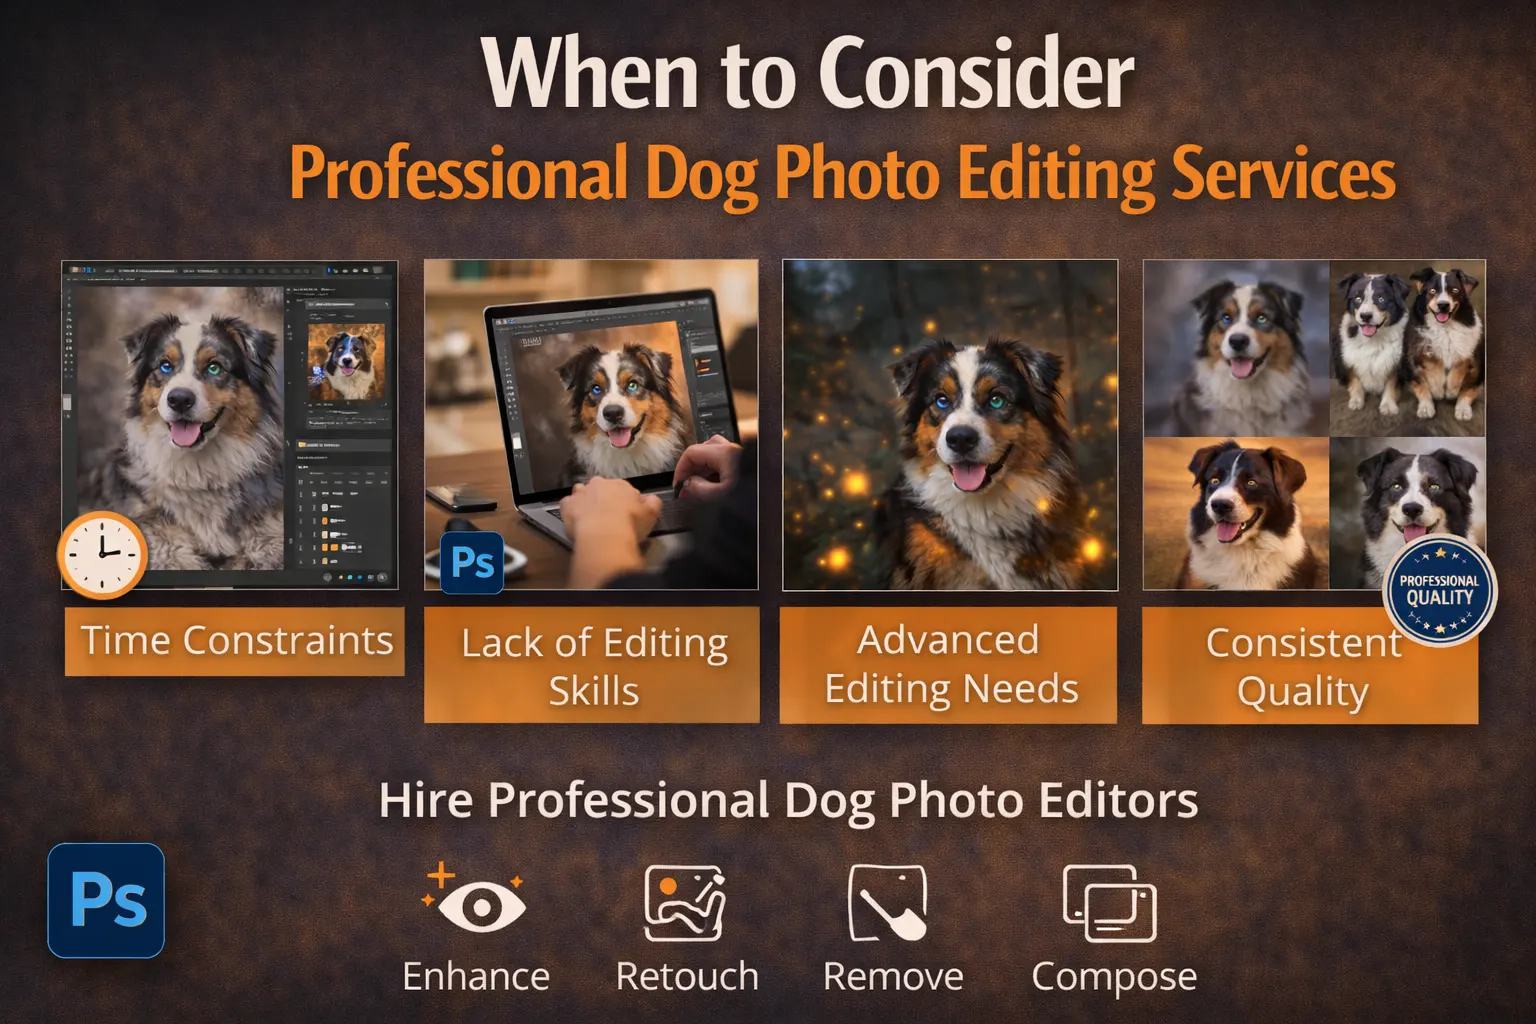
When to Consider Professional Dog Photo Editing Services
Editing dog photography takes time and focus. If you have many images to finish, the work can quickly become stressful. In this case, professional dog photo editing services can help. We also offer professional pet photo editing services for different types of animal photography. They save time and allow you to focus more on shooting and working with clients.
High-volume projects are a common reason to outsource. It is not easy to keep the same style and color across many photos. A professional team can keep lighting, tone, and detail consistent. Studios, breeders, and online sellers often need clean and uniform images. Professional editing helps maintain steady quality in every photo.
Some editing tasks also require extra care. Detailed fur masking and dog photo background removal must be done slowly. Careful color correction is also important for natural results. Skilled editors use proper tools to complete these steps smoothly.
If time is limited or quality must stay consistent, outsourcing can be a practical choice. It helps maintain speed, accuracy, and strong results in dog photography editing.
Frequently Asked Questions (FAQs)
What is the best software for dog photography editing?
Adobe Photoshop and Lightroom are widely used for dog photography editing. Photoshop works well for detailed tasks like fur masking and dog photo background removal. Lightroom is helpful for adjusting light and color quickly. Beginners can start with simple tools and move to advanced software as their skills improve.
How do I edit dog photos to look professional?
Start with white balance and exposure correction. Then improve fur detail, adjust contrast, and brighten the eyes. Clean up distractions in the background and keep colors natural. Balanced and simple edits usually create professional results in dog photography.
How can I enhance fur in dog photography?
Use light sharpening and gentle contrast adjustments to improve texture. Avoid heavy smoothing because it removes natural detail. Zoom in while editing to protect small hair strands. Careful dog photo retouching keeps the fur realistic and clean.
Is background removal necessary in dog photography?
Background removal is useful when the background is busy or distracting. It helps keep focus on the dog and improves composition. Soft blur can also reduce distractions without full removal. Clean backgrounds make professional dog photography look more polished.
When should I outsource dog photo editing?
Outsourcing is helpful when you handle many images or have limited time. Professional dog photo editing services can maintain consistent style and quality. This is useful for studios, breeders, and online sellers who need uniform results.
Conclusion
Editing plays an important role in dog photography. Simple adjustments in light, color, and detail can greatly improve the final image. Clean background removal, careful fur enhancement, and natural eye editing help create sharp and professional results. Small and balanced changes often work better than strong effects.
The key is to keep everything natural. Avoid heavy filters, strong saturation, or too much sharpening. Focus on clarity, consistency, and realistic tones. These steps make your dog photography look polished and trustworthy.
Practice helps you improve over time. Start with basic corrections and slowly learn advanced tools. If you handle many images or need steady quality, professional dog photo editing services can also be a smart option.