

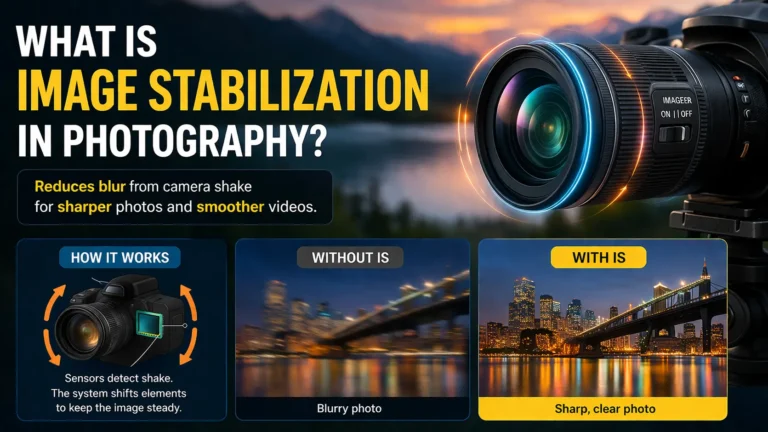
Ever taken a photo that looked blurry even though you tried to keep your hands steady? That usually happens because of small camera movements. This is where image stabilization in photography becomes useful.
In this guide, we will break down what image stabilization in photography really means, how it works, and the different types you might see in cameras and smartphones. By the end, you will have a clear idea of how to get sharper and more stable shots.
What Is Image Stabilization?
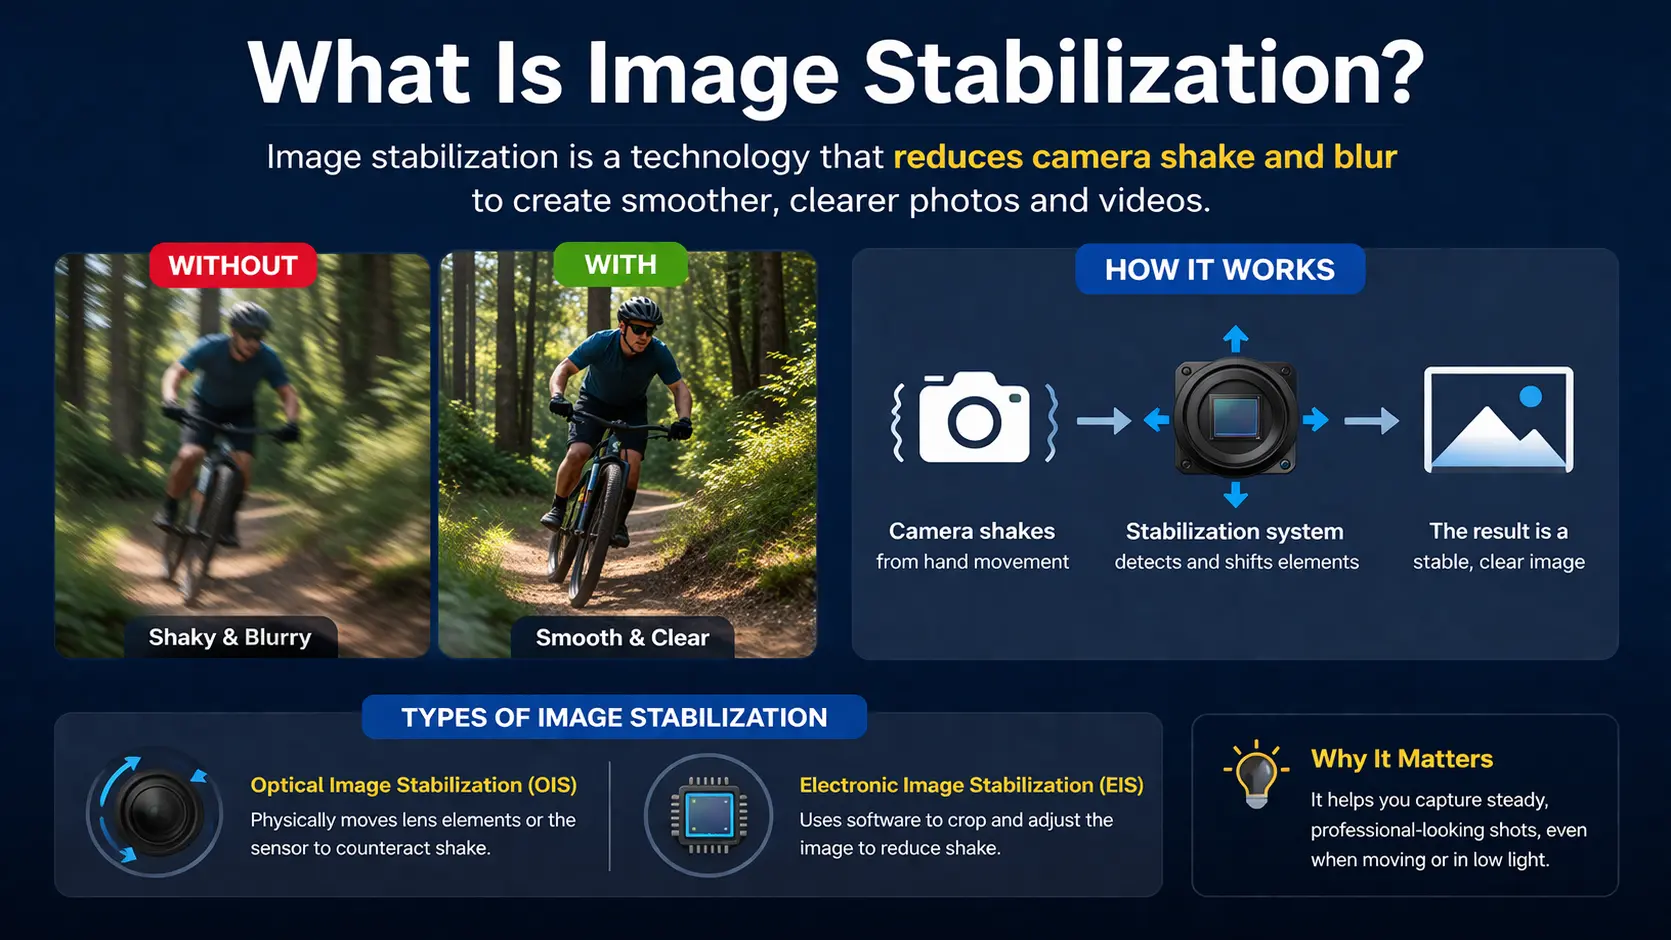
Image stabilization in photography is a feature that helps reduce blur from small camera movements. When you shoot handheld, even a tiny shake can affect how sharp your photo looks.
To deal with this, modern cameras and phones use image stabilization to keep things steady. It can work through the lens, the sensor, or even software. Because of this, you can take clearer photos and smoother videos without always needing a tripod.
How Image Stabilization Works
When you take a photo or video, your hands don’t stay completely still. Even a very small movement can make the camera shake. This is why some photos turn out blurry, especially in low light or when you zoom in.
Image stabilization is designed to deal with this problem. The camera notices the movement and tries to correct it at the same time. In some cases, parts inside the camera move slightly to balance things out. In others, software helps smooth the result.
Because of this, your photo or video looks more stable, even if your hands moved a bit while shooting.
Types of Image Stabilization
Not all image stabilization works the same way. Different cameras and smartphones use different methods to reduce blur and keep shots steady.
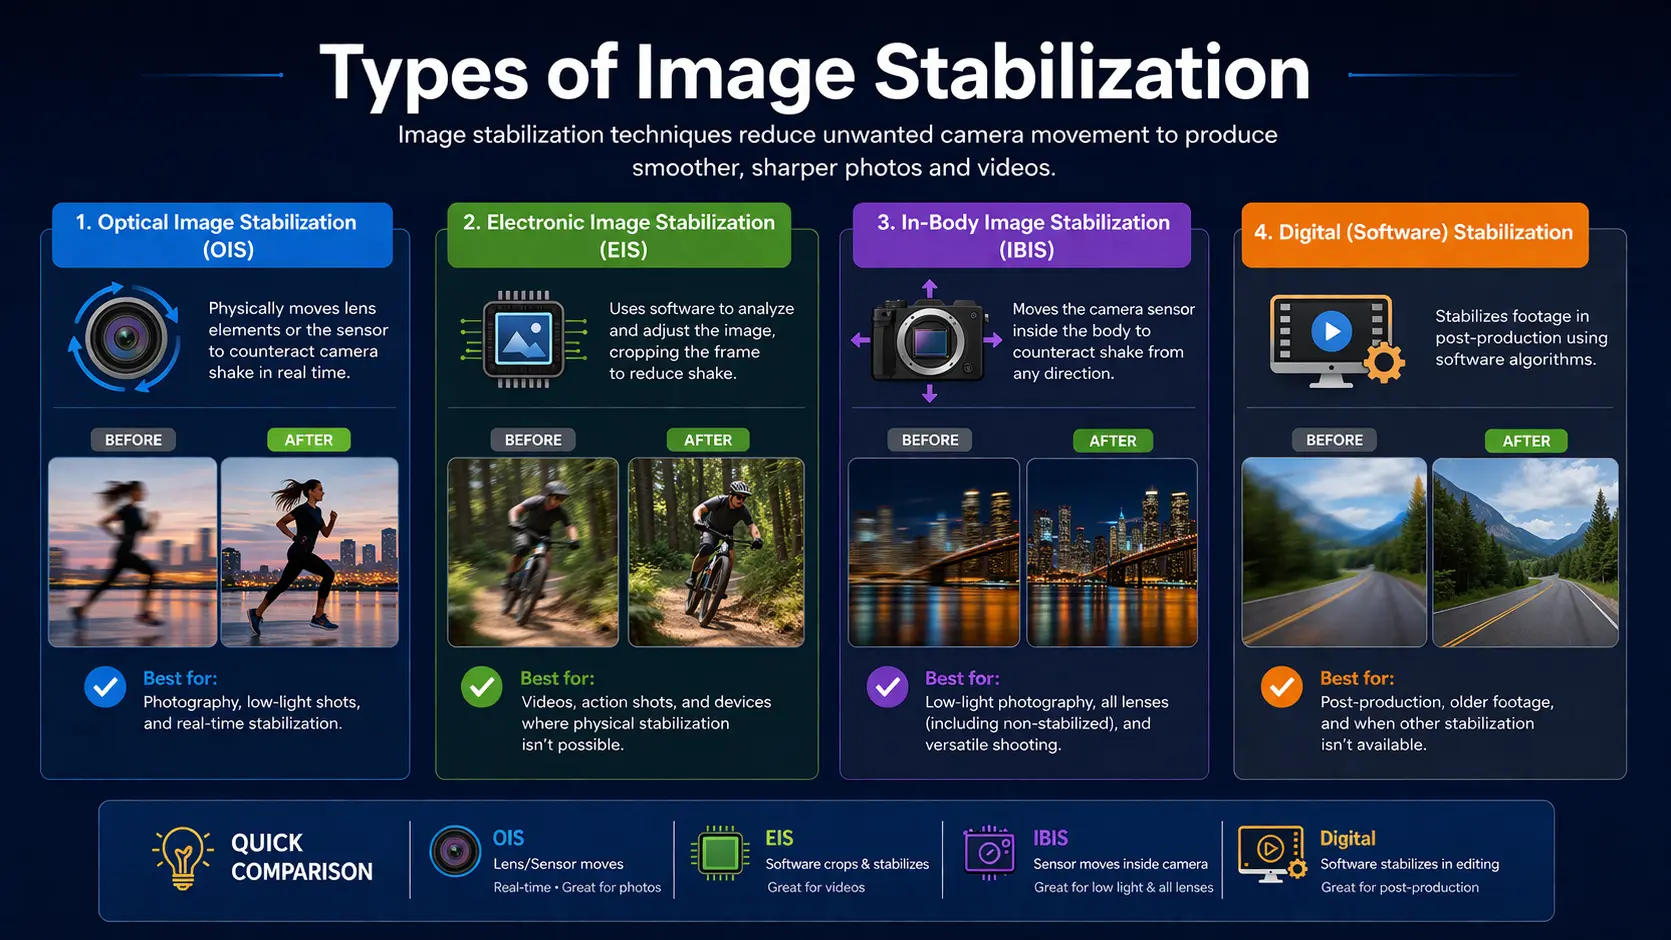
The most common types of image stabilization are Optical Image Stabilization (OIS), Electronic Image Stabilization (EIS), and In-Body Image Stabilization (IBIS). Each one works in a slightly different way, but the goal is the same—to reduce camera shake and improve image quality.
Optical Image Stabilization (OIS)
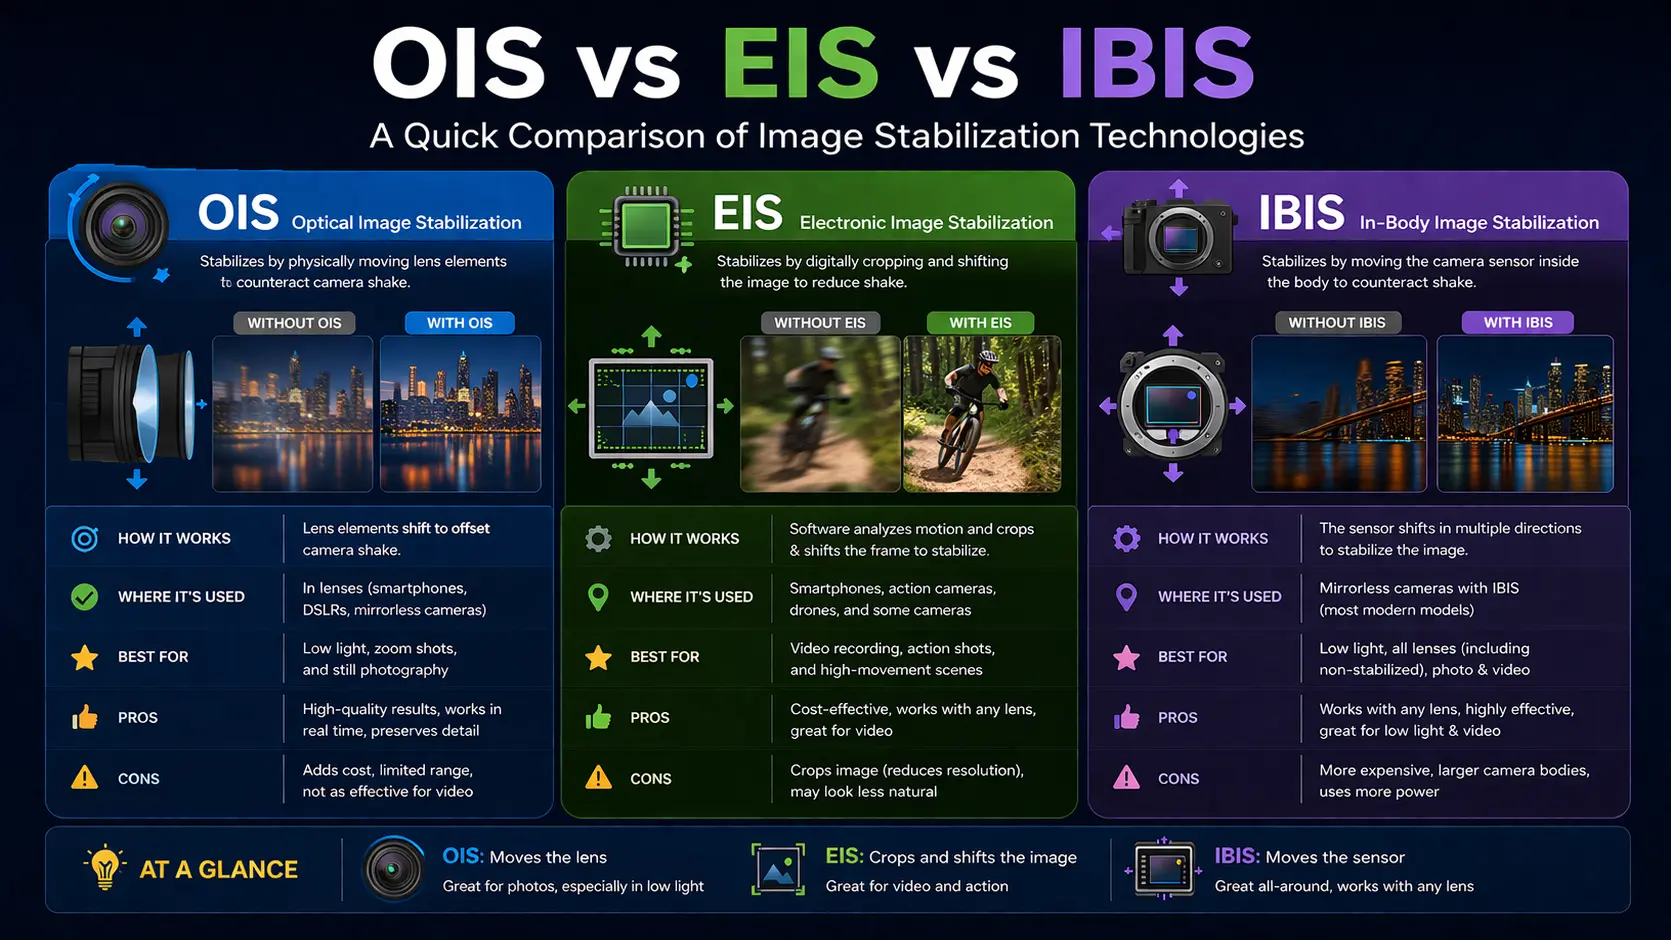
Optical Image Stabilization, or OIS, works by moving parts inside the camera to handle small shakes. In most cases, the lens shifts a little to balance your hand movement while taking a photo or video. This happens very quickly, so you don’t really notice it.
Since it’s hardware-based, the results usually look more natural. It’s quite helpful in low light or when you zoom in, where even a small shake can ruin the shot. That’s why many modern smartphones and cameras include OIS.
Electronic Image Stabilization (EIS)
Electronic Image Stabilization, known as EIS, uses software instead of physical movement. The camera records the motion and then adjusts the frame to make the video look smoother.
You’ll mostly see EIS in phones and action cameras. It works well for video, especially when you are walking or moving around. However, it sometimes crops the frame a bit, so there can be a small drop in quality. Still, for everyday use, it does a decent job.
In-Body Image Stabilization (IBIS)
In-Body Image Stabilization, or IBIS, works by moving the camera’s sensor instead of the lens. The sensor shifts slightly to balance out small movements while shooting.
This system is common in mirrorless and high-end cameras. One big advantage is that it works with different lenses, not just specific ones. IBIS is useful when shooting handheld, especially in tricky conditions where keeping the camera steady is not easy.
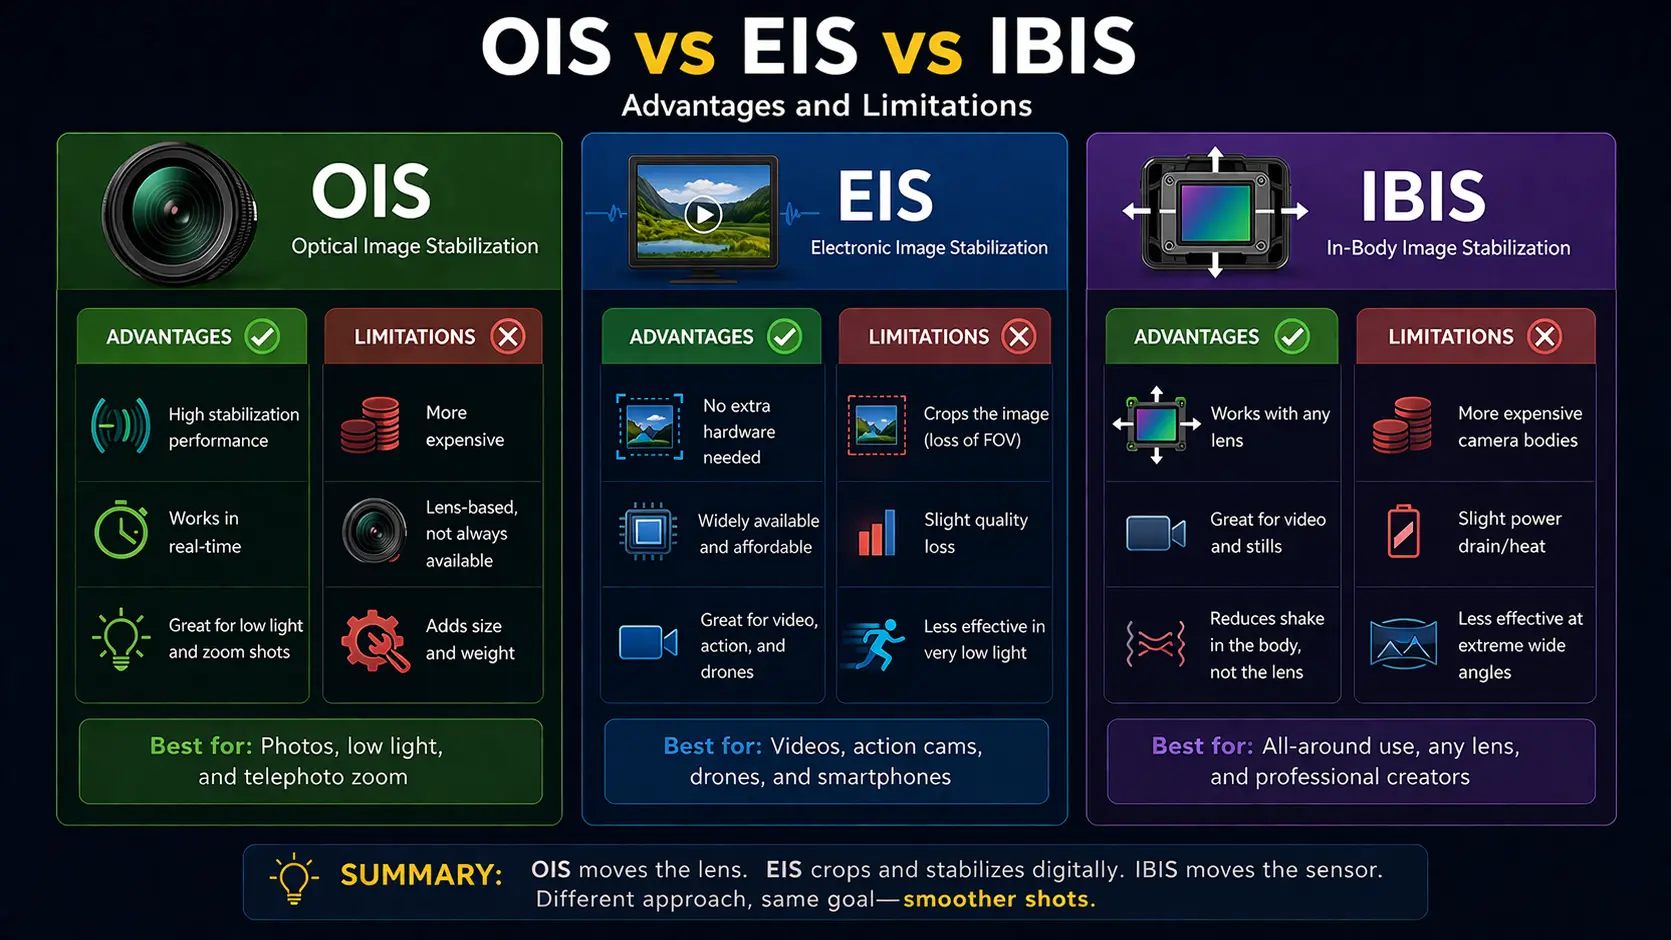
OIS vs EIS vs IBIS (Comparison)
When it comes to image stabilization, OIS, EIS, and IBIS all try to reduce blur, but they don’t work the same way. Each one has its own use depending on how you shoot.
OIS (Optical Image Stabilization):
This method moves the lens to handle small shakes. It is mostly used for photos and works really well in low light. The results usually look natural and sharp.
EIS (Electronic Image Stabilization):
This one uses software to smooth out movement. It is mainly used for video, especially when you are moving. It works fine, but sometimes the image gets slightly cropped.
IBIS (In-Body Image Stabilization):
Here, the camera sensor moves to reduce shake. It works for both photos and videos. One advantage is that it supports different lenses, which makes it more flexible.
In short, OIS is better for photos, EIS is useful for video, and IBIS gives a more balanced performance for both.
Why Image Stabilization Is Important
Image stabilization is important because it helps reduce blur when the camera is not fully steady. In low light, the camera needs more time to capture a photo, so even a small movement can make the image look unclear. With image stabilization, you can still get sharper results without needing perfect stability.
It also matters for video shooting and handheld use. When you record while walking or holding the camera by hand, small shakes are normal. Image stabilization helps smooth out those movements, so your videos look more stable and your photos stay sharp even without a tripod.
When You Need Image Stabilization
You need image stabilization in photography when it becomes hard to keep the camera steady. This often happens in low light, where the camera takes more time to capture an image. It is also useful when you zoom in, because even a small shake becomes more noticeable.
It is also helpful in everyday situations like handheld shooting or recording videos while moving. If you are not using a tripod, image stabilization makes a big difference. It helps you get clearer photos and smoother videos without needing extra equipment.
Advantages and Limitations
Image stabilization in photography has clear advantages, especially when you are shooting without a tripod. It helps reduce blur, making your photos sharper and your videos smoother. This is very useful in low light, during handheld shooting, or when you are zooming in on a subject.
However, it is not perfect in every situation. It cannot fully fix heavy movement or fast action scenes. In some cases, especially with software-based methods, there can be a slight drop in image quality. So while it helps a lot, it should not replace good shooting techniques.
Tips to Use Image Stabilization Effectively
To get the best results from image stabilization in photography, try to keep your hands as steady as possible. Even though stabilization helps, reducing extra movement will improve your photos. Holding the camera with both hands or keeping your arms close to your body can make a difference.
You should also know when to use it and when not to. For example, it works well for handheld shots and low light, but it may not be needed when using a tripod. In some cases, turning it off can actually give better results. Learning how and when to use it will help you get sharper and more consistent shots.
Conclusion
Image stabilization in photography can make a noticeable difference, especially when you are not using a tripod. It helps reduce blur from small hand movements, so your photos and videos look clearer in everyday situations.
If you often shoot handheld or in low light, it’s worth paying attention to this feature. Try using it in different conditions and see how your results change. Over time, you’ll figure out when it helps the most and how to get better, sharper shots.


