

When it comes to product photos for ecommerce, the stakes are high. Your product images are often the first (and sometimes only) thing potential customers will see before they decide whether or not to buy from you. This is why it’s so important to have high-quality, professional-looking product photos.
But if you’re not a professional photographer, how can you make sure your product photos look their best? One way is to hire a professional photographer to take pictures of your products. However, this can be expensive and may not be feasible for all businesses.
Another option is to do your own photography and then edit the images to make them look more professional. If you’re not sure how to do this, don’t worry! In this blog post, we’ll give you a step-by-step guide to editing product photos for ecommerce.
As a seller, it’s important to have high-quality product images that accurately represent your items. However, taking professional-quality photos can be costly and time-consuming. Fortunately, there are a number of ways to edit your images to make them look their best without spending a lot of money or time.
Here are some tips for editing your ecommerce product images:
- Crop the image to focus on the item.
- Adjust the brightness and contrast to make the item stand out.
- Use an editing program like Photoshop to remove any blemishes or imperfections.
- Add a border or frame to the image to give it a polished look.
How Do Professionals Edit Product Photos?
Product photos are an important part of any online store or catalog. They should be high-quality and edited to show the product in its best light. There are a few different ways to edit ecommerce product photos.
Professionals follow a structured and precise workflow to ensure product photos look clean, attractive, and ready for online sales. Each step focuses on enhancing the product while keeping it realistic and brand-consistent.
1. Reviewing and Selecting Images
Image review and selection is the first and most important step in e-commerce retouching. The purpose of this stage is to choose the highest-quality images before starting the editing process. During this step, special attention is given to image sharpness, lighting, color accuracy, and natural texture. To present the product realistically, images are selected based on clean backgrounds, consistent catalog style, and multiple angles. The main goal is to prioritize quality over quantity, so that with minimal editing, the images remain realistic, brand-consistent, and effective in increasing sales.
2. Background Removal or Cleanup
The main goal of e-commerce product photo retouching is to create clean, professional, and trustworthy images. The process begins with reviewing the image quality and planning the type of background required. Next, the background is removed precisely using AI tools or manual Photoshop techniques. Depending on the product type, a white, transparent, or lifestyle background is selected. After that, dust, spots, and scratches are cleaned from the background, and accurate color correction is applied. Background removal helps make the product look natural and realistic.
3. Color Correction and Lighting Adjustment
In e-commerce, the goal of color correction and lighting is to present the product’s colors accurately and realistically. Professionals start with RAW files and use Levels, Curves, HSL adjustments, and Temperature/Tint, along with a gray card to set the correct white balance. Proper exposure, preservation of highlights and shadows, and monitor calibration are ensured for consistent and high-quality images.
4. Product Retouching
The main goal of e-commerce product photo retouching is to present images clearly, professionally, and realistically. This process involves importing RAW files, removing dust and scratches, correcting colors and exposure, and adjusting shadows and highlights. Tools like Adobe Photoshop and Lightroom are used to accurately manage hue, selective color, cloning, and masking.
5. Shadow Creation
Shadow creation enhances product images by adding depth, realism, and a tangible feel. Shadows can be drop shadows (general soft shadows beneath the product), cast shadows (showing shape and direction from a specific light source), or reflection shadows (a mirror-like effect for sleek items).
Key Steps:
-
Isolate the Product: Remove the background using tools like Photoshop’s Object Selection or Photoroom AI.
-
Create a Shadow Layer: Add a new layer beneath the product to build the shadow.
-
Define Shadow Shape: Decide whether it’s a drop, cast, or reflection shadow.
-
Apply Shadow: Duplicate the product layer, fill with black/grey, blur, adjust opacity/curves, and mask unwanted areas.
-
Match Light Source: Adjust angle, softness, and darkness to align with the original lighting for realism.
Tools & Tips:
-
Software: Photoshop (manual), Photoroom (AI), Picsart.
-
Maintain consistent shadow styles across your catalog for professionalism.
-
Shadows create a 3D effect, making products feel more tangible.
6. Resizing and Optimization
Resizing E-commerce Product Photos:
Resizing product images means adjusting their width and height to meet platform requirements, ensuring they fit perfectly without on-the-fly scaling. A typical main image size is around 2000 x 2000 pixels, with at least 1000 pixels on the longest side for zoom functionality. Maintaining a consistent aspect ratio (like 1:1) across all listings gives a professional and uniform appearance. Tools like Adobe Photoshop, GIMP, or online editors can resize images without distortion, making them ready for upload.
Optimizing Images for Web:
Optimization reduces file size while preserving quality, improving page load speed and SEO. Choose the right format (JPEG for standard images, PNG for transparency, WebP for modern compression) and compress using software or online tools. Implement lazy loading for images below the fold, use descriptive file names and alt text for SEO, and leverage a CDN to deliver images faster worldwide. The overall goal is to provide visually appealing, fast-loading images that enhance user experience, build trust, and boost conversions.
7. Final Quality Check
E-commerce photo retouching involves assessing high-quality images, cleaning imperfections, isolating the product, correcting colors (sRGB), balancing shadows and highlights, enhancing texture, and refining shape. After editing, a final quality check ensures sharpness, consistency across angles, color accuracy on multiple devices, and visual fidelity compared to the physical product, with optimized JPEG files for web use.
What are the 3 Tips in Editing Images for Your Website?
There are many factors to consider when optimizing images for your website. Here are 3 tips to help ensure your images are providing the best user experience:
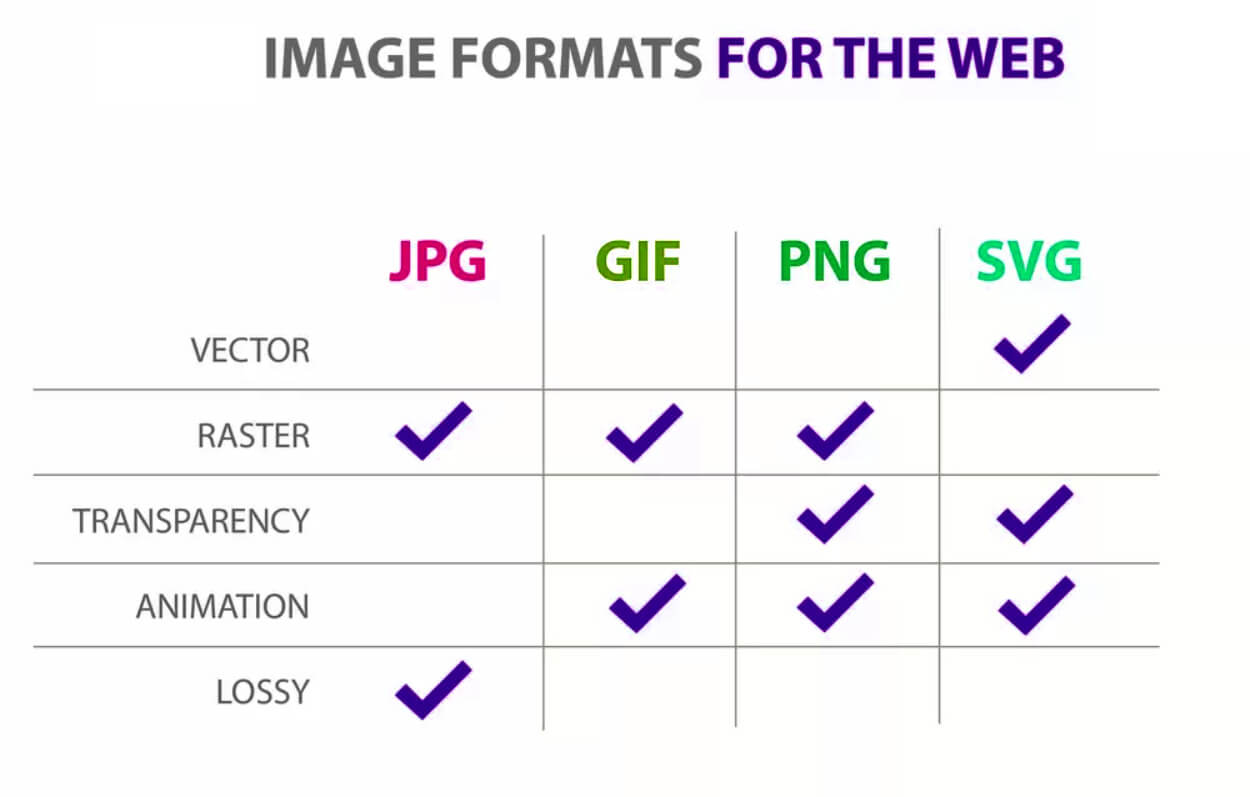
- Use the correct file format – JPEGs are best for photos, while PNGs or GIFs are better for graphics or logos. When in doubt, go with JPEG.
- Resize your images – make sure they’re not too large or small in relation to the rest of your content. Also, compress them so that they load quickly on your site.
- Add alternate text – this is important for accessibility and also helps search engines index your site better. Be sure to describe what’s in the image and keep it concise.
What are the 3 Basic Principles and Techniques in Editing Images?
Assuming you want tips on general image editing: The three basic principles are color correction, exposure, and sharpening. Color correction is the process of adjusting the colors in an image to achieve a desired effect.
This can be done by changing the hue, saturation, or lightness of an image. Exposure is the amount of light that hits an image sensor. This can be changed by altering the shutter speed, aperture, or ISO.
Sharpening is the process of making an image appear clearer and sharper. This can be done with filters or software tools.
How Can I Edit a Picture Product?
There are a few ways that you can edit a picture product. The most common way is to use editing software like Photoshop or GIMP. These programs will allow you to make changes to the image, such as cropping, resizing, and adding text or graphics.
Another way to edit a picture product is to use an online editor. There are many free online editors that you can use without having to download any software. However, these editors usually have fewer features than the editing software mentioned above.
Finally, if you want to make more drastic changes to the image, such as changing the color scheme or completely redesigning it, you may need to hire a professional graphic designer.
Product Photo Editing Online Free
If you are looking for a way to edit your product photos for free, there are a few options available to you. One option is to use an online photo editor such as PicMonkey or Fotor. These editors allow you to crop, resize, and adjust the color and brightness of your photos.
They also offer a variety of filters and effects that you can apply to your photos. Another option for editing your product photos is to use a free online photo editor such as GIMP or Paint.net. These editors provide more advanced editing capabilities than the online photo editors mentioned above.
However, they may require some time and effort to learn how to use them effectively. Once you have edited your product photos using one of the methods mentioned above, you will need to save them in a file format that can be used by an online printing service. The most common file formats used by these services are JPEG and TIFF.
If you are unsure about which file format to use, contact the customer service representative of the printing service you plan on using.
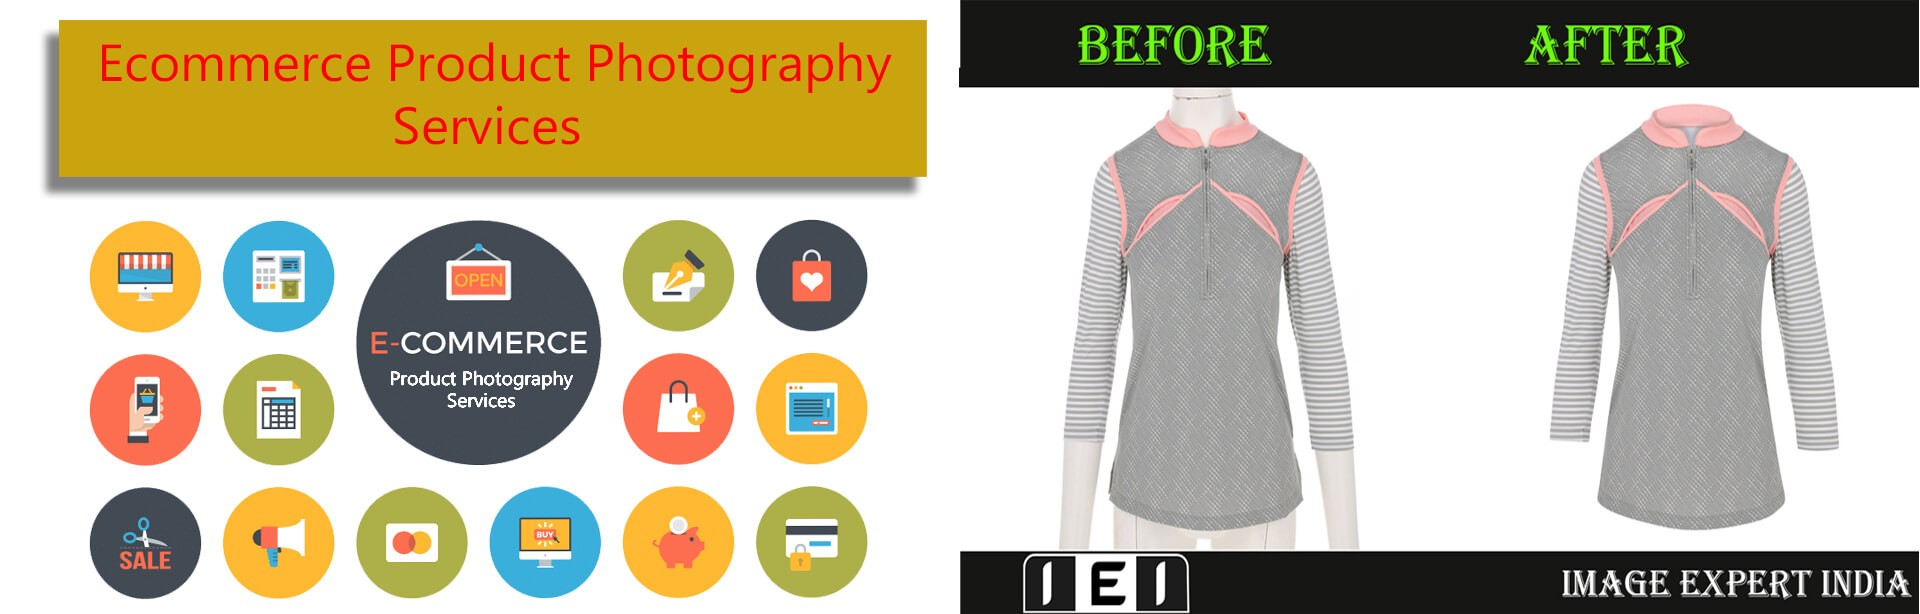
Ecommerce Product Photography Services
Ecommerce product photography services can provide your business with high-quality, professional photos of your products. These photos can be used on your website, in marketing materials, and even on social media to help promote your products. There are a number of benefits to using ecommerce product photography services.
First, you’ll be able to show off your products in the best light possible. Professional photos can make a big difference in how potential customers perceive your products. Second, using professional photography services can save you time and money.
You won’t have to worry about taking or editing photos yourself and you can be sure that the final product will meet your standards. If you’re looking for ecommerce product photography services, there are a few things to keep in mind. First, consider what type of photos you need.
Do you want close-ups of individual products? Lifestyle shots showing the product in use? Or both?
Next, think about budget and turnaround time. How much are you willing to spend on this service? And how quickly do you need the finished photos?
Once you know what you need, it will be easier to find a photographer who can meet those needs within your budget and timeline.
Product Photography Editing
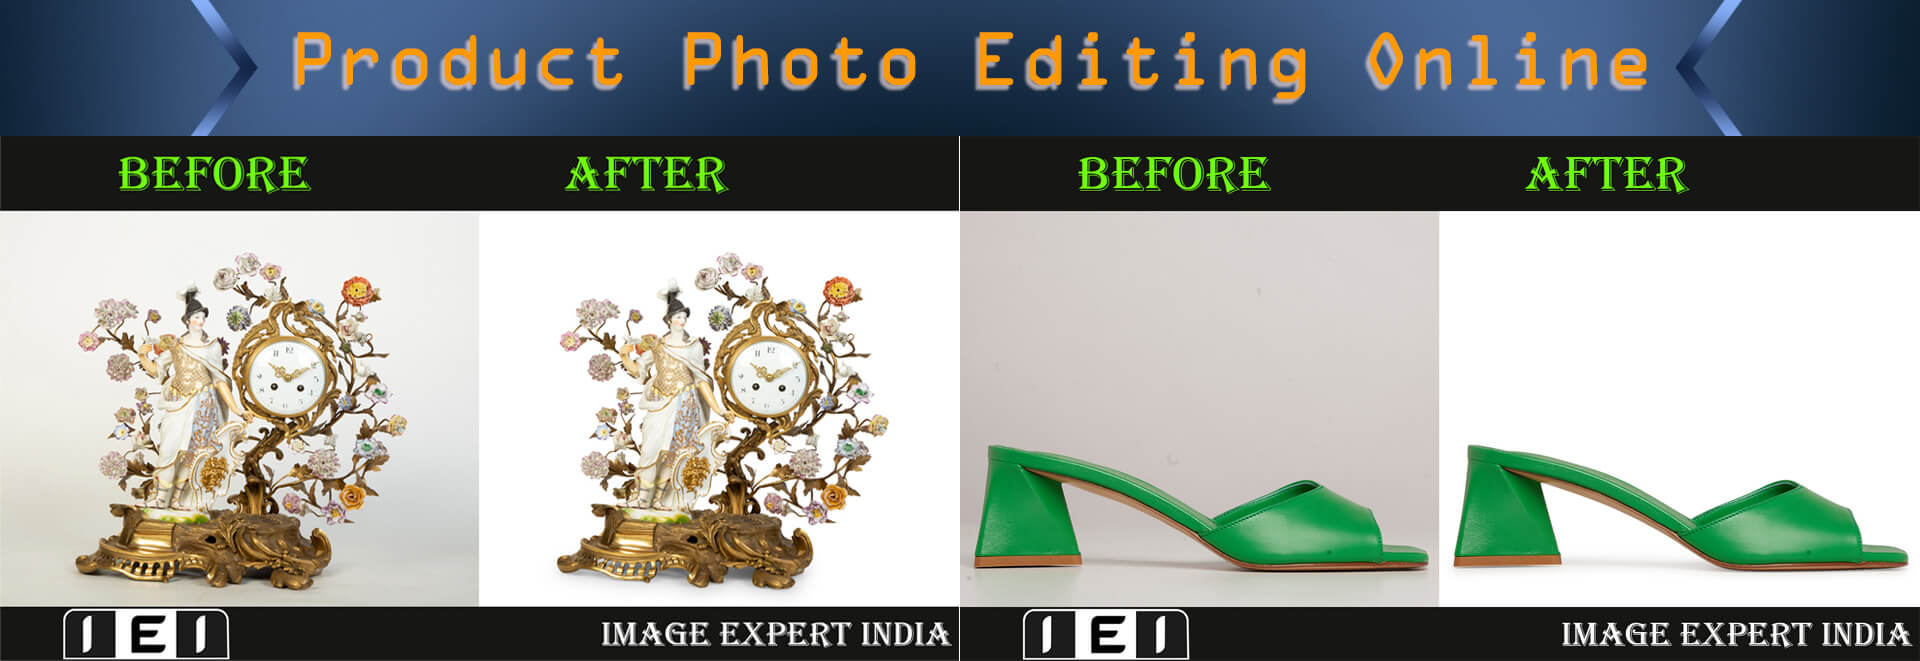
Product photography is a specialized type of photography that focuses on capturing images of products for commercial purposes. Product photos are often used in advertising and marketing, as well as in online and offline retail stores. Product photography editing is the process of retouching and manipulating product photos to improve their quality or to change their appearance.
Editing can be done using various software programs, such as Adobe Photoshop or Lightroom. It can also be done manually, using traditional darkroom techniques. There are many different ways to edit product photos, depending on the desired results.
Common edits include removing blemishes or flaws, adjusting colors, adding text or graphics, cropping the image, and changing the background. More advanced edits may involve combining multiple images, removing objects from the photo, or changing the perspective of the shot. Editing product photos can be a time-consuming process, but it’s important to get it right in order to create attractive and effective marketing materials.
When done well, edited product photos can make a big impact on potential customers and help boost sales.
ECommerce Photography
E-commerce photography is a specialized type of photography that is used to sell products online. This type of photography typically features product photos that are taken from multiple angles and with different lighting conditions in order to show off the product in the best possible light. E-commerce photos are often accompanied by text descriptions and other information about the product, such as pricing, shipping details, and return policy.
Product photos are the most important element of an e-commerce website, as they are what potential customers will use to make their buying decision. Therefore, it is important to make sure that your product photos are high quality and accurately represent the products you are selling. If you are not a professional photographer, there are many resources available online that can help you take great e-commerce photos.
In addition to product photos, e-commerce websites also need lifestyle images that show the products being used in real life scenarios. These types of images help potential customers visualize how the products would fit into their own lives. Lifestyle images can be sourced from stock photo websites or created specifically for your website using models or actors.
If you want to optimize your e-commerce website for search engines, it is also important to include keyword-rich Alt text with all of your images. Alt text is a description of an image that is displayed when the image cannot be loaded for some reason.
Conclusion
If you’re running an ecommerce business, then you know how important it is to have high-quality product images. But what do you do if you don’t have the time or budget to hire a professional photographer? Thankfully, there are some easy ways to edit your product photos to make them look great.
In this blog post, we’ll share our top tips for ecommerce product image editing. We’ll cover everything from choosing the right file format to using free online tools like Canva and PicMonkey. By the end of this post, you’ll be able to take amazing product photos that will help boost your sales.


