


Clear skin in photos looks great, but dark spots, acne marks, and uneven tones can ruin a good image. The good news is that Photoshop makes it easy to fix these problems with simple and powerful tools. Even if you are a beginner, you can remove dark spots and improve skin quality in just a few steps.
In this guide, you will learn how to use different dark spot remover tools in Photoshop, from basic tools to advanced AI features. By the end, you will know how to clean up images while keeping the skin natural and real.
Top Dark Spot Rem oval Tools
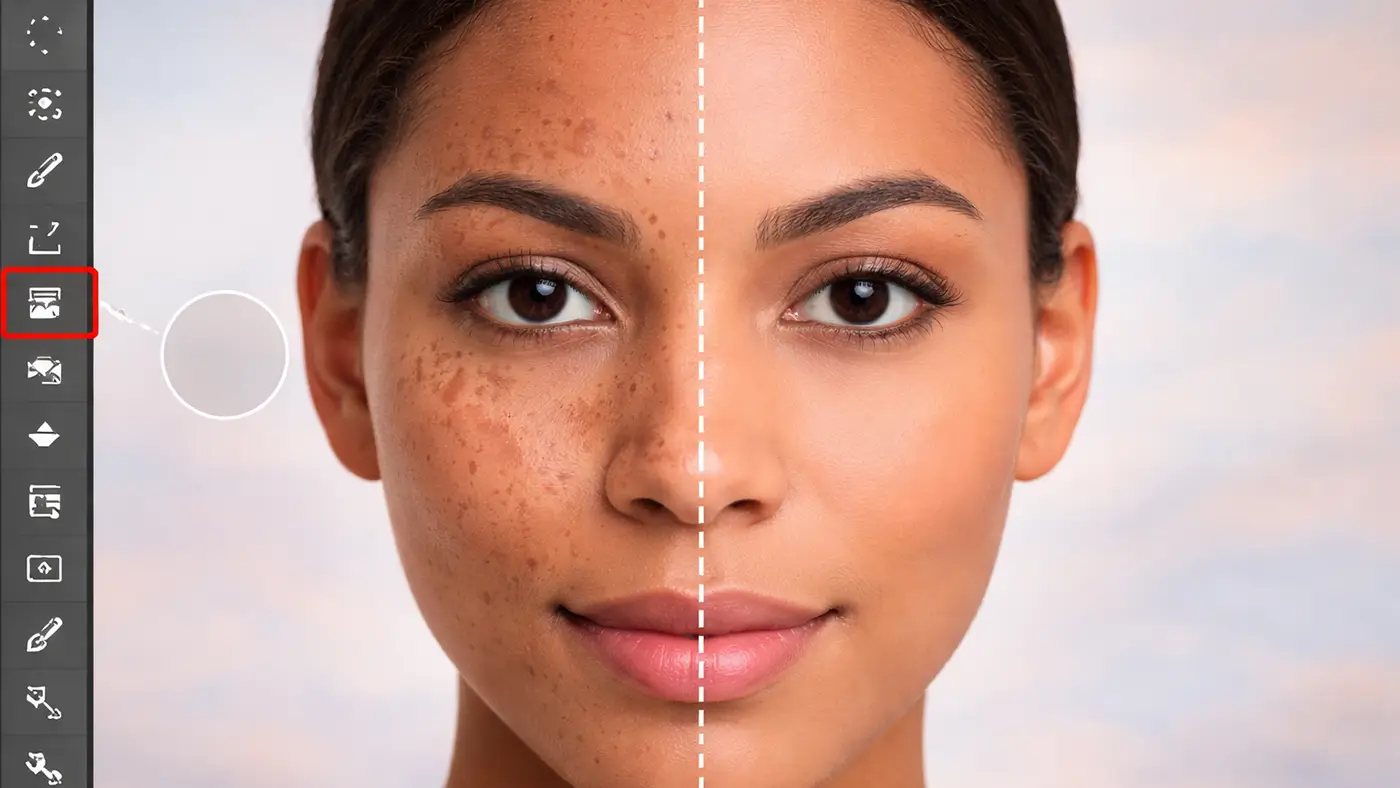
Spot Healing Brush Tool (Best for Quick Fix)
Spot Healing Brush Tool is one of the easiest and fastest tools in Photoshop. These dark spot remover tools help remove small spots, acne, and skin imperfections. It works automatically by analyzing the surrounding area and replacing the selected spot with clean pixels. You don’t need to choose a source point, which makes it perfect for beginners and quick edits.
How Does Spot Healing Brush Tool Work?
The Spot Healing Brush Tool uses smart blending to fix imperfections. You simply click or paint over a spot, and Photoshop fills it using nearby pixels. It matches color and texture automatically, which saves time and effort.
When Should I Use Spot Healing Brush Instead of Healing Brush?
You should use the Spot Healing Brush when you want to remove small spots quickly. It works best for simple edits and clean areas. Use the Healing Brush when you need more control, especially in areas with complex texture or lighting.
Why Does This Tool Sometimes Make Blurry or Smudged Spots?
Blurry results usually happen when the brush size is too big or when you edit a large area at once. Uneven lighting can also cause issues. To fix this, use a smaller brush and work on one spot at a time.
Which Mode Is Best — Content-Aware, Proximity Match, or Create Texture?
Content-Aware is the best mode for most cases. It gives natural results by blending surrounding pixels smartly. Proximity Match works well on simple backgrounds. Creating a texture can help in some cases, but it is less reliable.
How Do I Choose the Right Brush Size and Hardness for Better Results?
Choose a brush size slightly bigger than the spot. Keep hardness low, around 0–30%, for soft edges. This helps the edit blend smoothly with the skin.
How Can I Avoid Over-Editing or Making the Image Look Fake?
Do not remove every single spot. Keep some natural skin texture. Zoom in to edit, but also zoom out often to check the overall look. This helps keep the image realistic.
Can Spot Healing Brush Remove Large Objects or Only Small Spots?
The Spot Healing Brush works best on small spots. It is not good for large objects or big dark areas. For those, you should use tools like the Patch Tool or Content-Aware Fill.
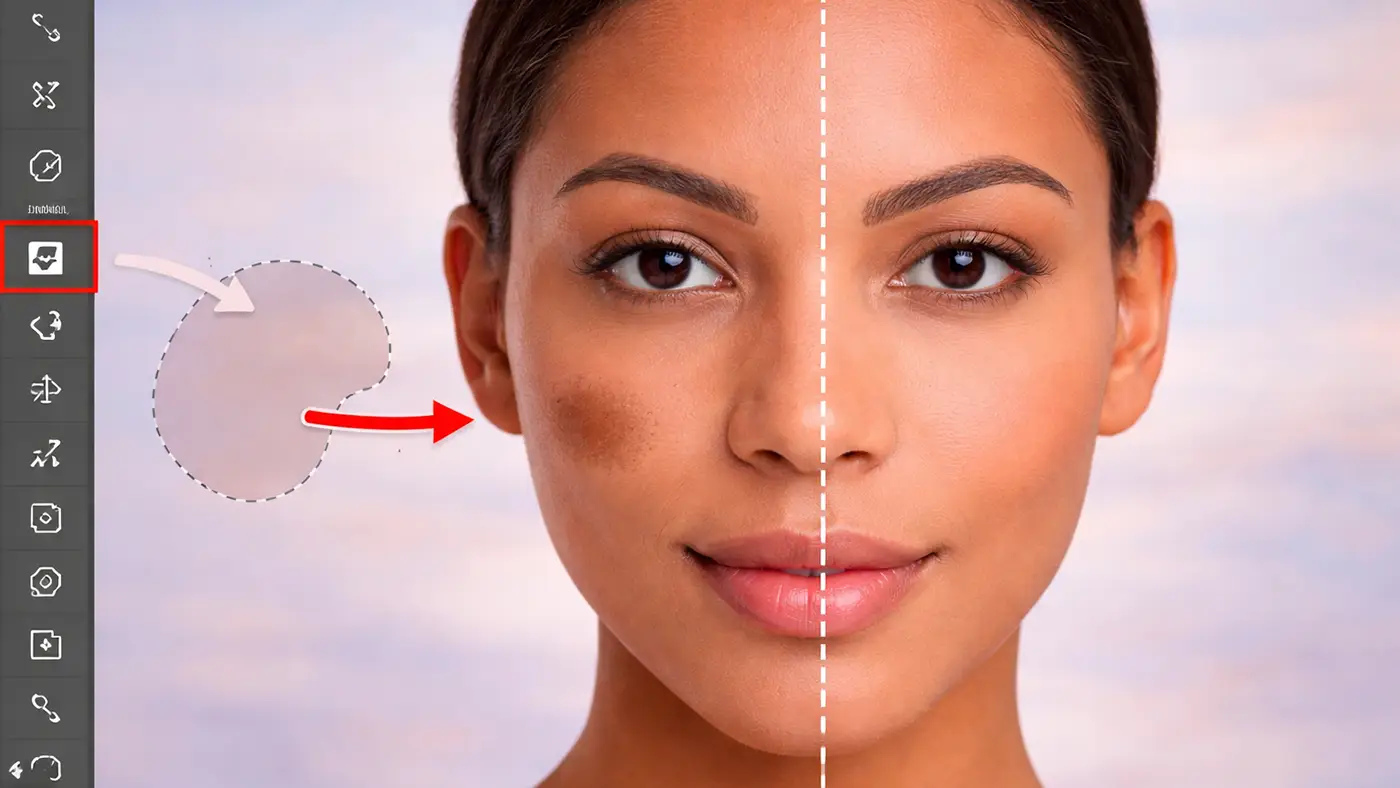
Patch Tool (Best for Large Spots)
The Patch Tool in Photoshop is a powerful option for fixing larger areas of skin, such as big dark spots, scars, or uneven patches. It allows you to select a problem area and replace it with a clean part of the image. These dark spot remover tools give more control than quick-fix tools and work well for detailed retouching.
How Does Patch Tool Work?
The Patch Tool works by letting you draw a selection around the area you want to fix. Then you drag that selection to a clean area of the image. Photoshop blends the texture, color, and lighting to match the original area, creating a smooth result.
Is Patch Tool Suitable for Removing Large Dark Spots?
Yes, the Patch Tool is very suitable for removing large dark spots. It works better than small tools like the Spot Healing Brush when dealing with bigger areas because it can handle more texture and detail.
When Should I Use the Patch Tool?
You should use the Patch Tool when you are working on larger spots, uneven skin tones, or areas that need more precise blending. It is also helpful when other tools do not give natural results.
How Do I Properly Select an Area for Patching?
You should carefully draw a selection around the spot, including a small amount of clean surrounding skin. Avoid making the selection too tight or too large. A balanced selection helps Photoshop blend the area more naturally.
What Is the Difference Between Source and Destination Mode in Patch Tool?
In Source mode, you select the damaged area first and drag it to a clean area to fix it. In Destination mode, you select a clean area and drag it over the damaged spot. Source mode is more commonly used for skin retouching.
Why Does My Patched Area Look Blurry or Mismatched?
This usually happens when you choose the wrong sample area with different lighting or texture. It can also happen if the selection is too large. To fix this, choose a nearby clean area with similar tone and texture.
How Can I Blend Edges Smoothly After Using the Patch Tool?
To get smooth edges, make sure your selection has soft edges. You can also slightly feather the selection before applying the patch. If needed, use a soft brush or Healing Brush afterward to refine the edges and make the result look natural.
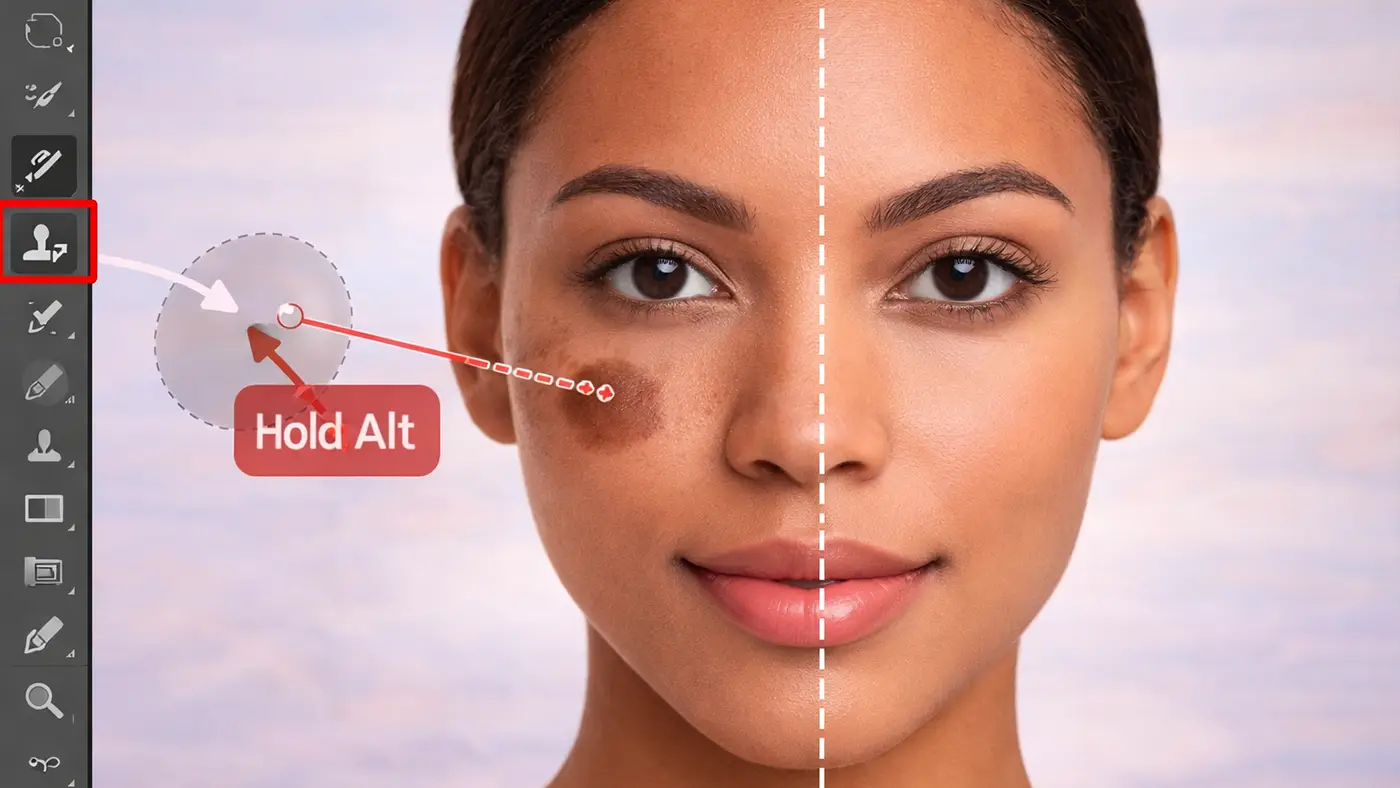
Clone Stamp Tool (High precision)
The Clone Stamp Tool is one of the most precise tools in Photoshop for removing dark spots. These dark spot remover tools work by copying pixels from one area of the image and placing them over another area. This gives you full control, which makes it very useful for detailed skin retouching.
How Does It Work to Remove Dark Spot?
The Clone Stamp Tool works by sampling a clean area of skin and painting over the dark spot. You choose a source point, then carefully brush over the unwanted spot. It copies texture, color, and detail exactly from the sampled area, which helps create a natural result when used correctly.
How Do I Select and Reset the Source Point Correctly?
To select a source point, hold the Alt key (Option on Mac) and click on a clean area of skin. This sets your sample. Then release the key and start painting over the dark spot. You should reset the source point often, especially when working on different areas of the face. Always choose a nearby area with similar texture and lighting for best results.
What Opacity and Flow Settings Are Best for Dark Spot Removal?
For natural-looking edit, keep opacity between 20% to 50% and flow around 30% to 70%. Lower settings allow you to build up the effect slowly, which helps avoid harsh or obvious edits. This method gives you more control and smoother blending.
How Can I Match Texture, Lighting, and Color of Skin?
To match skin properly, always sample from an area close to the dark spot. This ensures similar lighting and tone. Move your source point as you work to avoid repeating patterns. Use a soft brush to blend edges smoothly. Work in small strokes and check your result by zooming in and out to keep the skin looking natural.
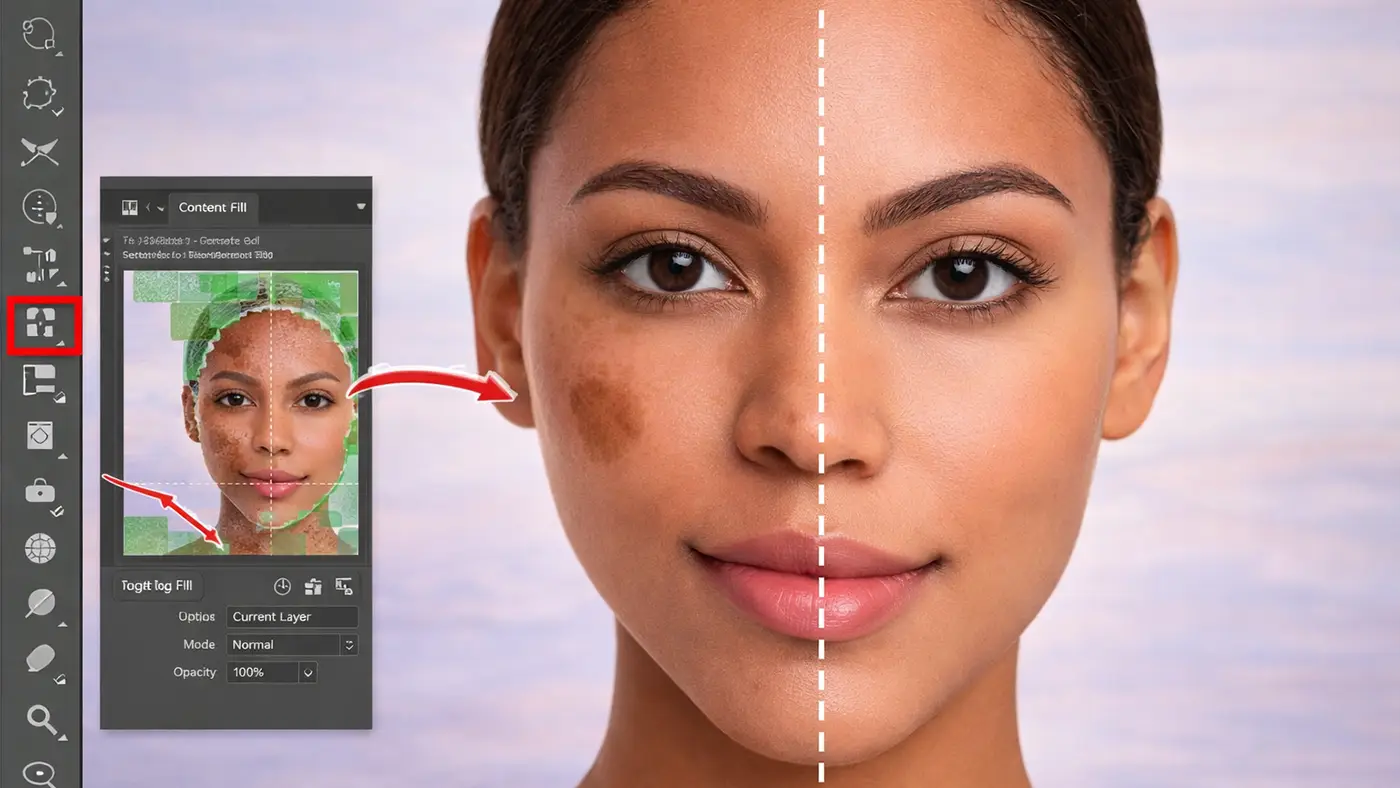
Content-Aware Fill (Advanced Tool)
Content-Aware Fill is an advanced Photoshop tool that helps remove dark spots by automatically filling the selected area with nearby pixels. It uses smart algorithms to match texture, color, and lighting. These dark spot remover tools are very useful for complex photo editing.
How Does Content-Aware Fill Work as a Dark Spot Removal Tool?
Content-Aware Fill works by analyzing the area around the dark spot and replacing it with similar pixels from nearby regions. You first select the unwanted area, then Photoshop generates a fill that blends with the surrounding skin. This helps create a smooth and natural look without manual cloning.
How Can I Accurately Select Dark Spots Before Using Content-Aware Fill?
You should use tools like the Lasso Tool to draw a clean selection around the dark spot. Keep the selection slightly larger than the spot, but not too wide. Avoid including too much extra area, as it can confuse Photoshop and reduce accuracy.
Why Does Content-Aware Fill Sometimes Make Dark Spot Fixes Look Unnatural?
This usually happens when the surrounding area has uneven lighting, complex textures, or strong shadows. If Photoshop samples from the wrong areas, the result may look unnatural. Poor selection or including mixed textures can also cause messy results.
What Are the Best Settings for Natural-Looking Dark Spot Removal?
For best results, adjust the sampling area so Photoshop only uses clean skin. Use color adaptation and keep rotation or scaling options moderate. Always preview the result before applying. Fine-tune the output on a new layer so you can adjust it later if needed.
Is Content-Aware Fill Effective for Large Dark Spots or Deep Pigmentation?
Yes, Content-Aware Fill works well for larger dark spots and uneven areas. However, for very detailed skin retouching, you may still need to refine the result using tools like the Healing Brush or Clone Stamp Tool to get a perfect finish.
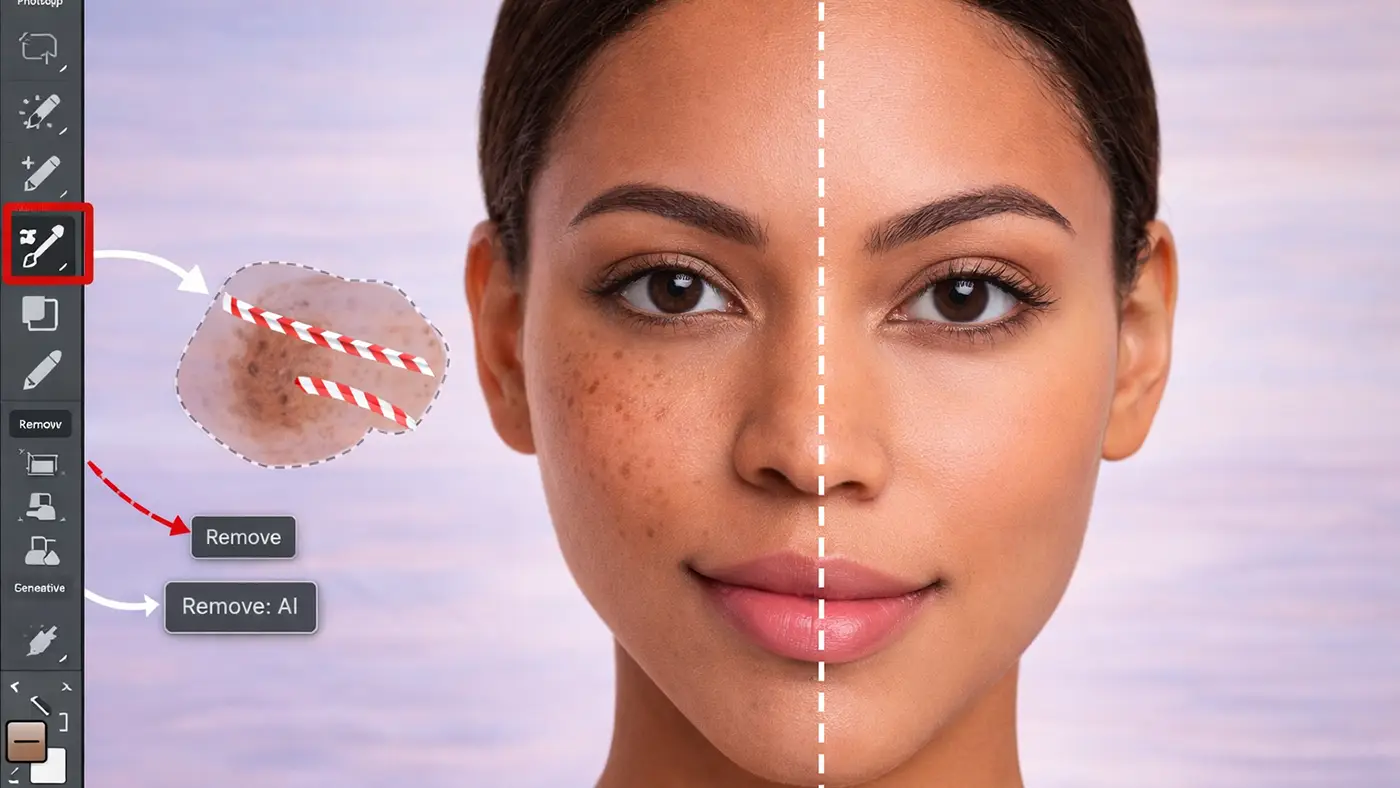
Remove Tool / Generative Fill (Latest AI Tool)
The Remove Tool and Generative Fill are the latest AI-powered features in Photoshop. They make dark spot removal faster and easier by automatically detecting and replacing unwanted areas with realistic content. These dark spot remover tools are great for both beginners and professionals who want quick, clean results.
How does the Remove Tool / Generative Fill work for removing dark spots?
The Remove Tool works like a smart brush. You simply paint over the dark spot, and Photoshop removes it by filling the area with matching pixels. Generative Fill goes a step further by using AI to create new content based on the surrounding area. It analyzes texture, lighting, and color to generate a natural replacement.
How can I make AI generate natural-looking skin after removing dark spots?
To get natural results, always work on small areas instead of large sections at once. Make sure the surrounding area is clean and consistent, so the AI has good data to sample from. You can also refine the result by adjusting the selection or using additional tools like Healing Brush for final touch-ups.
Can Generative Fill handle large or deep dark spots effectively?
Yes, Generative Fill can handle large and deep dark spots better than most traditional tools. It is especially useful for complex areas where texture and lighting vary. However, for very detailed skin retouching, you may still need to refine the result manually to keep it realistic.
What are the best tips to get accurate results for dark spot removal?
Use a precise selection and avoid including too much extra area. Always review multiple generated variations if available and choose the most natural one. Work on a new layer so you can edit non-destructively. Combine AI tools with manual tools like Clone Stamp or Healing Brush to achieve the best professional result.
Step-by-Step Instructions to Use Dark Spot Remover Tools
Removing dark spots in Photoshop is simple if you follow the right steps and use the correct tools. Dark spot remover tools help you fix skin imperfections quickly and get natural-looking results. This process helps you achieve clean and natural-looking skin without over-editing.
Step 1: Open Your Image in Photoshop: Start by opening your photo in Photoshop. Choose a high-quality image for better results.
Step 2: Duplicate the Background Layer: Press Ctrl + J (Windows) or Cmd + J (Mac) to duplicate the layer. This protects your original image and allows non-destructive editing.
Step 3: Zoom In to See Details Clearly: Zoom in to around 100%–200% so you can clearly see the dark spots and work with precision.
Step 4: Use Spot Healing Brush Tool for Small Spots: Select the Spot Healing Brush Tool and click on small dark spots. Photoshop will automatically remove them using nearby pixels.
Step 5: Use Healing Brush Tool for Better Control: For areas that need more accuracy, select the Healing Brush Tool. Hold Alt (Option on Mac) to sample a clean area, then paint over the spot.
Step 6: Use Patch Tool for Larger Areas: If you have bigger dark patches, use the Patch Tool. Draw a selection around the spot and drag it to a clean area to replace it.
Step 7: Use Clone Stamp Tool for Precision Work: For detailed retouching, use the Clone Stamp Tool. Sample nearby skin and carefully paint over the dark spot to match texture and tone.
Step 8: Use Content-Aware Fill or Remove Tool for Complex Areas: For difficult or larger spots, make a selection and use Content-Aware Fill or Generative Fill. Let Photoshop automatically create a clean result.
Step 9: Check and Refine Your Work: Zoom in and out to review your edits. Fix any unnatural areas using soft brushes or blending tools.
Step 10: Keep the Skin Natural: Do not remove every spot. Keep some natural texture so the image does not look fake or over-edited.
Step 11: Save Your Final Image: Once you are satisfied, save your image in high quality (JPEG or PNG).
Dark Spot Corrector Tips for Best Results
Getting clean and natural results in Photoshop is not just about using the right tools—it’s also about how you use them. The right dark spot remover tools can make a big difference in your final result. These tips will help you improve your dark spot removal and make your edits look more professional.
Use non-destructive editing for safety: Always work on a duplicate layer or use “Sample All Layers.” This way, your original image stays safe, and you can fix mistakes easily.
Work on small areas at a time: Do not try to remove all dark spots in one go. Focus on small sections. This gives you better control and prevents messy results.
Zoom in, but also zoom out often: Zoom in to edit details, but regularly zoom out to see the full image. This helps you keep the skin looking natural and balanced.
Choose the right tool for each situation: Use Spot Healing Brush for small spots, Patch Tool for larger areas, and Clone Stamp for detailed work. Mixing tools gives the best results.
Match texture, lighting, and skin tone: Always sample or select areas close to the spot. This ensures the texture and color match naturally with the surrounding skin.
Keep brush settings soft and subtle: Use a soft brush with low hardness. Avoid harsh edges, as they can make edits look fake or obvious.
Avoid over-editing the skin: Do not remove every single imperfection. Keeping some natural texture makes the image look real and professional.
Use low opacity for better blending: Lower opacity helps you build the effect slowly. This creates smoother and more realistic results.
Check edges carefully: After editing, look at the edges of the corrected area. If needed, refine them using a soft brush or Healing tool.
Practice and refine your technique: Good retouching takes practice. The more you work with different tools, the better your results will become.
Common Mistakes to Avoid
Many beginners make simple mistakes that can ruin the final result when removing dark spots in Photoshop. One common mistake is over-editing the skin by removing every single imperfection. This makes the image look fake and unnatural. Another issue is using the wrong tool for the job, such as using Spot Healing Brush on large areas instead of the Patch Tool.
Using a brush that is too big can also create blurry or smudged results. Many users forget to match the lighting and texture, which causes uneven skin tones. Editing directly on the original layer is another mistake, as it prevents easy corrections later.
Finally, not zooming out to check the full image can lead to unrealistic edits. Always aim for balance and keep the skin looking natural. These dark spot remover tools help remove acne marks, blemishes, and uneven skin tones.
Conclusion
Removing dark spots in Photoshop is easy when you use the right tools and methods. From the Spot Healing Brush to advanced tools like Generative Fill, each tool has a specific use. The key is to choose the right tool and work with care.
With practice, you can create clean, professional-looking images that still look natural and real.


