

Photoshop is a powerful tool that lets you change and improve your images in many ways. One of its most useful features is changing color in Photoshop, which can make any image look fresh. Whether you are editing a product photo, a design, or a personal picture, changing colors helps match themes or brand styles. If you are new to Photoshop or want an easy way to change colors, this guide will show simple and effective methods. We will cover basic steps and some advanced tricks to give you more control. By following these tips, you can confidently change object colors and make your images look polished and professional every time.
Why Change Color in Photoshop?
Before learning the techniques, it’s important to know why changing colors in Photoshop is useful. This skill helps you match brand colors or fit a marketing campaign easily. For example, product images may need color changes to show different options without taking new photos each time. Similarly, artists and designers use color changes to try different moods, themes, or fix color problems in their photos. Knowing why color changes matter helps you use this skill better in any project.
Changing an object’s color also helps important parts stand out in a photo or design. Whether highlighting a product or adding contrast, adjusting colors gives you full control. It makes your images look more professional, bright, and polished. Plus, it lets you try different looks and improve your Photoshop editing skills.
Preparing Your Image
The first step in learning how to change color in Photoshop is to prepare your image. Open Photoshop and load the image you want to edit. It’s essential to take a moment to analyze the image and decide which object or area you wish to change the color of. Is the object clearly defined, or do you need to isolate it from a complex background?
If you need to change color in Photoshop on an object with a busy background, start by selecting it carefully. Use one of Photoshop’s selection tools to isolate the object before applying any color changes. The Quick Selection Tool is a great option for selecting simple objects. It works by allowing you to brush over the object, and Photoshop will automatically try to detect the edges. For more complex objects, the Pen Tool might be more accurate, as it lets you manually trace the edges of the object.
Once the object is selected, take the time to refine the edges of the selection using the Refine Edge tool. This is especially important when working with areas like hair, fur, or soft edges. In these cases, the selection might not be clean, so you need to refine it carefully.
Using the Hue/Saturation Adjustment Layer
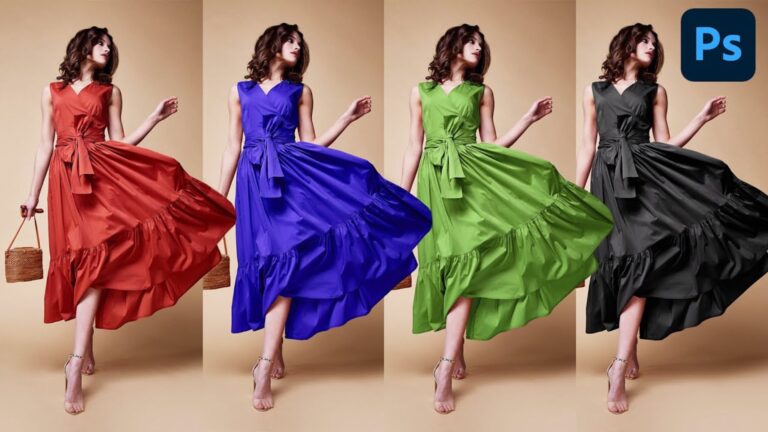
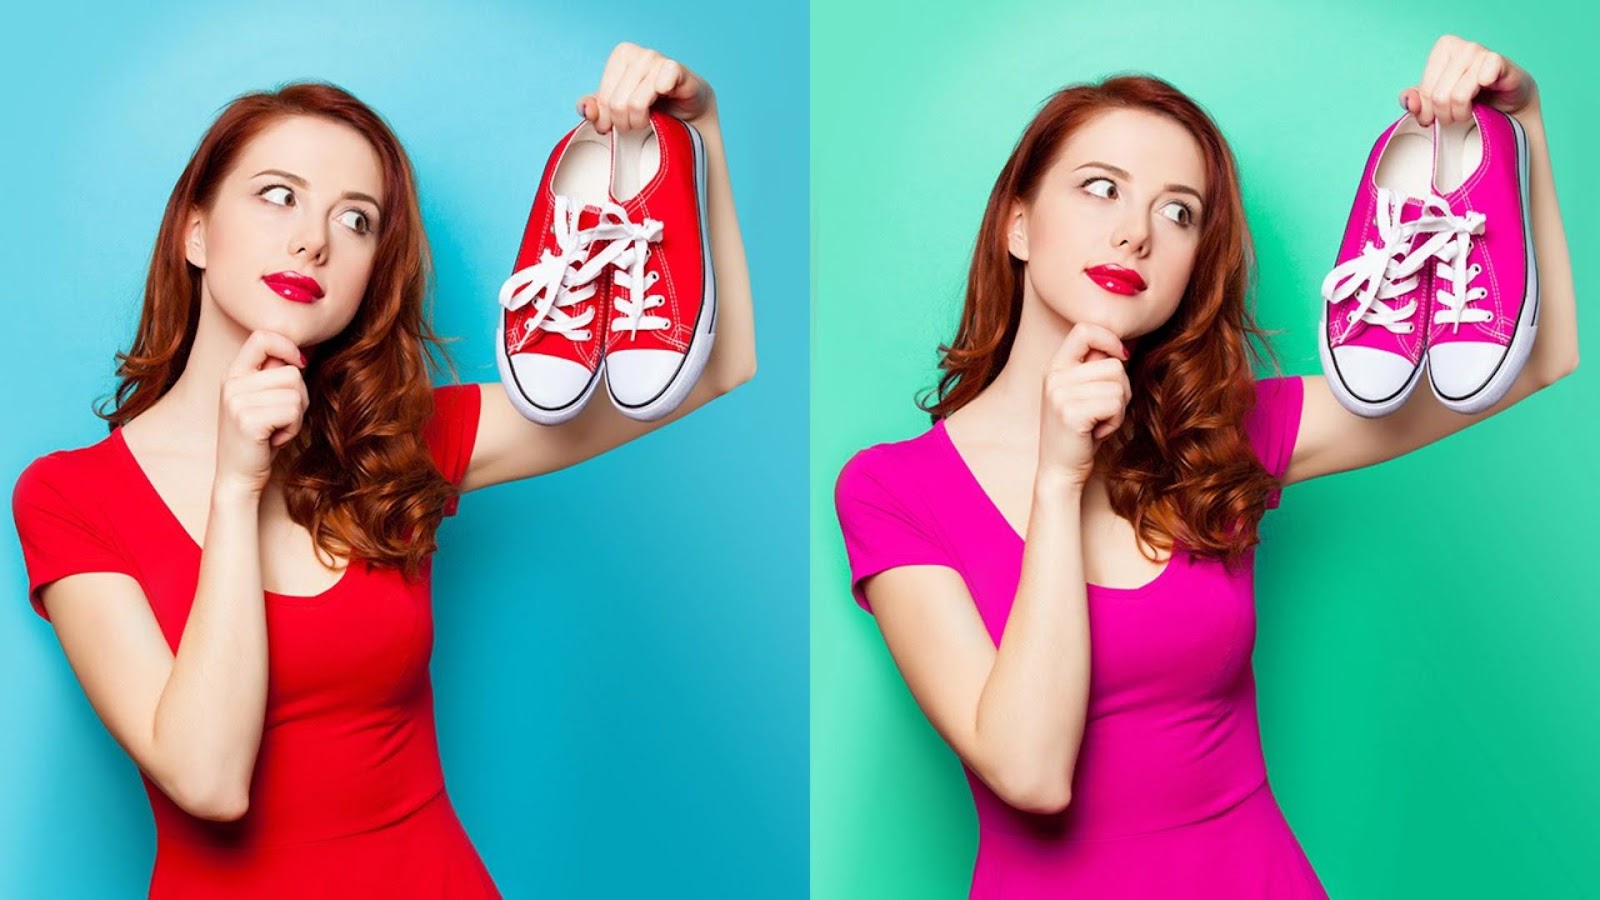
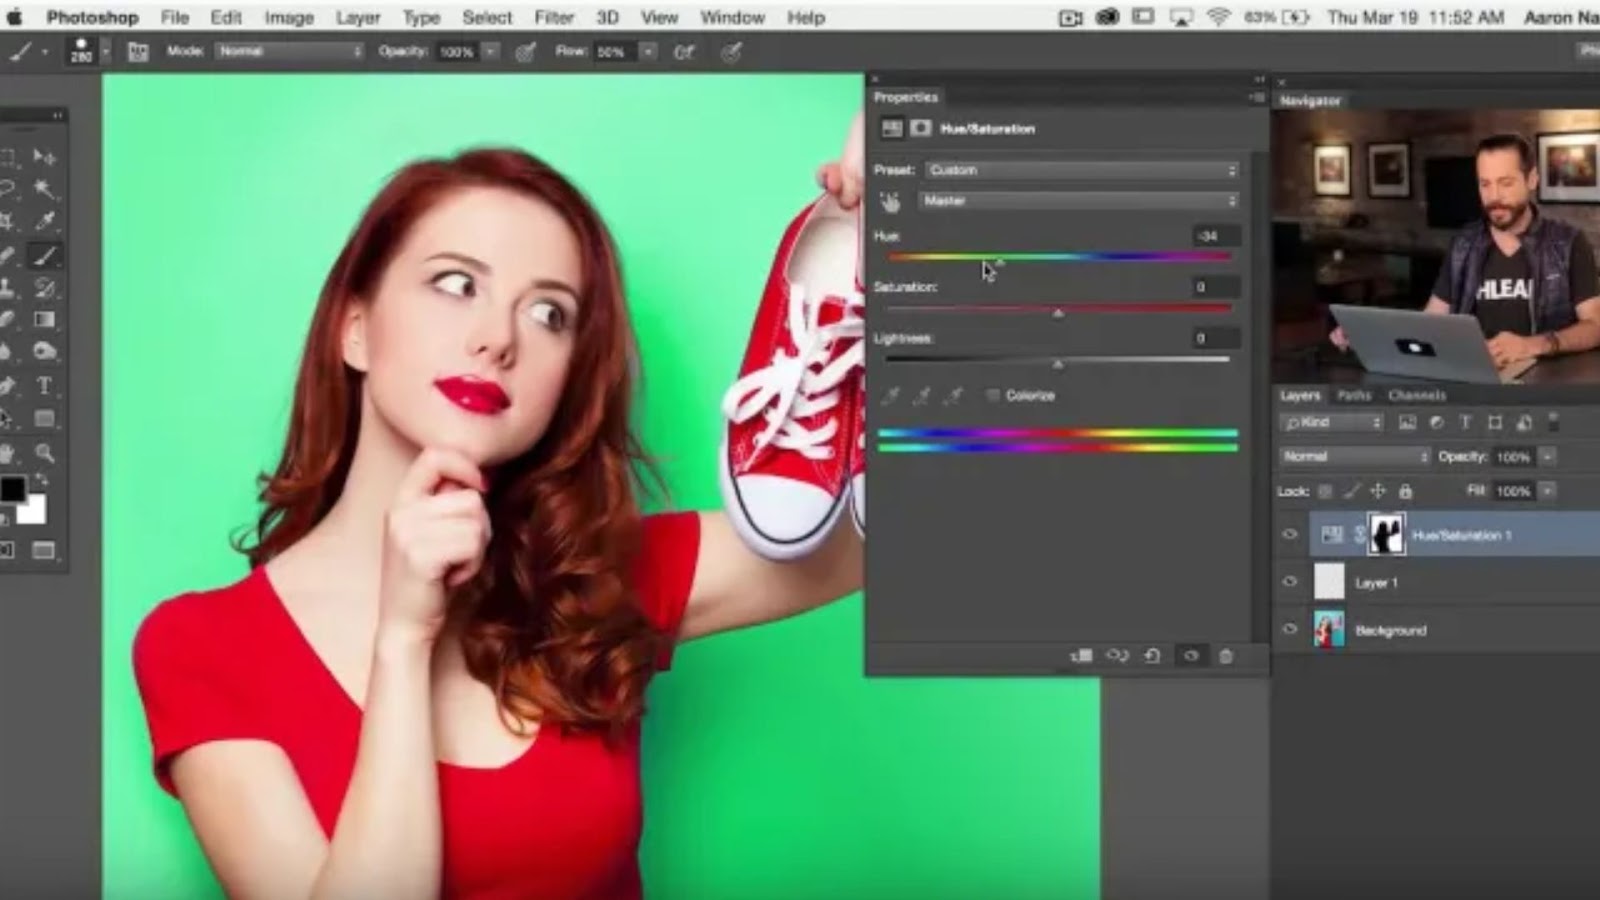
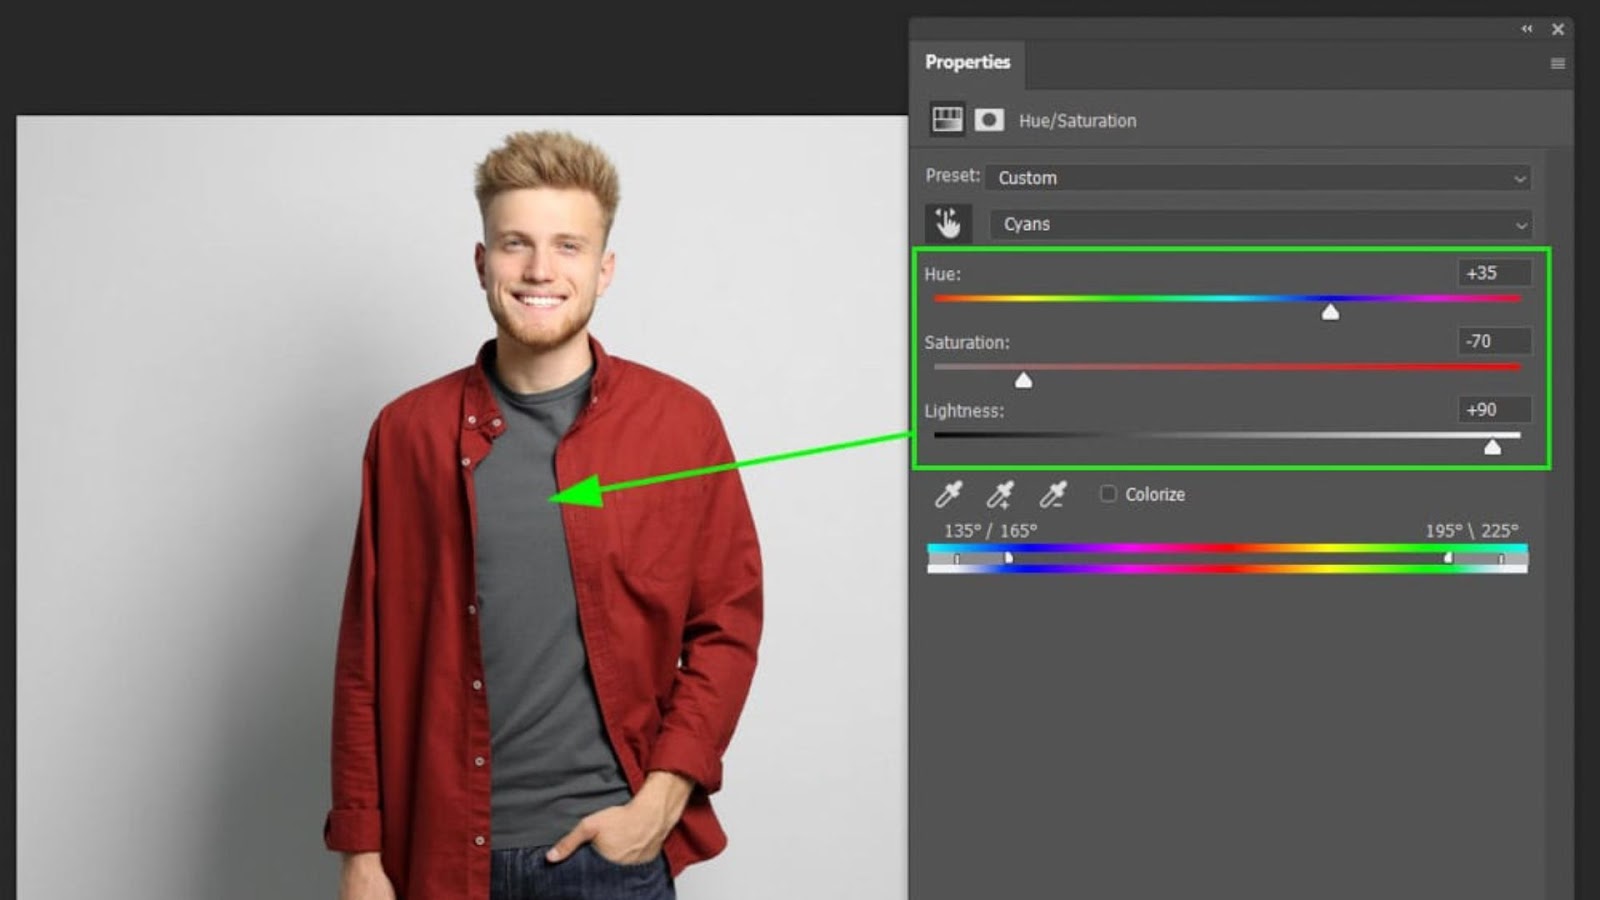
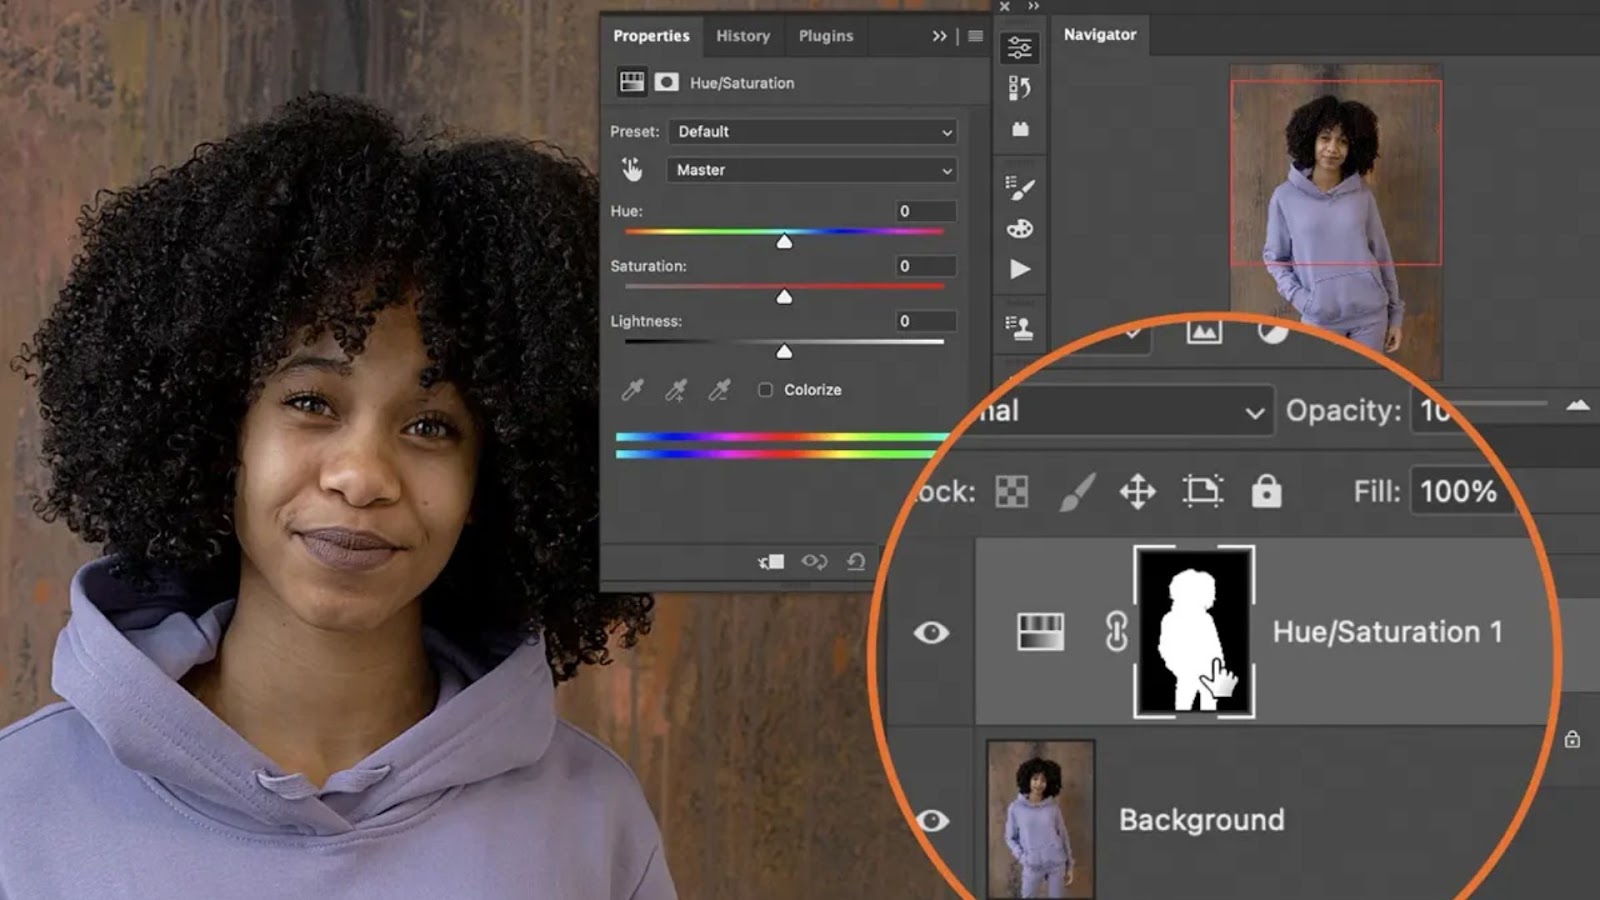
One of the most straightforward and common methods to change color in Photoshop is by using the Hue/Saturation Adjustment Layer. This adjustment allows you to shift the hue of an object, adjusting its color while also controlling its saturation and lightness.
To use the Hue/Saturation adjustment, create a new Adjustment Layer by clicking on the Adjustment Layer icon at the bottom of the Layers panel. From the menu, choose Hue/Saturation. In the Properties panel that appears, you’ll see three sliders: Hue, Saturation, and Lightness.
The Hue slider lets you change the overall color of the selected object. Moving the slider to the left or right will shift the object’s color along the color spectrum, making it appear red, green, blue, or any other color. You can also adjust the Saturation slider to make the color more vibrant (increasing saturation) or more muted (decreasing saturation). The Lightness slider allows you to make the object lighter or darker, adjusting the brightness of the color.
This method works especially well when you want to change the color of an object to something completely different, such as turning a green apple into a red one. However, if the object has multiple colors or shades, you may need to mask the effect to ensure that only the desired areas are altered.
Selective Color Adjustment
Another excellent way to change color in Photoshop is using the Selective Color adjustment layer. This tool gives you more control over different color ranges in your image. It allows you to target specific colors and adjust them separately with ease. This is a great option when you want to change one element’s color only. For example, you can turn a red shirt blue without changing other colors in the image.
To use the Selective Color adjustment, add a new Selective Color adjustment layer. In the Properties panel, you will see several color options, such as Reds, Yellows, Greens, and more. These options let you choose which color range you want to adjust.
If you want to change a red object to blue, start by selecting Reds from the dropdown menu. Next, gently adjust the Cyan, Magenta, Yellow, and Black sliders to get the perfect color. Adjusting these sliders shifts the object’s color without changing the rest of the image.
The Selective Color adjustment layer is very useful for changing specific colors only. It lets you tweak color parts without affecting the entire image. For instance, you can add a little yellow to a red object easily. Similarly, you can adjust how much blue appears in the shadows. This tool gives you precise control for professional-looking color edits.
Color Replacement Tool
For a more direct approach to change color in Photoshop, you can use the Color Replacement Tool. This tool allows you to directly paint over the existing color with the new color of your choice. It is ideal when you want to make more localized color changes on your object.
To access the Color Replacement Tool, select the Brush Tool in the toolbar and then choose Color Replacement Tool from the dropdown menu at the top. In the options bar, you can adjust the size of the brush and the tolerance (which controls how closely the replacement color matches the surrounding areas).
With the tool selected, simply brush over the object you want to change. Photoshop will automatically replace the old color with the new one you’ve selected. Keep in mind that this tool works best for objects with uniform colors. If the object has complex gradients or multiple colors, you may need to refine the edges and make additional adjustments to avoid color bleeding.
Using the Replace Color Command
If you are looking for a quick and effective way to change color in Photoshop, the Replace Color command is a great option. This feature allows you to select a color range and replace it with a new color.
To use the Replace Color command, go to Image in the top menu, select Adjustments, and then click on Replace Color. In the Replace Color dialog box, use the Eyedropper Tool to click on the color in the image that you want to change. You can adjust the Fuzziness slider to increase or decrease the range of colors that are selected.
Once the color is selected, use the Hue slider to change the color. You can also adjust the Saturation and Lightness sliders to fine-tune the replacement color. This tool is particularly helpful when you need to replace one specific color in the image without affecting the rest of the scene.
Refining the Edges and Masking
After changing the color in Photoshop, you may notice that the edges of the object appear rough or unnatural, especially if the color change is drastic. To fix this, you can refine the edges using the Refine Edge tool or create a layer mask.
To refine the edges, select the layer mask thumbnail in the Layers Panel and use the Brush Tool to paint with black to hide any unwanted color, or white to reveal areas that were accidentally masked out. A soft brush with low opacity is recommended for smooth transitions.
If you find that the color change has affected areas you didn’t intend to alter, you can easily mask the adjustment layer to protect the rest of the image. Click on the mask icon next to your adjustment layer and use the brush to paint over areas where you don’t want the color change to apply.
Creating Natural Color Changes
Changing color in Photoshop is a fantastic tool, but it’s important to keep the colors looking natural. Simply adjusting the hue can make an object look artificial or out of place. To make the new color fit well, pay attention to the object’s lighting and shadows so it blends smoothly with the rest of the image.
If you’ve changed the color of a product or an item with texture, consider adding shadows or highlights that match the new color. You can use the Dodge Tool to lighten areas or the Burn Tool to darken them. These tools allow you to add realistic light and shadow effects to your object, enhancing the overall look of the image.
Another important tip is to adjust the Blend Mode of your adjustment layer. Some blend modes, such as Soft Light or Overlay, can create more natural transitions between the new color and the existing tones of the image. Experiment with different modes to find the best look.
Conclusion
Changing object colors in Photoshop is a powerful and versatile way to improve images. Whether you work on product photos, design projects, or personal photography, it enhances results. With Photoshop’s robust set of tools, such as the Hue/Saturation Adjustment Layer, Selective Color, and Color Replacement Tool, you can easily change color in Photoshop and create stunning, professional-looking results.
By mastering these techniques, you gain the freedom to transform the colors in your images quickly and effectively. With practice, you’ll be able to make color changes with precision, ensuring that your images look seamless and visually striking. So, open up Photoshop, start experimenting, and discover the endless possibilities that come with learning how to change color in Photoshop.


