

“Top Jewelry Photography Tips for Sparkling Results” is your best manual for using professional photography methods to capture the brilliance and grace of great jewelry. Whether your business is a jewelry brand owner, a product photographer, a do-it-yourself seller on Etsy or Shopify, this article provides tested techniques to highlight your items in the best light.
Using both professional cameras and cellphones,
you’ll learn how to highlight sparkle, cut unwanted reflections, and produce amazing images. This book addresses every element to help your jewelry stand out online, including lighting configurations, model shots, post-processing, and macro lenses.We agree—you want your jewelry to sparkle online! Especially with lighting, reflections, and complex details, catching the actual genius of your works can be challenging. Not to worry though; we have you covered.
Jewelry Photography Tips for Creating Stunning Product Images
Great jewelry sales depend mostly on beautiful product images. Online customers rely just on visual appeal; they cannot touch or try on your creations. Here, Jewelry Photography Tips becomes quite important.
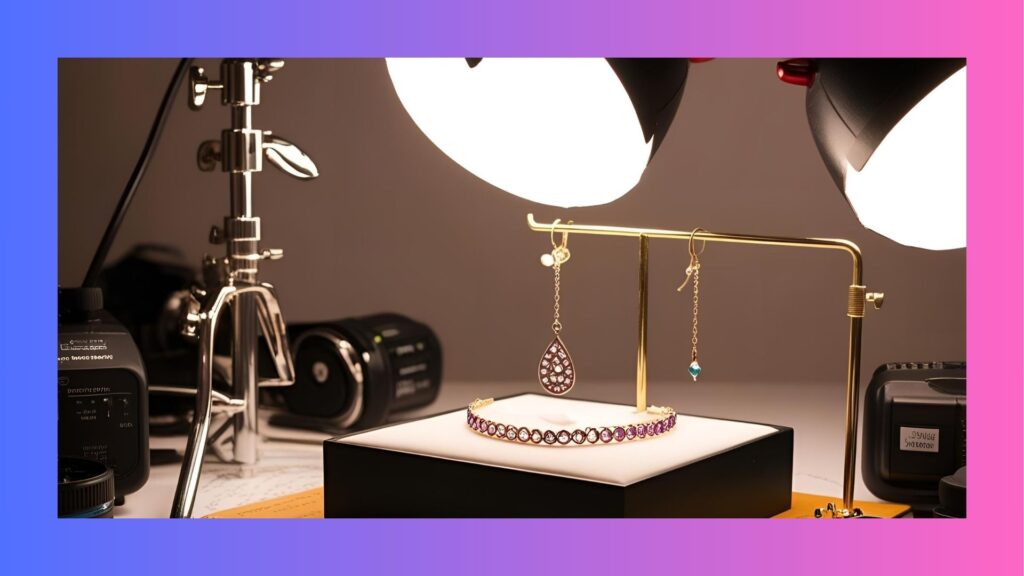
Start with a neutral backdrop, say white or light gray. This lets your jewelry take front stage free from distracting elements. Still another important consideration is soft, diffused lighting. Steer clear of strong shadows and equally light the piece using a lightbox or softbox.
For a straight-on view, point your camera parallel to the product. Add subdued accessories—such as an acrylic riser or velvet pad—to provide depth without overpowering the shot.
Good quality product photography can increase conversion rates by up to 30%, claims a 2024 BigCommerce research. You can’t ignore that statistic.

Jewelry Photography Tips to Capture Sparkle and Shine
Especially with diamonds, crystals, and gemstones, catching the natural sparkle of jewelry can be difficult. You have to find the right mix between lighting and angles to show the shimmer without overexposing your shot.
- Set up a single-point light source. This allows you to create deliberate glitter and reflections. Team this with a reflector or white card to soften shadows and bounce light back onto the jewellery.
- Set up a tripod. Crisp images catching fine sparks depend on stability. Even the smallest movement can cause blurriness that compromises brilliance.
- Shoot with a small aperture—f/16 or higher to obtain better depth of field. This stresses every element since it guarantees perfect attention on the whole production.
Choosing the Right Camera
Jewellery photography is much improved by the correct camera. Although current cellphones are amazing, a DSLR or mirrorless camera provides unparalleled control and image quality.
Advised cameras:
- Exceptional detail with full-frame accuracy in Canon EOS R5.
- Excellent dynamic range of the Nikon Z6 II makes it perfect for catching metal textures.
- Excellent low-light performance, ideal for studio setups, Sony A7 III
Search for a camera having RAW format shooting, macro capabilities, and manual mode. Since RAW files preserve all image information, post-processing is flexible.
To reduce motion blur, pair your camera with a tripod and remote shutter. Keep ISO low—between 100 and 200—to prevent grain.
Not every company has a high-end DSLR on hand. Fortunately, modern cellphones have great cameras that, with proper use, can produce professional-grade jewelry images.

Jewelry Photography Tips using smartphones
Employ natural lighting: Shoot close to a window or in shaded daylight to reduce strong shadows and reflections. Natural light enhances the real colors and sparkle of the jewelry.
Control Your Camera: Especially in close-ups, use a tripod or set your phone on a steady surface to prevent motion blur.
Choose a backdrop cleaner: Keep the background simple; soft neutral colors or white, black tones look great. This highlights the free from outside distractions jewelry.
Click here to focus and change exposure: Tap the jewelry to focus and slide to change exposure on the camera of your phone. This guarantees well lit and sharp work.
Change gradually: Edit programs can alter brightness, contrast, and sharpness. Steer clear of over-editing; keep the jewelry looking natural and sensible.
Reflective Surfaces and Metals
Reflective metal photography such as that of gold, silver, and platinum presents difficulties because of glare, unwanted reflections, and overexposure. These jewelry photo tips will help you overcome these challenges:
- Create soft, evenly light using a diffusion tent or lightbox.
- To avoid showing up in reflections, wear black or neutral-colored clothes.
- Around your arrangement, use white foam boards to control bounce light and remove hot spots.
- On your lens, try polarizing filters to cut reflections and glare.
Though not too shiny, keep your metal jewelry polished. Under studio lights, matte surfaces often show better.
75% of consumers say, according to Shopify, that more than descriptions, product photos affect their purchase choice. One must get metals just right.

Jewelry Photography Tips to Highlight Diamonds
Diamonds need light—just not too much. You have to know how light moves across a diamond if you are to exhibit brilliance and fire.
Aim a small LED light or penlight at several angles until you find best sparkle through your camera. Get several pictures from several angles.
Bring contrast by using black reflectors and let diamond facets come to life. Black cards laid next to the piece provide diamonds their characteristic “edge glow.”
Keep the background understated and let white balance capture the actual color of the diamond.
Bonus Tip: Often seen in luxury catalogs, shot floating-style images using tweezers or prop the ring on an acrylic block.
Post-Processing Flawless Edits
Professional editing is even beneficial for the best raw images. Your photos move from good to amazing in post-processing. These ideas for jewelry photography tips center on color correction, detail enhancement, and background cleanup.
Important Editing Processes:
- Using the healing tool, clear dust and imperfections.
- Boost clarity just to highlight gem facets.
- Change the color balance so stones and metals reflect their actual colors.
- For realism, soften shadows; brighten highlights for sparkle.
Use Lightroom or Adobe Photoshop, professional programs. Outsourcing to a reputable editor like Image_Expert_India guarantees consistency and saves time for batch edits.
Their jewelry photo retouching consists in:
- Elimination of background
- Natural shadow production
- Enhancement of diamond sparkle
- Path services for clipping
Well-edited images inspire more luxury and trust, so increasing buyer confidence.

How to Use Natural vs. Artificial Light
Lighting either highlights or underlines a jewelry photo. Achieving pro-level results requires an awareness of how to balance artificial and natural light.
Advice Regarding Natural Lighting:
- For soft, equal light, shoot close to a north-facing window.
- To reduce strong shadows, use white curtains as diffusers.
- Perfect for social media or lifestyle-related material.
Artificial Light Advice:
- Invest in ring lights or daylight-balanced LEDs.
- Full control and consistency come from lightboxes and softboxes.
- For depth and glitter, position lights at 45-degree angles.
Use both as needed. For excellent results, for instance, mix natural light with soft LED fill light.
Statistically, consistent lighting builds customer confidence; customers are 60% more likely to buy when product images reflect reality.
Jewelry Photography Tips Macro Lenses
Capturing the minute detail of small objects calls both macro lenses. You won’t lose clarity while concentrating tightly on diamonds, prongs, and engraving with them.
Suggested macro lenses:
- RF 100mm f/2.8L Macro Canon
- f/2.8 MacroNikon 105mm
- Sony FE 90mm f/2.8 Macro OSS
When shooting with a macro lens:
- Use a tripod to prevent camera shake while macro lens shooting.
- For deep focus, set a limited aperture—f/16 or above.
- Manually concentrate for accuracy.
Macro photography highlights workmanship, so strengthening brand reputation and enabling consumers to make informed decisions.

Creating Shadows: Jewelry Photography Tips for Realistic Results
shadows give jewelry photography tips dimension and realism. The correct shadow technique helps your pieces avoid artificial or flat appearance.
Shadow kinds:
- Great for realism, natural shadow reflects actual placement.
- Often used in e-commerce for neat presentations is drop shadow.
- Particularly for luxury jewelry, reflection shadow lends grace.
- Directions of lighting will help to produce soft, natural shadows.
- Steer clear of several light sources that might cast contradicting shadows.
Perfect shadows and improve realism using Photoshop or professional services like Image_Expert_
India.
Common Mistakes to Avoid in Jewelry Photography
Avoiding common pitfalls can drastically improve the quality of your images. Here are Jewelry Photography Tips focused on what not to do:
- Avoid harsh lighting that causes overexposure.
- Don’t rely on the camera flash, which can create glare.
- Unclean jewelry can ruin a shot—always clean pieces beforehand.
- Busy backgrounds distract from the product.
- Shooting without a tripod leads to blurry images.
Also, over-editing is a common trap. While enhancements are great, overly brightened or artificial images can mislead buyers and hurt brand trust.
Lighting Angles and Jewelry Photography Tips for Maximum Shine
The final shot shows how much sparkle and texture your light source angles allow.
Lighting Angle Advice for Jewelry Photography:
- Position lights to avoid flat lighting between 10 and 45 degrees.
- For translucent stones, create glow using backlighting.
- For highlights in hammered or engraved metal, try side lighting.
Try putting your light behind, beside, or above the product. Always view reflections through your camera lens.

Jewelry Photography Tips for Working with Models and Lifestyle Shots
Using models helps shooting jewelry to have emotional appeal and background. It speaks to scale, fit, and the way the work catches the way of life behind a product. For success with model-based sessions, these are fundamental jewelry photography tips:
Use natural stances: Steer clear of forced, stiff images. Experiment with elegance and sincerity.
Stress the jewelry: a shallow depth of focus (f/2.8 to f/5.6) helps to blur the background so maintaining the piece in focus.
Choose models with skin tones that complement the jewelry: Choose models whose skin tone brings out the jewelry. Yellow gold looks striking for warmer tones; silver balances cooler tones.
Use soft lighting and capture during golden hour for images depicting an outdoor life. To control shadows for inside views, position models near large windows using reflectors.
Pro Tip: Keep style understated—neutral clothing, basic makeup, and clean nails so the jewelry takes front stage.
Advanced Jewelry Photography Tips for Professional Results
These sophisticated jewelry photography tips can improve your images for those wishing to stand out in competitive markets or scale their company:
- Stack items with focus to For ultra-sharp detail across the whole work, combine several images taken at different focal points.
- 360-degree photography lets consumers see jewelry from all sides—perfect for online stores.
- For real-time previews and changes, tethered shooting links your camera to a computer.
- For depth and elegance free of distraction, use gradient backdrops.
To guarantee color accuracy, make investments in color calibration instruments including the X-Rite ColorChecker.
Frequently Asked Questions (FAQ)
Q1: What is the best camera setting for jewelry photography?
A: Use manual white balance, a low ISO (100–200), a small aperture (f/11 to f/16). Raw shooting will improve editing flexibility.
Q2: How do I get rid of reflections on jewelry?
A: Put polarizing filters and a lightbox first. To prevent reflecting in the work, arrange your lights carefully and dress in neutral colors.
Q3: Can I use my phone for professional jewelry photography?
A: Absolutely! Especially when combined with post-processing treatments, modern smartphones with manual controls, good lighting, and editing can produce outstanding results.
Q4: What background is best for jewelry photography?
A: White is the standard color used in e-commerce, but black, grey, and pastel tones accentuate particular metals and stones. Key is consistency over your range of products.
Q5: Should I use natural or artificial lighting?
A: Depending on the situation, both go rather nicely. Artificial light allows you control and consistency; natural light is soft and pleasing.
Conclusion
Your photography needs to be as brilliantly as your products if you are to succeed in the cutthroat realm of jewelry sales. Using these Jewelry Photographytips will help you to improve your visual brand from selecting the correct camera or smartphone configuration to mastering post-processing and lighting angle correction.


