

Photoshop shadow under the object-First, select the object you want to shadow. Determine in which direction it should fall. The laws of natural lighting must be observed, because if the shadow is made unnatural, it will ruin the whole picture.
HOW DO I CREATE A PHOTOSHOP SHADOW UNDER OBJECT?
Open and upload the selected image you want to shadow. Track down the thing ” File » – > « Open… ” (File – > Open).
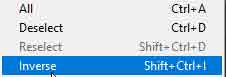
Use the ” Magic Wand ” tool to select an item. Hold down the Shift key and left-click on the white background. Then find the ” Highlight ” item, click it, and select ” Inversion.”
After that, the selected item must be copied to a new layer. To do so, left-click on the layer and select ” Duplicate Layer” or use the “Ctrl + J” keyboard shortcut.
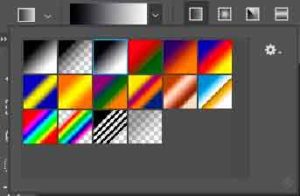
Go to the newly created layer. Select ” Gradient Tool ” on the left half of the select bar . Select ” Black and White ” in the gradient selector. Fill the shape vertically with a bottom-up gradient.
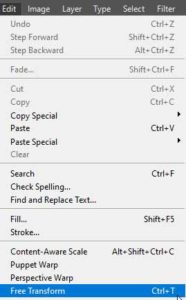
Likewise, by and by, in the ” Edit ” menu, select the ” Free Transform ” instrument. Hold down the Ctrl key, click at the top of the selected frame, and drag it to the desired side to give the shadow a natural slope.
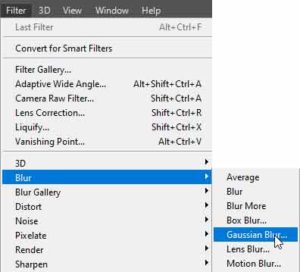
To blur the outline of a shadow, go to ” Filter ” -> ” Blur ” -> ” Gaussian Blur ” from the menu. Adjust the blur to suit your needs.
To remove an “excess” shadow, go to the layer with the original image, select the ” Eraser ” tool, and adjust the outline of the shadow very carefully.
Learn how to add shadows to Photoshop CC 2022 photos.
- You can Repeat this example in some other form of the program utilizing comparable tools. This is most often the case when moving an object to another background and making the image more realistic.
- The first thing to choose is the area to be transferred to the second background. You can pick it some way you like.

- We get a new layer with the image of cut-out fairy-tale characters.
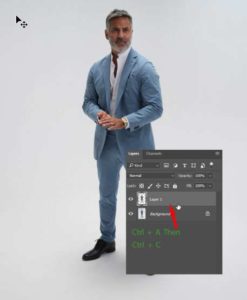
- In the newly created layer, press Ctrl + A to select the entire image. Copy it to the clipboard by pressing Ctrl + C.
- Let’s move on to the picture we want to transfer Pinocchio and the turtle to.
- Paste your objects on it by pressing Ctrl + V, scale as needed.
- We have transferred the image of fairy-tale characters, now we have to give reality to the new composition.
- Make a copy of this layer by pressing Ctrl + J.
- Now we create a shadow, taking into account the direction of the falling light. Go to the middle layer and hold down the Ctrl and T keys. A free conversion frame appears.
- Hover over the anchor point in the center of the top of the frame, hold down the Ctrl key and drag right and down, trying to keep parallel to the existing shadows.
- We get the following figure: the primary layer with the image of the dolls, which is used as a shadow, is placed on the ground with a transformation parallel to the natural shadows, and its copy remained unchanged and is used as the main image. Press the enter key.
Next, we need to shade the colored blank in shades of gray. Hover over the thumb

nail of the layer with the desired shadow image, hold down the Ctrl key and left-click on it. Our hitherto colored shadow stands out.
After that, fill the selected area with a black and white gradient. To do so, click the Latin letter “G” or select “Gradient” from the toolbar.

Click on the LMB gradient palette in the toolbar, the “Gradient Editor” will be highlighted. Select the “Black, White” gradient, shift the continuous color and color center 95% to the right. Click “OK.”
Also check that the gradient is linear, “Normal” mode, 100% opacity.

Go down to the image and, starting from the base of the shadow, holding down the LMB, draw a gradient at the top.
Deselect it by pressing Ctrl + D and we will get

In the Layers panel, the layer set to Instant Mask mode is highlighted in red. And now we extend the gradient, on the contrary, from the top of the reflection to its base.
Part of the image turns red and is denser at the top than at the bottom.
Turn off “Quick Mask” mode by pressing the “Q” key or clicking the icon in the toolbar. We get our choice, which must be blurred using the Gaussian Blur filter.
Go to the “Blur” line in the “Filter” menu and select “Gaussian Blur”.
Select about 4 pixels in the blur settings window (the value depends on the image size), click “OK”. Deselect by pressing Ctrl and D at the same time.
To make our shadow less contrasting and naturally fit the landscape, change the layer’s blending mode to Multiply and select 60 ÷ 80% opacity.

But it is still clear that the shadow we created has been torn from their owners and they have somehow been left hanging in the air.
Here’s how to fix this: Hold down Ctrl + T on your shadow layer, and call Free Conversion.
Hover over the shadow image in the conversion frame, hold down the LMB, and drag it to the owners’ feet.

To position the Photoshop shadow under the object pattern more precisely, move the mouse cursor over the transformation area, short-click on the RMB, select “Distortion” from the list of functions displayed, or click the icon to toggle between free transformation and distortion. modes.
A deformation grid is placed in the transformation area, which allows the LMB to be held down by hovering the mouse cursor over a certain network area, deforming it, changing the image accordingly. When you have reached the exact position of the shadow, press the enter key.
And for all to finally believe that the statues were here and standing, we dipped them in the grass. Go to the top layer, hold down Ctrl and click the LMB icon. Our heroes stand out. At the bottom of the layer’s palette, click the “Add Layer Mask” icon LMB, we get the following structure.
Go to the LMB by clicking on the mask, pick up the stamp by pressing the “S” key, select the grass bush from the brush set and shoot the green ones around the turtle paws and Bratina boots.
- The result is such a picture.

- Enjoy your creative success!
- If you don’t want to miss out on interesting photo editing tutorials, subscribe or Visit to our website www.imageexpertindia.com.
- The order form is below.
- As you know, you can create a lot of beautiful effects for your photos and pictures in Photoshop.
In addition, the program takes the opportunity to beautifully design individual objects and sections of photos.
You can draw your own image and Photoshop shadow under the object, if you don’t have enough experience, you can easily find pictures on any subject on the Internet. Such images are called clip art. Their main feature is that they all have a transparent background so that they can be inserted into a page of any color and look harmonious and beautiful. Note that the JPG format does not support the transparency of the background in the image, so select files with the extension PSD, GIF, or PNG.
You can immediately check the transparency of the background by opening the clip art you downloaded in Photoshop, while the transparent background looks like small grayish-white squares.
Now you can learn how to obscure an object in Photoshop.
METHOD ONE
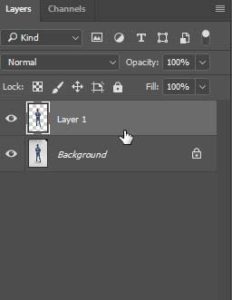
Open the file in Photoshop and you’ll see its name in the lower-right window, called the layer. Press the menu button at the bottom of the Layers window to create a duplicate layer (hover over the button so that you don’t have a problem) or use CTRL + J.
Select the object along the outline with the mouse and hold down the CTRL key on your keyboard, then click the next shadow layer button.
Now fill the selected tea with black filling. To do this, press ALT + Backspace together and you will see the result immediately.
To blur the outline of the shape, open the “Filter” menu section and go to the “Blur” sub-menu. In the window that opens, select the “Gaussian Blur” tab. Select the required pixel size from the “Radius” menu – one and a half to fifteen. In this case, you will immediately see the result in the preview window. When you have reached the desired result, click “OK”.
Move the shadow behind the object, swapping layers.
Right-click the shadow layer and press CTRL + T. After that, the distortion turns on, which is immediately visible in the drawing as a frame around the object, and has three anchor points on each side of the image, in the corners and in the center.
Hold down the CTRL key and move the center of the image’s top node to give the image the most natural shape for the shadow, focusing on the image’s lighting. If the photo is illuminated from above, adjust the shadow to a length shorter than the subject and vice versa.
Also adjust the slope of the shade according to the lighting. When everything is set, press “Enter”.
Now lighten the shadow by reducing the opacity value in the layers window to about 60 percent. Play with this value, taking into account the background and colors of your image.Photoshop shadow under the object are perfect.
HOW TO SHADOW AN IMAGE IN PHOTOSHOP IS ANOTHER METHOD
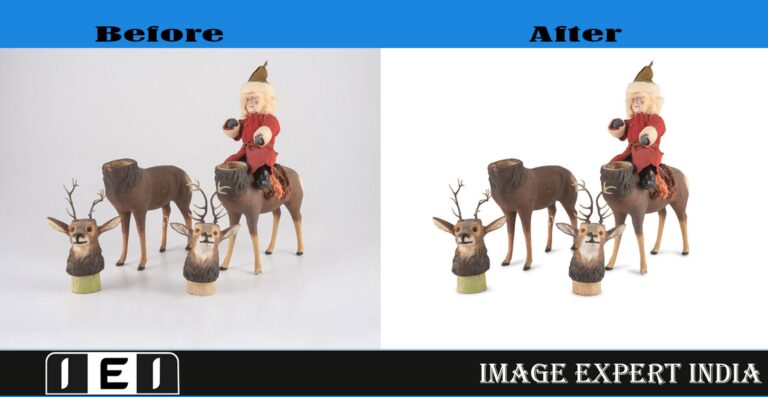
For this method, we’re considering a method that allows you to overshadow an image with a white background in Photoshop (so it’s clearer).
Open a photo with a white background.
Select an item using the shortcut tool or quick mask.
Make two copies of this layer (keyboard shortcuts Ctrl + J).
First, process the top layer (highlighted in the image above). Go to the “Perspective” tool in the “Transform” line of the “Edit” menu.
Hover over the top mark in the middle and move it to the right as you can see in the image below, then press the center.
Now we need to level our duplicate – select the free conversion tool from the same menu item and move the center of the top square down as shown below and press the center again.
Decrease the brightness of the reduced and smoothed duplicate by opening its settings in the “Image” – “Correction” menu.
Now blur this layer. Click the “Filter” menu item and select “Blur” and then “Gaussian Blur.” The radius is set to eight pixels. With high resolution, you can further increase blur.
Go to the Layers panel and drag the middle layer to the top with the mouse.
Here’s what you should end up with.
However, the shade seems too unreal due to its dirt, so let’s make it brighter.
Go to layers and set 45 percent opacity.
Well, now everything seems more real.
In this example, the shadow does not represent the actual shape, but the nature of the object you want to emphasize. You can see what’s going on by looking at the image below.
I think you get the point. There can be many examples – it all depends on your imagination.
How to make such an interesting effect in Photoshop?
Open two drawings or photos in the program. One is the one you want to cast a shadow on, and the other is the one you want to cast a shadow on.
The image you want to cast a shadow on can even be of poor quality because it is used as a template.
Delete the background image in the shaded image and create it in a new layer similar to the shots described above, if the shadow is too dark, lighten it. You can also set the blur for realism.
Now copy and move this background-cleaned and processed image to the main photo. If the size of the shadow is very large, reduce it by applying a transformation effect (go to the “Edit” menu item, select “Transform” and then “Scale”).
Since our shadow should be behind the object and at the top of the background, select the object using the shortcut tool or quick mask and duplicate it to create a new layer. As a result, you achieve the desired effect.
Well, you’ve learned how to create a shadow on an object or object in an image in Photoshop. You will be able to pleasantly surprise not only your relatives and friends, but also your immediate superiors, who will definitely appreciate your new skills.
VIDEO LESSONS
Anyone who works with a graphic image quite often needs to add a shadow to the image. Someone needs to add clip art to the picture. Someone cut an object from a photo and pasted it into another background. The image is more realistic by adding a shadow to the inserted image.
Photoshop shadow under object may look different. Its appearance depends on the light source, how the source is positioned relative to the object. When creating a collage of different parts of a photo, you need to look carefully at which fragment has the lighting. And where the shadows, if any, fall, of course.
The easiest way to create a shadow on a flat object raised above the surface in Photoshop. Moreover, it is located parallel to the surface. To do this, use the Drop Shadow effect. More on that.
HOW DO I CREATE SHADOWS IN PHOTOSHOP?
This shadow is usually a shadow of text raised above the surface. If you have any desire to feature it, give it a volume impact. All you have to do is place the object from which the shadow falls on a separate transparent layer. For this layer, set the Drop Shadow layer impact and that is all there is to it. This layer casts a shadow on the layer underneath.
To apply a layer effect in Photoshop, double-click the layer name. In the Layer Style dialog box, select Drop Shadow (in some versions of Photoshop, this term is translated as an outer shadow).
To get the standard shadow, as in the image, to one side and somewhat beneath the text, set the accompanying boundaries:
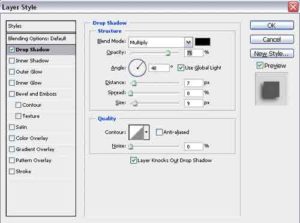
With other parameters
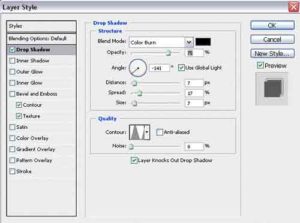
second result:
Take a stab at exploring different avenues regarding the settings in this exchange and get your choices.
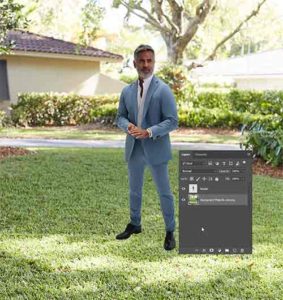
But this is the easiest option, but how to make a shade for a standing person on the ground? This impact is much of the time only important to make it look practical Photoshop shadow under the object.
HOW TO DRAW A PERSON SHADOW IN PHOTOSHOP ?
The cast shadow follows the form of the article, however not actually, yet misshaped. When light falls vertically from above, it stays small below the subject. If it is a man’s shadow at noon, it is under his feet. When the sun goes down, the shadows are long, elongated.
Try creating a shadow from a person using this tutorial. You can use these pictures.
Open a wooden photo. In this photo, the main light comes from the left, so the shadow stays on the Right.
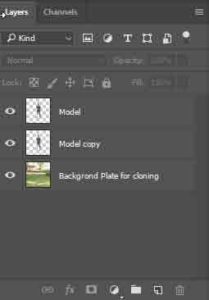
Double-click a layer to open it. OKAY. Using any appropriate selection tool, you must select the object you want to shadow and copy it to a new transparent layer. In this case, the background is smooth, so the easiest way is to select the background with the Magic Wand tool and then choose> Inverse. The human figure is highlighted. Copy the cooks to a new layer (you can use the shortcut key).
Create a new layer without deselecting it (Ctrl + N). Go to it and fill in the selection in black. Name this layer Shadow.
The result should be three layers. The bottom layer is the original image, the background layer, we don’t touch it. The background of this photo is just white, so you didn’t have to worry about preserving it. However, you may have a different background and you need it. The shadow ought to be over the foundation layer, yet beneath the individual.
If you don’t have the same layer order, just drag it to the desired location.
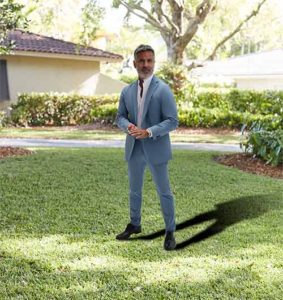
For the shadow layer, set the opacity to 60%.
Apply the Transform command Edit> Convert> Distortion (Edit> Transform> Distortion). Move the markers to the side and down to “put” a shadow “on the floor or other surface. Be careful not to let your feet come off. If it doesn’t work perfectly, there’s nothing you can do with an elastic band.
If the shadow is natural, end the conversion by pressing the enter key.
Create a layer mask – Click the button at the bottom of the Layers palette (Layers).
Make sure the mask is highlighted. Draw a gradient from the top right corner (or any side with a shadow) to the bottom left corner. What is it for? The shade is denser at the bottom of the legs and the farther, the brighter. The gradient fill mask hides the top of the shadow slightly.
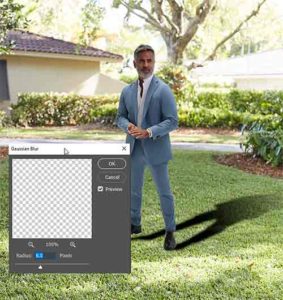
Finally, apply Filter> Blur> Gaussian Blur and specify the desired blur for the shadow layer.
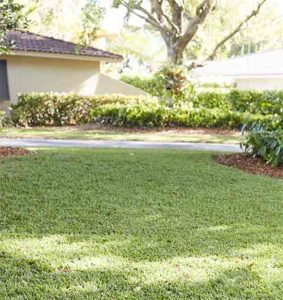
And if it is necessary to put the shade not on a uniform background, but on the grass, for example?
Our shade is translucent, the grass shines through it a bit. Layers are used to make this realistic. For a shaded layer, set to Soft Light or Multiply if the shadow should be contrasting.
Here is the result:
USE SHADOWS TO CREATE AN INTERESTING EFFECT ON A PHOTO.
The idea is that the shadow does not correspond to reality, but reflects the nature of the object.
For example, a big boss is sitting on a chair and there is a joker on the wall with a hat. Or, the person in the photo smiles friendly at the other person and his or her shadow looms menacingly over him or her.
Open two photos in Photoshop, one to add a shadow effect to, and one we decided to make a shadow. We will use another photo as a template so you can take any quality picture.
To create a shadow, remove the background from the image and create it on a new layer as above.
Then copy the created image to the first photo. Photos may vary in size, so use Edit> Convert> Scale Transform to fit.
The shadow ought to be over the foundation layer, however below the individual. Therefore, the object itself must be selected in any suitable way and duplicated in a new layer.
Here is the result.
In this tutorial, we create an intricately shaped wooden shade.
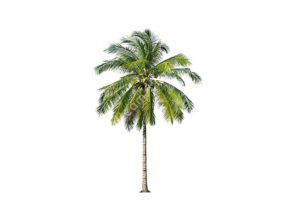
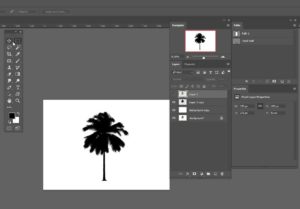
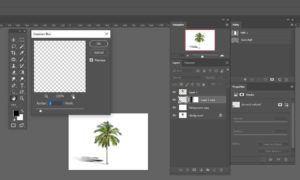
- Open the tree image. Cut it out and include it in your working document. Duplicate layer (Ctrl + J)
- Name the duplicate layer “Drop Shadow”. Apply the Multiply mode to it. Also apply the overlay style Color Overlay> Black and set the fill to 98%.
- Then choose Edit> Convert> Offset (Edit> Convert> Skew). You will see a frame and a target icon in the middle. Move the center along the tree. Then change the layer to achieve the desired shading angle (determined by the direction of the light).
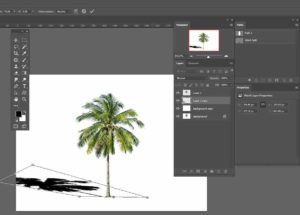
- Suppose the sun is shining on the right. This can be understood by looking closely at the trunk: the right side of the tree is brighter than the left. So the shadow should fall to the left, to the ground.
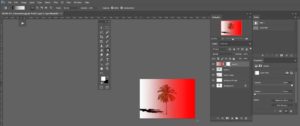
The shadow should be darkest at the bottom and the farther away from the subject, the brighter it should become. This means that we need to soften the shadow smoothly. We use an instant mask for this.In Quick Mask mode, draw a linear gradient in black and white.
Switch back to normal mode (press again), the mask will disappear, but the selected area will remain.
All you have to do is press the Delete button.
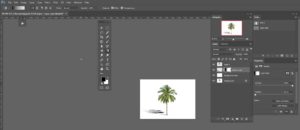
- Use Curve to lighten the shadow a little more by pressing Ctrl + M (Image> Adjustment> Curves).
- If there is an object on the ground where the shadow of a tree falls, the shadow should go around or over them.
The longer the shadow, the more it expands and is cloudy in its light part.
Also keep in mind that the farther away a shadow is from an object, the more blurred its edges will be (the appearance of a “vignette”).
To do this, select the desired area and apply a bracket (select [Options]> Bracket [Feather]), then add a mask. (Approximate translation.)
You can also use Gaussian blur to lighten the shadow.
- Our tree is ready for transplanting. Since we do not place the trees on a flat but in a mountainous area, there are also drops in the shade that need to be adjusted.
You can make all the necessary adjustments using free conversion (Ctrl + T). Thats why Photoshop shadow under the object are more important.


