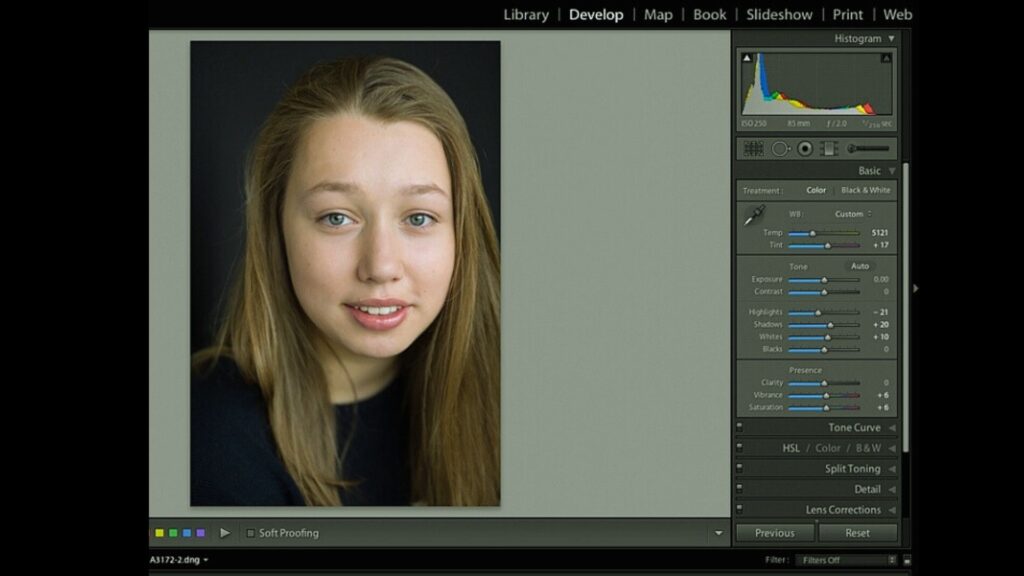
Headshots are more than just simple portraits. They represent a person’s identity, professionalism, and personal branding, especially in today’s visual-driven world. Whether you’re photographing corporate professionals, actors, or influencers, the ability to deliver sharp, engaging, and polished headshots is crucial. Adobe Lightroom is one of the best tools for enhancing headshots, providing powerful yet intuitive features that can elevate your photography to a professional level.
In this article, we’ll cover essential Lightroom techniques to transform your headshots and bring out the best in your subjects.
Begin with the Right Exposure Settings
A great headshot starts with good exposure. When working with RAW files, Lightroom’s Basic Panel allows you to recover shadows and highlights while maintaining image quality. Start by balancing the overall exposure and ensure your subject’s face is well-lit.
- Exposure Slider: Adjust the slider to ensure the subject is neither too dark nor too bright.
- Highlights & Shadows: Pull down the highlights if the image has blown-out areas, and lift the shadows to bring detail back into underexposed parts.
Balancing these elements early on ensures that you have a solid foundation for the rest of your edits.
Perfect White Balance for Natural Skin Tones
White balance can make or break the natural look of a headshot. Too warm, and your subject’s skin may appear orange. Too cool, and it may look pale or sickly. Lightroom offers simple, effective tools to adjust this.
- Use the Eye Dropper Tool: Click on a neutral gray area of the image to set the correct white balance automatically.
- Fine-Tune: Manually adjust the Temperature and Tint sliders to ensure skin tones look true to life. Warmer tones tend to work better for headshots, as they provide a healthy and inviting appearance.
Crop and Straighten for Impactful Composition
Before diving into detailed edits, crop and straighten the image to focus on your subject. Lightroom’s Crop Overlay tool is an easy and efficient way to do this.
- Aspect Ratio: For professional headshots, stick to a 4:5 or 1:1 aspect ratio, which centers attention on the face.
- Rule of Thirds: Use the rule of thirds grid overlay to position the subject’s eyes along the top third line, creating a well-balanced composition.
A clean and well-cropped image ensures that your subject is the focal point of the photo.
Enhance Details with Clarity and Texture
Headshots should emphasize the subject’s best features, and Lightroom’s Clarity and Texture sliders are ideal for enhancing facial details without overdoing it.
- Clarity: Increase the Clarity slider slightly to add contrast to midtones, bringing out subtle facial features without making the skin look harsh.
- Texture: Use the Texture slider to emphasize fine details like hair, eyes, and lips. Be careful not to overdo it, as too much texture can exaggerate skin imperfections.
The goal is to highlight the subject’s best features while keeping the overall appearance soft and approachable.
Soften Skin with Targeted Adjustments
Unlike other portrait editing tools, Lightroom allows you to smooth skin using localized adjustments. The Adjustment Brush and Radial Filter are perfect for selectively softening skin while maintaining overall sharpness.
- Adjustment Brush: Select the brush tool and reduce the Clarity and Texture sliders. Paint over the skin areas you want to soften. Avoid eyes, lips, and hair, which should remain sharp.
- Radial Filter: Use the Radial Filter to apply a soft-focus effect around the face, blending any harsh lines and creating a subtle, flattering glow.
This technique will help you create smooth, radiant skin without losing essential details.
Brighten and Sharpen Eyes for a Lively Expression
The eyes are the soul of a headshot, and Lightroom makes it easy to brighten and sharpen them, making your subject look more alert and engaging.
- Adjustment Brush: Use a new Adjustment Brush with increased exposure and clarity to brighten the whites of the eyes. Be careful not to over-brighten, as this can look unnatural.
- Sharpness: For the irises, increase the Sharpness and Clarity sliders slightly. This will make the eyes pop, giving them more definition and drawing attention to them.
By focusing on the eyes, you enhance the overall impact of the headshot, ensuring it’s eye-catching and vibrant.
Use the Healing Brush for Blemish Removal
Even the best headshots may have small distractions like blemishes or stray hairs. Lightroom’s Spot Removal Tool (also called the Healing Brush) allows you to clean up these imperfections quickly and non-destructively.
- Spot Healing: Select the Spot Removal Tool and click on any blemishes or distractions. Lightroom will automatically sample nearby areas to blend the correction seamlessly.
This tool is especially useful for removing small distractions while preserving skin texture.
Control Highlights and Shadows with the Tone Curve
For more advanced control over your headshot’s light and shadow balance, the Tone Curve offers precision adjustments. This tool allows you to refine contrast, making the image pop without losing detail in the highlights or shadows.
- Highlights and Shadows: Lift the shadow areas slightly to bring out more detail in darker regions, and bring down the highlights to retain texture in bright areas like the forehead or nose.
The Tone Curve gives you granular control over contrast, ensuring that the lighting looks natural and professional.
Add Vignetting to Focus on the Subject
A subtle vignette can guide the viewer’s eye toward the subject by darkening the edges of the image. Lightroom’s Post-Crop Vignetting tool is perfect for this task.
- Post-Crop Vignetting: Go to the Effects panel and use the Post-Crop Vignetting slider to darken the edges of the image. Keep the effect subtle so that it doesn’t distract from the subject.
Adding a vignette is a great way to frame your subject and ensure that the viewer’s attention is on the face.
Final Color Grading for a Professional Look
Once you’ve completed the basic edits, it’s time to apply some color grading for a professional finish. Lightroom’s Color Grading panel offers advanced control over shadows, midtones, and highlights.
- Warm or Cool Tones: For a more inviting, friendly headshot, apply warm tones to the midtones and highlights. If you’re going for a more formal, corporate look, cooler tones in the shadows can create a sophisticated feel.
- Balance: Use the Balance slider to fine-tune the overall color grade. Aim for subtle adjustments that enhance the mood without overpowering the subject.
Color grading adds the final touch, giving your headshots a polished, professional appearance that reflects the subject’s personality.
Conclusion
Editing headshots in Lightroom is all about refining details and enhancing the subject’s natural features while maintaining an authentic look. From basic exposure adjustments to advanced skin softening and color grading techniques, Lightroom offers a comprehensive set of tools that allow you to transform your headshots into professional-quality images. With practice, these essential techniques will help you produce headshots that not only impress your clients but also stand out in competitive industries.
FAQs
Can I retouch skin in Lightroom, or should I use Photoshop?
You can retouch skin in Lightroom using tools like the Adjustment Brush and Spot Removal Tool. However, for more detailed retouching, such as frequency separation, Photoshop may offer more precise control.
How do I make a subject’s eyes stand out in a headshot?
To enhance eyes, use Lightroom’s Adjustment Brush to increase exposure and clarity around the irises. This will brighten and sharpen the eyes, making them more engaging.
What’s the best way to fix exposure issues in Lightroom?
The Basic Panel in Lightroom provides sliders for Exposure, Highlights, and Shadows. Use these to correct overexposure or underexposure and recover details from both the darkest and brightest areas of the image.
How can I ensure my headshots look natural after editing?
Always apply edits subtly. Focus on enhancing the subject’s features rather than over-editing. Use tools like Clarity, Texture, and Vignetting with restraint to maintain a natural and polished look.
Is it necessary to use color grading on headshots?
While not necessary, color grading can add a professional finish to your headshots by enhancing mood and visual appeal. Subtle color adjustments to shadows and highlights can make a significant difference in the final image.
Experience Perfection: Claim Your Free Trial Today!
Get a firsthand look at our exceptional services with a no-obligation free trial—start transforming your visuals today!


