

The Ghost Mannequin Neck Joint is one of the most critical aspects of the ghost mannequin technique, used primarily in fashion photography. This technique allows you to present garments as if they’re floating, without a visible model or mannequin, offering a clean, professional look. Achieving perfect symmetry in the neck joint is crucial because it makes the garment appear naturally worn while highlighting its design and structure. In this article, we’ll explore how to achieve the perfect Ghost Mannequin Neck Joint, the importance of symmetry in fashion photography, and how to master this technique for e-commerce success.

What is the Ghost Mannequin Neck Joint?
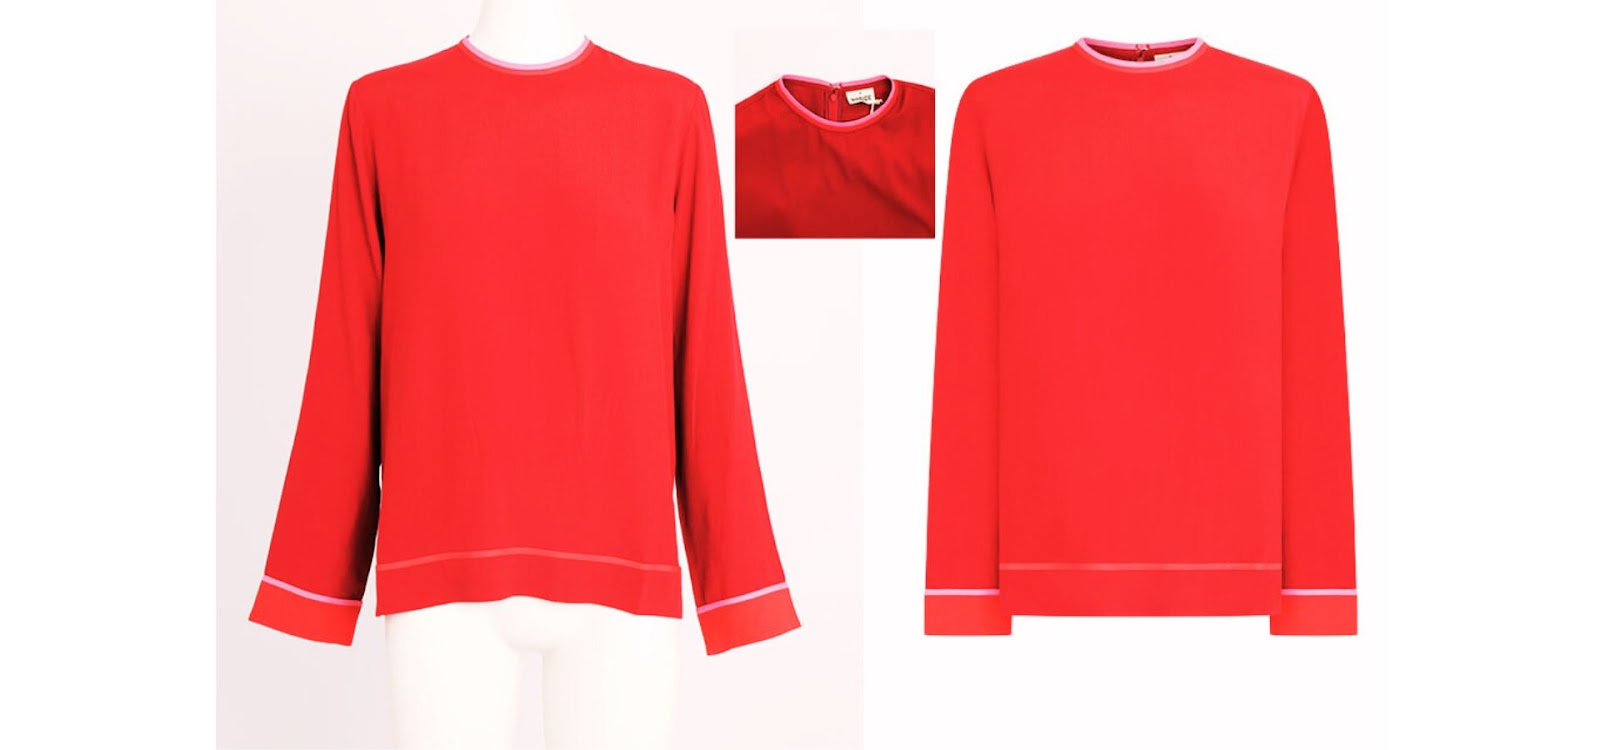
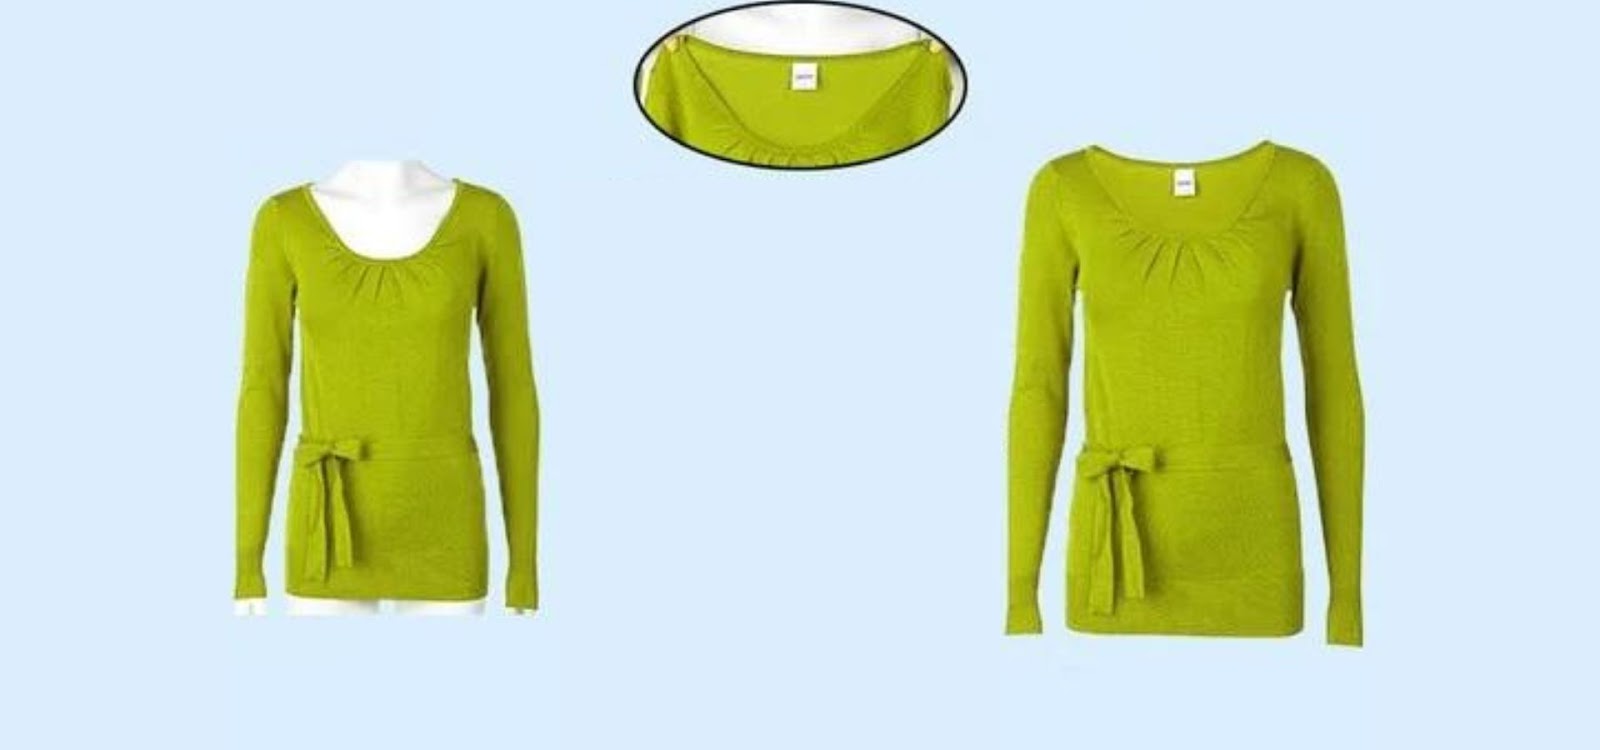
The Ghost Mannequin Neck Joint refers to the part of the ghost mannequin effect where the neckline of the garment is edited to remove the mannequin and create a seamless, natural look. Since the mannequin often supports the garment around the neck, removing the mannequin while keeping the fabric in place can be tricky. Achieving a perfect Ghost Mannequin Neck Joint ensures the garment looks flawless, making it appear as though it is floating naturally. This technique involves careful photography and editing, ensuring that the neckline appears symmetrical and realistic.
Why Symmetry is Essential in Ghost Mannequin Neck Joints
In fashion photography, especially for e-commerce, symmetry is a key element that impacts how appealing and professional a product looks. When you achieve symmetry in the Ghost Mannequin Neck Joint, the garment looks polished and well-structured, giving customers a clearer understanding of its fit and style. On the other hand, uneven necklines or poorly aligned neck joints can make the garment appear misshaped or unprofessional, which could lead to a loss of trust in the brand. Therefore, achieving perfect symmetry in the neck joint is crucial for creating professional-quality Ghost Mannequin Composite Images that boost sales.
Step-by-Step Guide to Creating a Perfect Ghost Mannequin Neck Joint
1. Photograph the Garment on a Mannequin
The first step to achieving a perfect Ghost Mannequin Neck Joint is taking high-quality photos of the garment on a mannequin. Ensure the garment is fitted correctly on the mannequin, especially around the neckline. It’s important to capture both the front and back of the garment, as well as any inside details like labels or inner seams. These will be used in post-production to create the final composite image.
2. Capture the Inner Neckline Separately
In addition to photographing the garment on the mannequin, you’ll also need to take separate shots of the inner neckline. After you’ve taken the primary photos, remove the garment from the mannequin and photograph the inside of the neckline. This step is crucial for achieving a seamless Ghost Mannequin Neck Joint, as it provides the necessary details for creating the illusion that the garment is floating without support.
3. Use Photoshop for Precise Editing
After photographing the garment, the next step is to use photo editing software like Photoshop to remove the mannequin and create the ghost mannequin effect. Begin by aligning the inner neckline image with the front and back shots of the garment. Use layer masks, the pen tool, and other editing tools to carefully remove the mannequin, while ensuring that the neckline remains intact and symmetrical. Precision is key here – the more accurately you edit, the better the Ghost Mannequin Neck Joint will appear.
4. Align the Neckline Perfectly
One of the most important steps in achieving a perfect Ghost Mannequin Neck Joint is aligning the neckline accurately. This involves carefully matching the inner neckline with the outer edges of the garment to create a seamless transition. If the neckline is misaligned, it can throw off the symmetry of the entire image, making the garment look unprofessional. Spend extra time in this step to ensure everything lines up perfectly.
5. Refine and Adjust for Symmetry
Once you’ve aligned the neckline and removed the mannequin, the final step is to refine and adjust the image to ensure perfect symmetry. This may involve making small tweaks to the positioning of the neckline, adjusting shadows, or fine-tuning the edges to create a smooth, natural appearance. At this stage, it’s also important to zoom in and examine the image closely to catch any imperfections that could affect the final result.
Challenges in Achieving a Perfect Ghost Mannequin Neck Joint
Misalignment of the Neckline
One of the biggest challenges in creating a Ghost Mannequin Neck Joint is misalignment. If the front and back images of the garment don’t line up properly, the neckline will look uneven, leading to an unprofessional appearance. To avoid this, make sure to take multiple shots from the same angle and distance, and use gridlines in Photoshop to ensure perfect alignment.
Inconsistent Lighting
Lighting plays a crucial role in how the final composite image turns out. If the lighting is inconsistent between the shots of the front, back, and inner neckline, it can create shadows and highlights that make the Ghost Mannequin Neck Joint look unnatural. Always use soft, even lighting during your photo shoot to ensure that all the images blend together smoothly.
Editing Overlaps
Sometimes, during the editing process, there can be overlaps or gaps in the garment’s edges when trying to align the neckline. These imperfections can distort the shape of the garment, making it look misshaped. To avoid this, use careful layer masking techniques and feathering to blend the edges seamlessly, ensuring a perfect Ghost Mannequin Neck Joint.
Best Practices for Ghost Mannequin Neck Joint Editing
Use High-Resolution Images
The higher the resolution of your images, the more detail you’ll have to work with during the editing process. This is especially important for achieving a smooth Ghost Mannequin Neck Joint, as high-resolution images allow for more precise editing and better results.
Take Multiple Shots for Flexibility
It’s always a good idea to take multiple shots of the garment from different angles and with different lighting setups. This will give you more flexibility during the editing process, allowing you to choose the best images for creating a perfect Ghost Mannequin Neck Joint.
Keep Editing Subtle
While it can be tempting to make heavy edits to ensure a clean neck joint, it’s important to keep the edits subtle. Over-editing can result in a final image that looks unnatural or too “polished.” The goal is to make the garment appear as though it’s naturally floating, so stick to light touch-ups and careful adjustments.
Tools for Achieving the Perfect Ghost Mannequin Neck Joint
Adobe Photoshop
Photoshop is the industry standard when it comes to editing Ghost Mannequin Neck Joints. Its advanced tools, such as the pen tool, layer masks, and content-aware fill, allow for precise control over the editing process. With Photoshop, you can achieve the perfect balance of symmetry and realism needed for professional-quality results.
GIMP for Beginners
For those who are new to photo editing, GIMP is a free alternative to Photoshop that also allows for basic editing of Ghost Mannequin Neck Joints. While it may not have all the advanced features of Photoshop, it provides enough tools for beginners to create clean and professional-looking images.
Why the Ghost Mannequin Neck Joint Matters for E-Commerce
In the world of e-commerce, first impressions are everything. Customers are more likely to purchase a product if they can clearly see its design, fit, and structure. A perfectly executed Ghost Mannequin Neck Joint gives customers a better view of the garment, allowing them to visualize how it will look when worn. This not only enhances the customer’s shopping experience but also builds trust in the brand by presenting the product in a polished and professional way. A well-executed Ghost Mannequin Composite Image, with a perfectly aligned neck joint, can significantly boost a brand’s online presence and increase sales.
Common Mistakes to Avoid
Ignoring the Inner Neckline
One of the most common mistakes in creating Ghost Mannequin Neck Joints is neglecting to photograph the inner neckline. Without this crucial step, the final image will lack depth and look incomplete. Always remember to capture the inside details of the garment for a fully realized ghost mannequin effect.
Rushing the Editing Process
Another mistake is rushing through the editing process. Achieving a perfect Ghost Mannequin Neck Joint takes time, and hasty edits can result in misalignment or uneven edges. Take the time to carefully refine and adjust the neckline to ensure that the final image looks professional and symmetrical.
Using Inconsistent Camera Angles
Inconsistent camera angles can make it difficult to align the neckline during the editing process. Always use a tripod and keep the camera at the same angle and distance from the garment throughout the photo shoot to ensure consistency in your images.
Conclusion
Mastering the Ghost Mannequin Neck Joint is essential for creating high-quality, professional product images in fashion photography. By focusing on symmetry, careful editing, and attention to detail, you can achieve a flawless neck joint that enhances the overall look of the garment. Whether you’re an e-commerce brand looking to boost sales or a photographer aiming to perfect your craft, nailing the Ghost Mannequin Neck Joint will set your product images apart and ensure your garments look their absolute best.
FAQs
What is a Ghost Mannequin Neck Joint?
A Ghost Mannequin Neck Joint is a technique used in fashion photography where the mannequin’s neck is removed from the image to create a seamless, floating appearance for the garment. This method ensures that the garment appears naturally worn and showcases its fit and structure without any visible support.
Why is achieving symmetry important in the Ghost Mannequin Neck Joint?
Symmetry is crucial in the Ghost Mannequin Neck Joint because it ensures the garment looks polished and professionally presented. Perfect symmetry highlights the garment’s design and fit, making it more appealing to customers and providing a clearer view of how the item will look when worn.
What are the common challenges in creating a perfect Ghost Mannequin Neck Joint?
Common challenges include misalignment of the neckline, inconsistent lighting, and editing overlaps. These issues can lead to an unprofessional appearance if not addressed properly. Ensuring consistent lighting, taking multiple angles of the garment, and precise editing are key to overcoming these challenges.
Can I create a Ghost Mannequin Neck Joint without professional software?
While professional software like Adobe Photoshop offers the best tools for creating a Ghost Mannequin Neck Joint, beginners can use free alternatives like GIMP. These tools provide basic editing capabilities that can still produce high-quality results, though they may require more manual adjustments.
How long does it take to edit a Ghost Mannequin Neck Joint?
The time required to edit a Ghost Mannequin Neck Joint can vary depending on the complexity of the garment and the editing skills of the individual. On average, it can take anywhere from 30 minutes to a few hours to achieve a seamless and professional-looking result.


