In the competitive world of e-commerce, presenting your products with high-quality visuals is paramount. Ghost mannequin editing and retouching is a technique that has revolutionized how product photos are displayed. This method involves removing the mannequin or model from the image, leaving behind a clean and professional-looking product shot. This editing style enhances the visibility of your product’s design and fit, offering a more polished and appealing presentation. By using ghost mannequin editing and retouching, you can significantly elevate the visual appeal of your product photos, making them more attractive to potential customers and increasing your chances of making a sale.
Understanding Ghost Mannequin Editing and Retouching
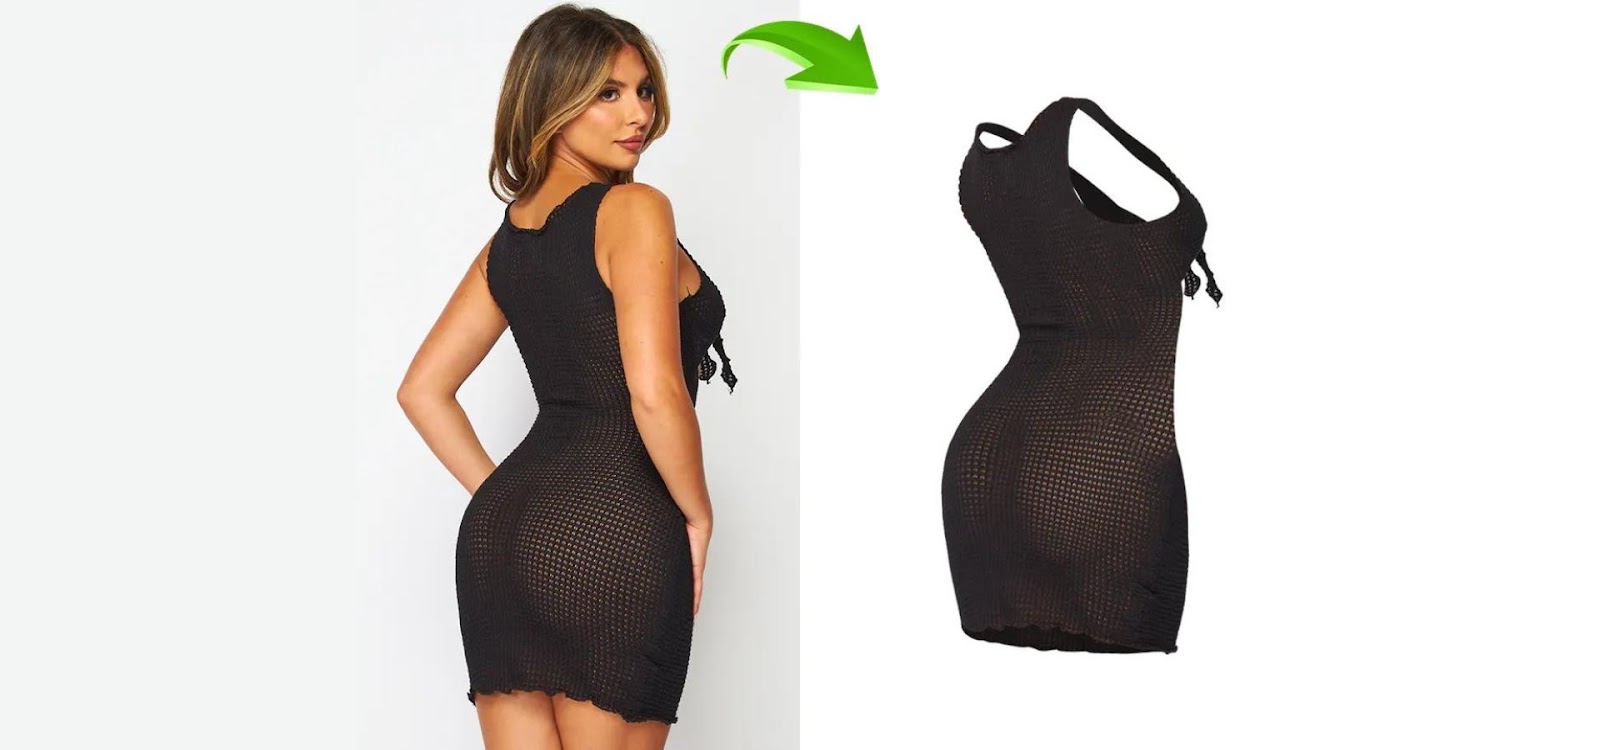
What is Ghost Mannequin Editing and Retouching?
Ghost mannequin editing and retouching is a specialized photography technique used to remove the mannequin or model from product images. This process creates a “ghost” effect, where the product appears to be displayed on an invisible mannequin. The result is a professional-looking image that focuses solely on the product itself. This method is particularly useful in showcasing clothing and accessories, as it highlights the fit, shape, and design details without any distractions from the mannequin or model. By leveraging ghost mannequin editing and retouching, you can ensure that your product images stand out and effectively communicate the quality and style of your items.
How It Differs from Traditional Product Photography
Traditional product photography often involves displaying products on mannequins or models, which can sometimes distract from the product’s actual features. In contrast, ghost mannequin editing and retouching eliminates the mannequin from the image, presenting the product in a clean and unobstructed manner. This approach allows customers to focus on the product’s details and fit, leading to a more accurate representation of what they can expect. By utilizing ghost mannequin editing and retouching, you create a uniform and professional appearance for your product photos, which can enhance your brand’s image and attract more customers.
Benefits of Using Ghost Mannequin Editing and Retouching
The benefits of ghost mannequin editing and retouching are numerous. Firstly, it significantly enhances the visual appeal of your product images, making them more eye-catching and professional. Secondly, it provides a consistent look across all your product photos, which is essential for maintaining a cohesive brand image. Additionally, this technique can help improve sales by presenting your products in the best possible light, making them more enticing to potential buyers. Overall, ghost mannequin editing and retouching is a valuable tool for any e-commerce business looking to improve the quality and effectiveness of their product images.
Preparing for Ghost Mannequin Editing and Retouching
Essential Equipment and Tools
To achieve the best results with ghost mannequin editing and retouching, you will need specific equipment and tools. A high-quality camera is essential for capturing clear and detailed product photos. Mannequins are also necessary for showcasing the product’s fit and design. Proper lighting equipment will help ensure that your photos are well-lit and free of harsh shadows. Finally, photo editing software such as Adobe Photoshop or similar tools is crucial for performing the actual ghost mannequin editing and retouching. By using the right equipment and tools, you can ensure that your ghost mannequin editing and retouching process produces high-quality and professional results.
How to Photograph Your Product for Optimal Results
To get the best results from ghost mannequin editing and retouching, it’s important to start with high-quality photos. Use a neutral background to keep the focus on the product itself. Proper lighting is crucial; aim for even, diffused lighting to avoid harsh shadows and highlight the product’s details. Taking photos from multiple angles can also provide a comprehensive view of the product, which is beneficial for the editing process. By following these guidelines, you can ensure that your photos are well-suited for ghost mannequin editing and retouching, resulting in a polished and professional final image.
Choosing the Right Background and Lighting
Choosing the right background and lighting is essential for effective ghost mannequin editing and retouching. Opt for a neutral-colored background that will not distract from the product. Proper lighting is also critical; use diffused lighting to create an even illumination that minimizes shadows and highlights the product’s features. Consistent and high-quality lighting helps ensure that the product appears natural and well-defined in the final edited image. By paying attention to these elements, you can achieve the best results in ghost mannequin editing and retouching, enhancing the overall quality of your product photos.
The Editing Process: Step-by-Step
Step 1: Importing and Organizing Photos
The first step in ghost mannequin editing and retouching is to import and organize your photos in your chosen editing software. Proper organization of your files helps streamline the editing process and ensures that you can easily locate and work on each image. Label your photos and categorize them to keep track of different angles or variations of the product. By starting with a well-organized workflow, you can efficiently proceed through the editing process and achieve consistent and high-quality results.
Step 2: Removing the Mannequin
Techniques for Manual Removal
Removing the mannequin from your images is a crucial step in ghost mannequin editing and retouching. For manual removal, use tools such as the Pen Tool or Lasso Tool to carefully trace and remove the mannequin from the photo. This method requires precision and attention to detail but allows for complete control over the editing process. By meticulously removing the mannequin, you can achieve a clean and professional-looking product image.
Using Automated Tools
For a more efficient approach, you can use automated tools available in many editing software programs. Tools like the Magic Wand or Quick Selection Tool can speed up the removal process by automatically selecting and removing the mannequin. However, these tools may require additional adjustments to ensure a clean finish. Automated tools can be a valuable asset in ghost mannequin editing and retouching, especially when working with a large volume of images.
Step 3: Refining the Edges
Refining the edges of the product is an essential part of ghost mannequin editing and retouching. Use tools such as Refine Edge or Select and Mask to smooth out any rough or jagged edges left after removing the mannequin. This step ensures that the product looks seamless and natural in the final image. By paying close attention to the edges, you can enhance the overall quality of the edited product photo.
Step 4: Adding Depth and Dimension
To give your product images a more realistic appearance, add depth and dimension through techniques like Layer Styles and Drop Shadows. These effects can create a 3D look and make the product appear more lifelike. By incorporating depth and dimension, you can make your product images more engaging and visually appealing, enhancing the effectiveness of your ghost mannequin editing and retouching.
Step 5: Final Touch-Ups and Color Correction
The final step in ghost mannequin editing and retouching involves making touch-ups and color corrections to perfect the image. Adjust the colors, brightness, and contrast to enhance the product’s appearance and ensure it looks its best. Use Adjustment Layers for non-destructive edits and tools like the Clone Stamp or Healing Brush to fix any minor imperfections. By carefully performing these final adjustments, you can achieve a polished and professional result.
Advanced Techniques in Ghost Mannequin Editing and Retouching
Creating a Realistic Shadow Effect
Adding a realistic shadow effect is an advanced technique in ghost mannequin editing and retouching that can enhance the product’s appearance. Use tools like Drop Shadow or Custom Shadow layers to create a shadow that complements the product’s dimensions and adds a natural touch. A well-designed shadow can make the product look more grounded and realistic in the final image.
Adding Textures and Patterns
Incorporating textures and patterns into your product images can add depth and visual interest. This technique is especially useful for showcasing fabric details and making the product look more dynamic. Use editing tools to overlay textures or patterns that complement the product’s design, enhancing its overall appeal.
Enhancing Fabric Details
To highlight the fine details of the fabric, use tools like Sharpen or High Pass Filter. These techniques can bring out the texture and intricacies of the material, making the product look more appealing and high-quality. By focusing on fabric details, you can create more engaging and attractive product images through ghost mannequin editing and retouching.
Common Mistakes and How to Avoid Them
Over-editing
One common mistake in ghost mannequin editing and retouching is over-editing, which can result in unnatural-looking images. Avoid excessive manipulation and focus on enhancing the product without altering its true appearance. Strive for a balance between refinement and realism to maintain the integrity of the product.
Poor Quality Photos
Another mistake to watch out for is using poor-quality photos as the base for editing. Blurry or poorly lit images can lead to subpar results even with meticulous editing. Ensure that your original photos are high-quality and well-composed to achieve the best outcomes in ghost mannequin editing and retouching.
Incorrect Background Removal
Incorrect background removal can undermine the quality of your ghost mannequin editing and retouching. When removing the background, ensure that you carefully eliminate any remnants and create a clean, natural-looking edge. Pay close attention to details, especially around complex areas like fabric folds or patterns. Regularly zoom in to check for accuracy and avoid leaving unnatural artifacts that can detract from the overall quality of the image.
Choosing the Right Software for Ghost Mannequin Editing and Retouching
Comparison of Popular Editing Tools
Selecting the right software is crucial for effective ghost mannequin editing and retouching. Adobe Photoshop is a popular choice due to its extensive features and capabilities, including advanced selection tools and layer management options. GIMP is a free alternative with many similar features, though it may have a steeper learning curve. Affinity Photo offers a balance of powerful tools and affordability. Evaluate each software based on your specific needs, such as ease of use, features, and budget, to find the best fit for your ghost mannequin editing and retouching tasks.
Features to Look For
When choosing software for ghost mannequin editing and retouching, consider features such as Layer Management, which allows you to work on different parts of the image separately. Advanced Selection Tools are essential for precise mannequin removal and background editing. Color Correction Options are important for enhancing the product’s appearance. Ensure that the software you select provides these key features to facilitate effective and efficient editing.
Outsourcing vs. DIY: What’s Best for You?
Pros and Cons of Outsourcing Editing
Outsourcing ghost mannequin editing and retouching can be a practical solution if you lack the time or expertise for in-house editing. Professional editors can deliver high-quality results and manage large volumes of images efficiently. However, outsourcing can be costly, and you may have less control over the final product. Weigh the benefits of professional results and time savings against the potential costs and the need for quality control.
Benefits of Doing It Yourself
Performing ghost mannequin editing and retouching yourself offers complete control over the editing process and can be more cost-effective, especially if you have the necessary skills and tools. DIY editing allows you to customize the images to your specific needs and maintain a hands-on approach to quality assurance. It’s ideal for those who have the time to invest in learning editing techniques and want to ensure consistency in their product images.
Conclusion
Ghost mannequin editing and retouching is a powerful technique that can transform your product photos, making them more professional and appealing. By understanding the process, using the right tools, and avoiding common mistakes, you can enhance your product images and effectively showcase your items. Whether you choose to handle the editing in-house or outsource it to professionals, the key is to focus on achieving high-quality results that highlight the best features of your products. Embracing ghost mannequin editing and retouching can significantly impact your e-commerce success, helping you attract more customers and boost sales.
FAQs
What is the best software for ghost mannequin editing and retouching?
Adobe Photoshop is widely regarded as the best software for ghost mannequin editing and retouching due to its comprehensive set of tools and features. However, alternatives like GIMP and Affinity Photo also offer strong capabilities for editing.
How can I improve the quality of my product photos before editing?
To improve your product photos before ghost mannequin editing and retouching, ensure proper lighting, use a high-resolution camera, and shoot from multiple angles. A neutral background also helps in creating a professional final image.
What are the common mistakes in ghost mannequin editing and retouching?
Common mistakes include over-editing, using low-quality photos, and incorrect background removal. Avoid these issues by focusing on precision, maintaining image quality, and carefully removing backgrounds.
How can I achieve a professional look with minimal effort?
To achieve a professional look with minimal effort, use pre-set filters, batch processing tools, and automated editing features. Ensuring high-quality initial photos will also reduce the need for extensive editing.
Is it worth outsourcing ghost mannequin editing and retouching?
Outsourcing can be worthwhile if you lack the time or expertise for ghost mannequin editing and retouching. It provides professional results and efficient handling of large volumes of images but can be more expensive. Evaluate your needs and budget to determine the best approach.