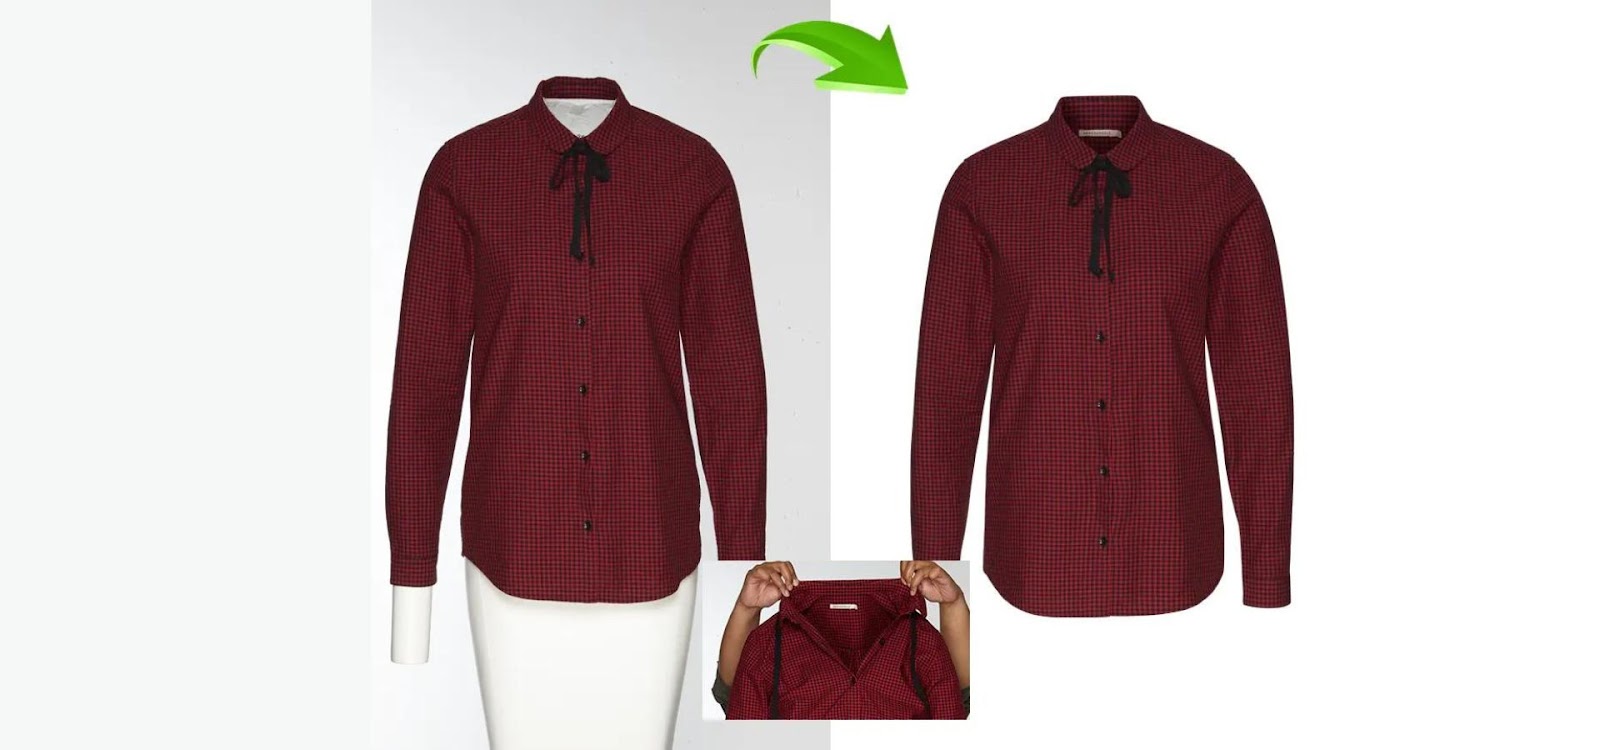
In the realm of e-commerce, product imagery is the first impression you make on potential buyers. High-quality, professional-looking photos can be the deciding factor between making a sale or losing a customer. One of the most effective techniques for showcasing apparel online is Ghost Mannequin Editing. By using Adobe Photoshop, this editing method removes the mannequin from clothing images, creating a floating effect that focuses solely on the product. This tutorial will explore the essentials of Ghost Mannequin Editing in Photoshop and guide you through transforming your product imagery with this powerful tool.
What is Ghost Mannequin Editing?
Ghost Mannequin Editing is a photo editing technique used primarily in fashion and apparel photography. It involves taking photographs of garments on a mannequin and then digitally removing the mannequin in post-production. The final image displays the garment as if it is being worn, but with no visible mannequin or model, creating a clean, three-dimensional effect that showcases the garment’s shape and fit.
Why Use Ghost Mannequin Editing in Photoshop?
Photoshop is the industry-leading software for professional image editing, making it the perfect tool for Ghost Mannequin Editing. With Photoshop, you have access to advanced features like masking, layer blending, and precise cutting tools that allow for flawless mannequin removal. Here’s why Photoshop is essential for this editing technique:
- Precision and Control: Photoshop provides detailed control over every element, from masking to color correction, ensuring seamless edits.
- High-Quality Results: With Photoshop’s powerful tools, you can achieve high-quality, professional-looking images that stand out.
- Creative Flexibility: You can experiment with backgrounds, lighting effects, and shadows, allowing for creative product presentations.
How to Perform Ghost Mannequin Editing in Photoshop
The process of Ghost Mannequin Editing in Photoshop can be broken down into a few essential steps. Below is a step-by-step guide on how to create this effect using Adobe Photoshop.
Step 1: Capture Multiple Photos of Your Garment
Before diving into Photoshop, it’s essential to capture multiple photos of your garment. The key to a successful ghost mannequin effect is having shots from multiple angles, including front, back, and detail shots like collars or inside linings. Ensure you also capture the inside of the garment (for example, under a jacket’s collar) for a realistic finish.
Step 2: Open Images in Photoshop
Once your images are captured, open them in Photoshop. Start with the main image of the garment (the front view on the mannequin). You’ll also open additional images of the back and inside for later steps.
Step 3: Create a Mask to Remove the Mannequin
In this step, you will use Photoshop’s Pen Tool or Lasso Tool to carefully outline the garment and create a selection. After selecting the garment, create a mask by clicking the mask icon at the bottom of the Layers panel. This will hide the mannequin, leaving only the garment visible.

Step 4: Edit and Refine the Edges
After creating the mask, it’s essential to refine the edges to make the garment look as natural as possible. Use the Select and Mask feature to adjust the edge smoothness, feathering, and contrast. This will help to eliminate any harsh lines and blend the edges smoothly.
Step 5: Add Missing Parts of the Garment
Now, it’s time to fill in any areas of the garment that were hidden by the mannequin. For example, the inside of a collar or the back of a shirt. Open the additional images you captured (like the inside of the garment) and use the Pen Tool to cut out the necessary parts. Once selected, copy and paste these sections onto your main image. You can adjust their position and scale using the Move Tool.
Step 6: Merge Layers and Blend the Garment
Once all parts of the garment are in place, it’s time to merge the layers. Select all relevant layers and use Ctrl+E (or Command+E on a Mac) to merge them. After merging, use the Clone Stamp Tool or Healing Brush to blend any inconsistencies or visible seams.
Step 7: Add Shadows and Depth
To add realism to your image, consider adding shadows or depth using Photoshop’s Drop Shadow feature or manually painting shadows with a soft brush. This gives the garment a more three-dimensional look, making it appear as though it’s naturally floating in space.
Best Practices for Ghost Mannequin Editing in Photoshop
1. Use High-Resolution Images
Always use high-resolution images for your editing. The higher the resolution, the easier it is to work with fine details like fabric texture and stitching. Low-resolution images can become pixelated and lose quality during editing.
2. Ensure Proper Lighting
Consistent lighting is crucial for Ghost Mannequin Editing. Inconsistent lighting across different shots can lead to mismatched colors and shadows, making the final image look unnatural. Use soft, even lighting for a clean, professional look.
3. Maintain Natural Colors and Textures
One of the main goals of Ghost Mannequin Editing is to showcase the product as realistically as possible. Avoid over-editing by keeping the garment’s natural colors and textures intact. Over-saturation or excessive smoothing can make the product look fake and unappealing.
Common Mistakes in Ghost Mannequin Editing
Inaccurate Masking
One of the most common mistakes in Ghost Mannequin Editing is inaccurate masking. Poor masking can lead to rough edges, missing details, or an unnatural look. Always take your time when creating a mask and use tools like the Refine Edge Brush to perfect your selection.
Neglecting Shadows
Without proper shadows, the product can look flat and unrealistic. Adding subtle shadows under the garment and around key areas like sleeves or collars will give your image depth and make it more engaging.
Why Choose Ghost Mannequin Editing Over Model Photography?
While model photography can be effective, it’s often more expensive and time-consuming than Ghost Mannequin Editing. Here’s why many brands choose the latter:
- Cost-Effective: You don’t need to hire professional models, stylists, or photographers, making it a more budget-friendly option.
- Focus on the Product: With Ghost Mannequin Editing, the sole focus is on the garment, allowing customers to see the product’s details without distractions.
- Consistency: It’s easier to maintain a consistent look across your product line using Ghost Mannequin Editing, ensuring a cohesive brand image.
Tools for Ghost Mannequin Editing in Photoshop
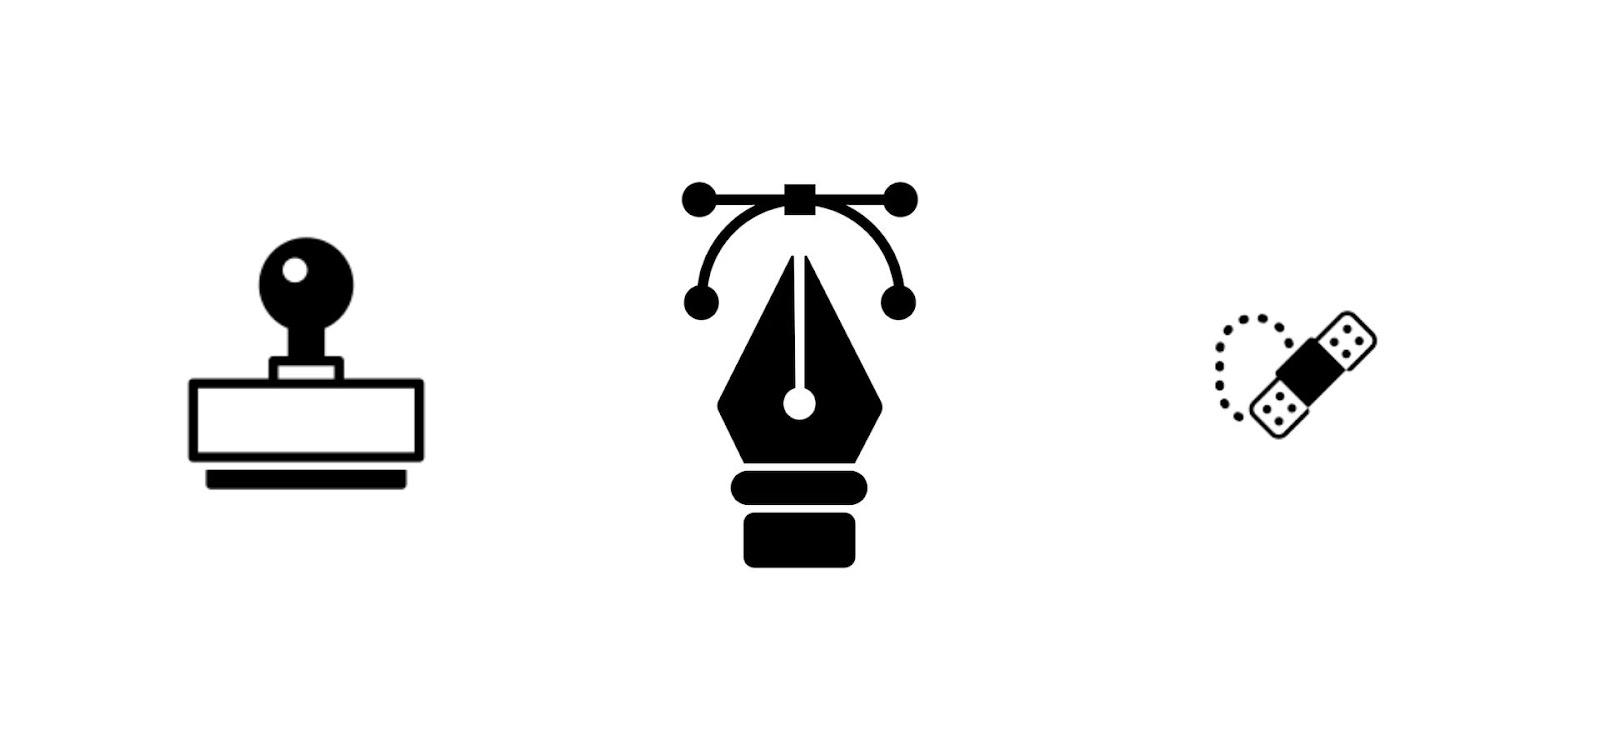
Pen Tool
The Pen Tool is ideal for creating precise selections and paths, especially around intricate details like collars or seams.
Clone Stamp Tool
The Clone Stamp Tool is useful for fixing any inconsistencies or for removing unwanted details, such as stray threads or wrinkles.
Healing Brush Tool
The Healing Brush Tool helps blend areas seamlessly, perfect for smoothing out any imperfections after merging layers.
Enhancing Product Imagery with Ghost Mannequin Editing
Ghost Mannequin Editing in Photoshop not only removes distractions like mannequins or models but also enhances the product’s presentation. By focusing solely on the garment, it allows for a clean, professional look that appeals to potential buyers. The floating, 3D effect gives customers a clear idea of the product’s fit and style, making it easier for them to imagine wearing it themselves.
Future Trends in Ghost Mannequin Editing
As technology evolves, so do the tools available for Ghost Mannequin Editing. With the rise of AI-driven editing software, the process will become faster and more automated, making it accessible to even more businesses. While Photoshop remains the go-to tool, we can expect more innovation in the future, such as faster masking processes and advanced shadow simulation techniques.
FAQs
Is Ghost Mannequin Editing difficult for beginners?
While it can be challenging at first, with practice and the right tools in Photoshop, anyone can learn Ghost Mannequin Editing.
How long does it take to edit one image?
The time it takes to complete a Ghost Mannequin Edit depends on the complexity of the garment, but on average, it can take between 1 to 3 hours.
Can I use free software for Ghost Mannequin Editing?
While Photoshop is the best tool, alternatives like GIMP or Affinity Photo can also be used, though they may not offer the same advanced features.
Why is lighting so important for Ghost Mannequin Editing?
Consistent lighting ensures that your images blend seamlessly and look natural once the mannequin is removed.
What’s the difference between Ghost Mannequin Editing and flat lay photography?
Flat lay photography captures the garment laid flat, which lacks the 3D, lifelike appearance that Ghost Mannequin Editing offers.