In the world of photography, capturing the perfect shot often requires more than just a good eye and a quality camera. Lighting conditions, environmental factors, and camera settings can all affect the colors in an image, sometimes leading to results that are less than ideal. This is where photo color correction comes into play. With the help of powerful tools like Adobe Photoshop, color correction allows photographers and editors to enhance and adjust the colors in an image, making them look more natural or aligned with a particular artistic vision. In this article, we’ll dive deep into the various aspects of photo color correction using Photoshop, exploring both basic and advanced techniques that can elevate your photos to a professional level.
What is Photo Color Correction?
Photo color correction is the process of adjusting the colors in an image to make them appear more accurate and visually appealing. This can involve fixing color imbalances, correcting white balance, adjusting brightness and contrast, and enhancing specific color tones. It’s important to note that color correction is different from color grading. While color correction focuses on achieving accurate and natural colors, color grading is about creating a specific mood or style by deliberately altering the colors.
Why Use Photoshop for Color Correction?
Photoshop is the industry standard for professional photo editing, and its color correction capabilities are second to none. The software offers a wide range of tools and features that make it ideal for both beginners and experienced editors. With Photoshop, you can make precise adjustments to every aspect of color in your image, from overall brightness and contrast to specific hues and tones. The flexibility and control provided by Photoshop are unmatched, making it the go-to choice for anyone serious about photo editing.
Basic Tools for Color Correction in Photoshop
Adjusting Brightness and Contrast
Using the Brightness/Contrast Tool
The Brightness/Contrast tool is one of the most straightforward options for color correction in Photoshop. This tool allows you to quickly adjust the overall brightness and contrast of your image. Increasing brightness makes the image lighter, while decreasing it darkens the image. Contrast, on the other hand, affects the difference between the lightest and darkest areas of your image.
Tips for Optimal Brightness and Contrast Settings
When using the Brightness/Contrast tool, it’s important to strike a balance. Too much brightness can wash out the details, while too much contrast can lead to harsh, unrealistic images. A good practice is to make small adjustments and frequently compare the edited image to the original to ensure that you’re enhancing rather than detracting from the photo.
Hue and Saturation Adjustments
How to Use the Hue/Saturation Tool
The Hue/Saturation tool in Photoshop is used to adjust the overall color tone (hue) and the intensity of the colors (saturation) in your image. You can shift the hue to change the color balance, making it warmer or cooler, or adjust the saturation to make the colors more vibrant or subdued.
When and Why to Adjust Hue and Saturation
Adjusting hue and saturation is particularly useful when the colors in your image don’t match the real-life scene or when you want to create a specific mood. For instance, increasing saturation can make a sunset appear more vibrant, while reducing it can create a more muted, calm atmosphere.
Levels and Curves Adjustments
Understanding the Levels Tool
The Levels tool allows you to adjust the brightness and contrast of an image by manipulating its tonal range. This tool provides a histogram that shows the distribution of shadows, midtones, and highlights in your image. By moving the sliders, you can adjust the black point, white point, and midtones to achieve the desired look.
Mastering Curves for Precise Adjustments
The Curves tool offers even more control than the Levels tool. It allows you to adjust the brightness and contrast of specific tonal ranges by manipulating a curve on a graph. You can create multiple points on the curve to fine-tune the image’s tonal range, making it one of the most powerful tools for color correction in Photoshop.
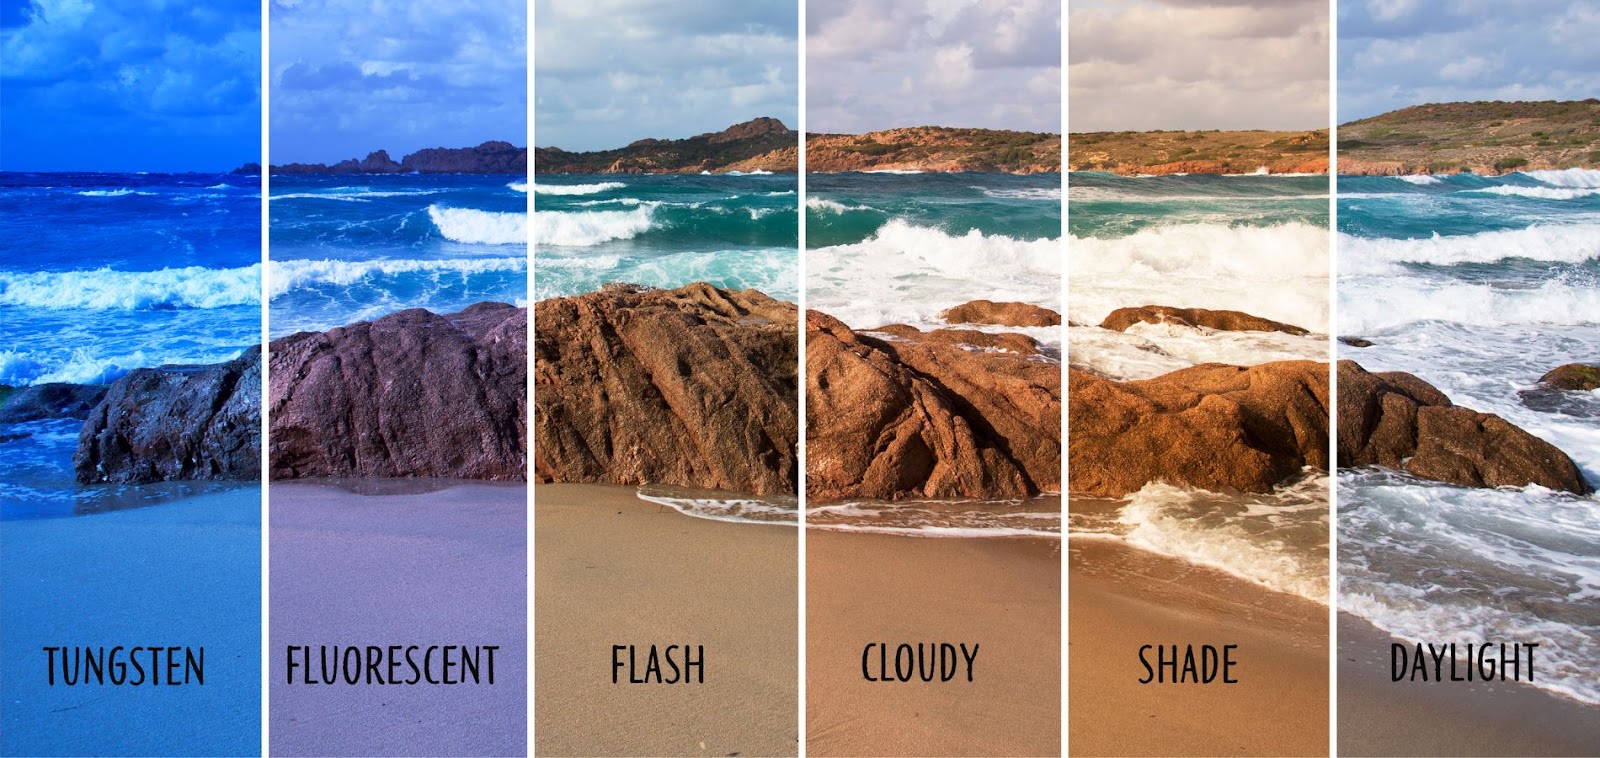
White Balance Correction
The Role of White Balance in Photography
White balance refers to the color temperature of your image, which affects how warm or cool the colors appear. Incorrect white balance can result in unnatural color tones, such as a blue or yellow cast over the entire image.
Correcting White Balance Using Photoshop
In Photoshop, you can correct white balance by using the Camera Raw filter or the Levels tool. By adjusting the temperature and tint sliders, you can neutralize any unwanted color casts and restore the natural colors of the image.
Advanced Color Correction Techniques
Selective Color Adjustment
Using the Selective Color Tool
The Selective Color tool allows you to target and adjust specific color ranges within your image. This is particularly useful when you want to enhance or tone down certain colors without affecting the rest of the image.
Targeting Specific Color Ranges
With the Selective Color tool, you can choose from a variety of color channels (reds, yellows, greens, etc.) and adjust the cyan, magenta, yellow, and black components of each color. This gives you precise control over the color balance in your image, allowing for highly customized adjustments.
Color Balance Adjustment
Adjusting Shadows, Midtones, and Highlights
The Color Balance tool in Photoshop allows you to adjust the color tones in the shadows, midtones, and highlights separately. This is useful for correcting color imbalances and creating a more cohesive look across your image.
Enhancing Image Mood with Color Balance
By adjusting the color balance, you can subtly shift the mood of your image. For example, adding more blue to the shadows can create a cooler, more dramatic feel, while adding yellow to the highlights can warm up the image and create a more inviting atmosphere.
Using Photoshop’s Camera Raw Filter
Benefits of Camera Raw for Color Correction
The Camera Raw filter in Photoshop offers a comprehensive set of tools for color correction. It allows you to adjust exposure, contrast, white balance, and individual color channels, all in a non-destructive manner.
Key Features of the Camera Raw Filter
Some of the key features of the Camera Raw filter include the ability to adjust clarity, vibrance, and saturation, as well as apply gradient filters and spot corrections. This makes it a powerful tool for achieving professional-level color correction.
The Role of Layers and Masks in Color Correction
Using Adjustment Layers
Advantages of Non-Destructive Editing
Adjustment layers allow you to make color corrections without permanently altering your original image. This non-destructive editing method lets you experiment with different adjustments and easily revert to the original if needed.
Layer Management for Complex Corrections
When working on complex color corrections, it’s essential to manage your layers effectively. Grouping related adjustment layers and naming them appropriately can help keep your workflow organized and efficient.
Applying Layer Masks for Precision
Masking Techniques for Local Adjustments
Layer masks allow you to apply adjustments selectively, targeting specific areas of your image. This is particularly useful when you need to correct colors in certain parts of the image without affecting the entire photo.
Combining Masks with Adjustment Layers
By combining masks with adjustment layers, you can achieve precise control over your color corrections. This technique is especially helpful when working with images that require multiple localized adjustments.
Batch Processing for Color Correction
What is Batch Processing?
Batch processing is a technique that allows you to apply the same color correction settings to multiple images automatically. This is particularly useful when working with large photo sets that require consistent color adjustments.
Automating Color Correction for Multiple Images
In Photoshop, you can create and save actions that perform specific adjustments, then apply these actions to a batch of images. This saves time and ensures consistency across all the images.
Using Photoshop Actions for Efficiency
Photoshop Actions are a powerful tool for batch processing. By recording your color correction steps as an action, you can quickly apply the same corrections to a large number of images with just a few clicks.
Best Practices for Batch Color Correction
Maintaining Consistency Across Images
When batch processing, it’s important to ensure that your color corrections are consistent across all images. This may require fine-tuning your actions and testing them on a few images before applying them to the entire batch.
Quality Control in Batch Processing
After batch processing, it’s essential to review the images individually to ensure that the corrections have been applied correctly. Make any necessary adjustments to individual images to maintain high-quality results.

Common Challenges in Photo Color Correction
Overcoming Underexposed or Overexposed Images
Techniques to Recover Details
Underexposed or overexposed images can be challenging to correct, but Photoshop offers several tools that can help. By using the Levels, Curves, and Shadows/Highlights tools, you can recover lost details and improve the overall quality of the image.
Dealing with Color Casts
Identifying and Correcting Unwanted Color Tones
Color casts occur when an image has an overall tint that affects all the colors. This can be caused by lighting conditions or incorrect white balance. In Photoshop, you can use the Color Balance and Hue/Saturation tools to remove unwanted color casts and restore natural colors.
Preserving Skin Tones
Ensuring Natural-Looking Skin Colors
Skin tones are one of the most challenging aspects of color correction. It’s important to maintain natural-looking skin tones while making other adjustments. The Selective Color and Hue/Saturation tools can be particularly useful for fine-tuning skin tones without affecting the rest of the image.
The Impact of Color Correction on Photography
Color correction plays a crucial role in enhancing the visual appeal of your photos. It can transform a dull, lifeless image into something vibrant and eye-catching. Additionally, color correction helps create a cohesive look across a photo set, making it essential for professional photography and editing.
Conclusion
Photo color correction is a vital skill for photographers and editors alike. With tools like Photoshop, you have the power to make precise and impactful adjustments to your images, ensuring they look their best. Whether you’re a beginner or an experienced editor, mastering color correction techniques can greatly enhance your work. Remember, practice makes perfect, so don’t hesitate to experiment and refine your skills over time.
FAQs
What is the difference between color correction and color grading?
Color correction focuses on achieving accurate and natural colors, while color grading is about creating a specific mood or style by deliberately altering the colors.
Can I perform color correction in Photoshop Elements?
Yes, Photoshop Elements offers basic color correction tools, but it lacks some of the advanced features available in the full version of Photoshop.
How do I know when I’ve overcorrected a photo?
Overcorrection occurs when colors look unnatural or exaggerated. Regularly compare your edited image with the original and use subtle adjustments to avoid overcorrection.
What are some alternatives to Photoshop for color correction?
Other popular options include Adobe Lightroom, Capture One, and GIMP, each offering different tools and features for color correction.
How can I learn more advanced color correction techniques?
There are many online tutorials, courses, and books available that cover advanced color correction techniques. Practice and experimentation are key to mastering these skills.